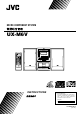
MICRO COMPONENT SYSTEM UX-M6V MICRO COMPONENT SYSTEM UX-M6V STANDBY /ON OPEN /CLOSE DISPLAY FM MODE /VOCAL STANDBY/ON TIMER ON/OFF CD/SHUFFLE TUNER /BAND PROGRAM REC TAPE /REV.MODE OSD/DIM OSD/DIM SET SHUFFLE BAND REV.
Warnings, Cautions and Others Caution — STANDBY/ON button! Disconnect the mains plug to shut the power off button in any completely. The STANDBY/ON position does not disconnect the mains line. The power can be remote controlled. CAUTION To reduce the risk of electrical shocks, fire, etc.: 1. Do not remove screws, covers or cabinet. 2. Do not expose this appliance to rain or moisture. CAUTION • Do not block the ventilation openings or holes.
IMPORTANT FOR LASER PRODUCTS REPRODUCTION OF LABELS / 1 CLASSIFICATION LABEL, PLACED ON REAR ENCLOSURE 2 WARNING LABEL, PLACED INSIDE THE UNIT DANGER-Invisible laser radiation when open and interlock defeated. AVOID DIRECT EXPOSURE TO BEAM. CLASS LASER 1 PRODUCT VORSICHT-Unsichtbare Laserstrahlung, wenn Abdeckung geöffnet und Sicherheitsverriegelung überbrückt. Nicht dem Straht aussetzen. ADVARSEL:USYNLIG LÅSERSTRALING VED ÅBNING,NÅR SIKKERHEDSAFBRYDERE ER UDE AF FUNKTION.
English Introduction We would like to thank you for purchasing one of our JVC products. Before operating this unit, read this manual carefully and thoroughly to obtain the best possible performance from your unit, and retain this manual for future reference. About This Manual Power sources This manual is organized as follows: • When unplugging from the wall outlet, always pull the plug, not the AC power cord. • The manual mainly explains operations using the buttons and controls on the unit.
English Contents Location of the Buttons and Controls ..................... 3 Front Panel ................................................................ 4 Remote Control ......................................................... 5 Getting Started .......................................................... 6 Unpacking ................................................................. 6 Putting the Batteries into the Remote Control .......... 6 Connections ....................................................
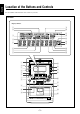
English Location of the Buttons and Controls Become familiar with the buttons and controls on your unit. Front Panel Display Window 1 2 9 p 3 q w e 4 r 5 t 6 7 8 y u i 1 w 2 MICRO COMPONENT SYSTEM UX-M6V STANDBY /ON OPEN /CLOSE e DISPLAY FM MODE /VOCAL r OSD/DIM t 3 4 5 6 7 TIMER ON/OFF SET PROGRAM SHUFFLE BAND REV.
Front Panel See pages in the parentheses for details. 1 Disc compartment (12) 2 STANDBY/ON button (8) Turns the unit on or off (standby mode). 3 CD/SHUFFLE button (12, 14) Selects CD/VCD mode. Starts or stops shuffle play in CD/VCD mode. TUNER/BAND button (10) Selects tuner mode. Selects FM or AM in tuner mode. TAPE/REV.MODE button (17) Selects tape mode. Selects auto reverse mode. 4 DISPLAY button (8, 21) Displays the clock. Selects the time length until the unit is turned off.
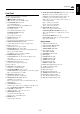
English Remote Control Remote Control 1 2 3 4 5 6 7 8 9 p q w e r t y STANDBY/ON CD/SHUFFLE TUNER /BAND PROGRAM REC TAPE /REV.
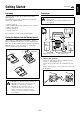
Continued Unpacking Connections After unpacking, check to be sure that you have all the following items. The number in the parentheses following each item name indicates the supplied quantity. • • • • • • DO NOT connect any equipment to the unit while the unit is powered. • DO NOT plug in any equipment until all connections are completed.
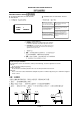
English 2 Connect the supplied AM loop antenna to the AM LOOP terminal. Place the antenna away from the unit and adjust its position for the best reception. 1 4 Connect the VIDEO OUT jack at the rear of the unit to the TV using a video connecting cord (not supplied). 5 Set the voltage selector to the local power line voltage (for specific version only). 2 6 Connect the AC power cord of the unit to the AC outlet after all other connections have been made.
Common Operations English Continued Turning On or Off the Unit On clock resetting If a power failure occurred or the AC power cord is disconnected, the clock is reset to “0:00” (flashing). In such a case you need to set the clock again. To turn on the unit Press STANDBY/ON on the unit or remote control. The unit turns on with the last source selection remaining valid.
English Demonstration Mode Digital Sound Control The unit has a demonstration mode that shows various features offered by the unit. The unit’s digital sound control feature enables you to select desired preset equalizer settings (selectable as sound modes) to enjoy special sound effects matching the music type. You can also use the BBS system to enjoy powerful bass sound created by emphasizing low frequencies. To activate the demonstration In standby mode, press REPEAT/DEMO. The demonstration begins.
Tuning In a Station Continued English Listening to FM and AM Broadcasts Presetting Stations You can preset 20 FM and 10 AM stations. 1 Press TUNER/BAND to select tuner mode. • There is a time limit in doing the following steps. If the setting is canceled before you finish, start from step 1 again. The unit automatically turns on, and tunes in the last station tuned in (either FM or AM). 2 Press TUNER/BAND to select the band, FM or AM. 1 Tune in the station you want to preset.
English Tuning In a Preset Station 1 Press TUNER/BAND to select tuner mode. BAND TUNER 2 Press TUNER/BAND to select the band, FM or AM. 3 Press 8/2 or 3/8 repeatedly to select the desired preset number. PRESET DIRECTION PLAY/PAUSE • Alternatively, use the number buttons on the remote control. To select preset number 5, press 5. To select preset number 12, press +10 and then 2. To select preset number 20, press +10, +10 and then 0.
This unit can play back all digital audio CDs, video CDs (VCDs), finalized digital audio CD-Recordable (CD-R) discs and finalized digital audio CD-Rewritable (CD-RW) discs. Continued English Playing Back CDs/VCDs/MP3-CDs Loading a Disc 1 Press CD/SHUFFLE to select CD/ VCD mode. SHUFFLE CD The unit automatically turns on. • Switch on the connected TV when loading a VCD. 2 Press 0 OPEN/CLOSE.
English Playing Back a Disc To select a desired track (for MP3-CD only) In stop mode, press 4 or ¢ SEARCH/TUNING repeatedly (or press the number buttons on the remote control) to select a desired track from the current album. The track name scrolls through the display briefly. On the TV screen, the arrow moves up/down in the track list of the current album. Press 3/8 to start playback. 1 Load a disc. • See “Loading a Disc” on the previous page. 2 Press 3/8 to start playback.
Shuffle Play To clear the program Press 7 in stop mode. “PROG CLEARED” scrolls through the display and the PROG. indicator goes off. English Continued STOP/CLEAR You can play all the tracks in random order. • The stored program is cleared when the CD compartment is opened. In play mode, pause or stop mode, press CD/SHUFFLE. SHUFFLE CD The SHUFFLE indicator lights up. To exit shuffle play mode, press CD/SHUFFLE again or 7. The SHUFFLE indicator goes off.
English On Screen Display (OSD) for a CD/VCD Various VCD Operations If you insert a CD/VCD, your TV screen will serve as an additional display for messages (such as PLAY, STOP, etc.) and information stored on the VCD/CD. PAUSE Press OSD/DIM repeatedly to select the information to display. To continue playback, press 3/8 again. GO TO This function allows you to start playback at the desired time point on the disc.
English A-B REPEAT This feature is also applicable to the audio CD (except MP3CD). A certain scene or passage of the disc can be played back repeatedly. A-B 1 Press A-B on the remote control during playing a CD/VCD to mark the repeat start point. “A→” lights up on the display. “B” starts blinking. 2 Press A-B again to mark the repeat end point. “A→B” lights up steadily on the display. The selected scene or passage is played repeatedly.
English Playing Back Tapes Auto Reverse • Use only type I normal tapes. Press TAPE/REV.MODE repeatedly to select the desired playback mode. The use of tapes longer than 120 minutes is not recommended, since characteristic deterioration may occur and these tapes easily jam in the pinchrollers and the capstans. : Loading a Tape 1 Press 0 EJECT to open the tape deck door. REV. MODE TAPE playback on one side of the tape only. : both sides are played once.
English Recording Recording Tapes IMPORTANT: • It may be unlawful to record or play back copyrighted material without the consent of the copyright owner. • The recording level is automatically set correctly, so it is not affected by the volume control. Thus, during recording you can adjust the sound you are actually listening to without affecting the recording level. • While recording, you can hear sound modes and/or the BBS sound effect through the speakers.
English Karaoke Microphone Mixing When playing a VCD, each press changes the audio channel selection as follows: Microphone mixing is available in CD/VCD mode. Connecting a microphone (not supplied) to the unit allows you to sing along with the music source. CH LEFT CH RIGHT STEREO VP LEFT VP RIGHT 1 Connect a microphone to the MIC jack.
Continued There are three timers available — daily timer, recording timer and sleep timer. Before using the timers, you need to set the built-in clock. (See page 8.) 7 Set the time to stop playback following the same procedure as steps 5 and 6. Using Daily Timer 8 Press TIMER ON/OFF SET (or TIMER on the remote control) to activate the timer. “TIMER OK” appears on the display briefly and the timer is now set. With the daily timer, you can wake to your favorite music or radio program.
English Using Sleep Timer With the sleep timer, you can fall asleep to music. You can set the sleep timer using the remote control when the unit is turned on. How the sleep timer actually works The unit automatically turns off after the specified time length passes. 1 Press and hold DISPLAY until “SLEEP OFF” appears on the display. DISPLAY 2 Press DISPLAY repeatedly to select the desired time length. The SLEEP indicator starts blinking.
English Maintenance To get the best performance of the unit, keep your discs, tapes, and mechanism clean. Handling discs Cassette decks • Remove the disc from its case by holding it at the edge while pressing the center hole lightly. • Do not touch the shiny surface of the disc, or bend the disc. • Put the disc back in its case after use to prevent warping.
English Troubleshooting If you are having a problem with your unit, check this list for a possible solution before calling for service. If you cannot solve the problem from the hints given here, or the unit has been physically damaged, call a qualified person, such as your dealer, for service. Symptom Cause Action No sound is heard. Connections are incorrect or loose. Check all connections and make corrections. (See pages 6, 7.) Power cannot be turned on. The power cord is unplugged.
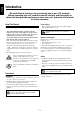
VIDEO OUT FM 75Ω COAXIAL AC 110-127V AM LOOP AC 220-240V VOLTAGE SELECTOR + IMPORTANT for mains (AC) line BEFORE PLUGGING IN, do check that your mains (AC) line voltage corresponds with the position of the voltage selector switch provided on the outside of this equipment and, if different, reset the voltage selector switch, to prevent from a damage or risk of fire/electric shock.