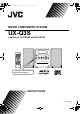
UX-Q3S[A]-01.fm Page 1 Wednesday, September 8, 2004 8:39 AM MICRO COMPONENT SYSTEM UX-Q3S Consists of CA-UXQ3S and SP-UXQ1S For hiding the demonstration display, refer to page 9.
UX-Q3S[A]-02.fm Page 1 Wednesday, September 8, 2004 8:36 AM Warnings, Cautions and Others Introduction CAUTION To reduce the risk of electrical shocks, fire, etc.: 1. Do not remove screws, covers or cabinet. 2. Do not expose this appliance to rain or moisture. CAUTION — F button! Disconnect the mains plug to shut the power off completely. The F button in any position does not disconnect the mains line. The power can be remote controlled. CAUTION • Do not block the ventilation openings or holes.
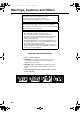
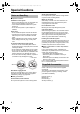
UX-Q3S[A]-02.fm Page 2 Wednesday, September 8, 2004 8:36 AM CAUTION — Proper Ventilation To avoid risk of electric shock and fire and to protect from damage, locate the apparatus as follows: Top/Front/Back/Sides: No obstructions should be placed in the areas shown by the dimensions below. Bottom: Place on the level surface. Maintain adequate air path for ventilation by placing on a stand with a height of 10 cm more. In addition, maintain the best possible air circulation.
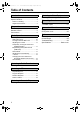
UX-Q3[A].book 1 ページ 2004年9月8日 水曜日 午前11時15分 Table of Contents Introduction Notes on Operation .............................. 2 Special Cautions................................... 3 Notes on Handling................................... 3 Supplied Accessories.............................. 3 Preparation Part Description .................................... 4 Remote Control .................................... 5 Connections.......................................... 6 Basic Operations Basic Operations .....
2 ページ 2004年9月8日 水曜日 午前11時15分 Introduction Notes on Operation Suitable Locations for the Main Unit To minimize the need for servicing and maintain the high quality of this product, do not place the main unit in the following locations: • In a position subject to high humidity or considerable dust • On an uneven or unstable surface • Near a heat source • Near a computer, fluorescent light or other electric appliance • In a small room with insufficient ventilation • In a position exposed to direct sunligh
UX-Q3[A].book 3 ページ 2004年9月8日 水曜日 午前11時15分 Special Cautions Avoid high temperatures Do not expose the system to direct sunlight and do not place it near a heating device. Notes on Handling ■Important cautions Installation of the system • Select a place which is level, dry and neither too hot nor too cold; between 5°C and 35°C. • Leave sufficient distance between the system and the TV. • Do not use the system in a place subject to vibration.
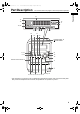
UX-Q3[A].book 4 ページ 2004年9月8日 水曜日 Part Description 午前11時15分 Introduction Preparation Preparation The numbers refer to the pages in which the parts are explained. 12 14 12 11 16 19, 22 23, 25 16 11 13 17, 18 14 19 20 Cassette holder: 19 PUSH-OPEN 11, 14 21 9, 12 12 16 Remote control sensor: 5 11 16, 22 16, 19 CD tray: 16 16, 22 14, 16, 19 14, 16, 19 * This terminal is for connecting a pair of headphones equipped with a stereo mini plug (commercially available).
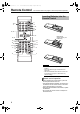
UX-Q3[A].book 5 ページ 2004年9月8日 水曜日 Remote Control 午前11時15分 The numbers refer to the pages in which the parts are explained. Inserting Batteries into the Remote Control 10,15, 17 11 10 17, 18, 24 15, 23 25 16, 22 16, 19 R6P(SUM-3)/ AA(15F) type dry-cell batteries (2) 16, 22 19 14 16 19 17, 18 23 17 11 20 13 11 14 10, 23 11 12 13 12 11 11 CAUTION • Do not use a used battery and a new battery together. • Do not use different types of batteries at the same time.
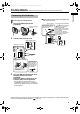
UX-Q3[A].book 6 ページ 2004年9月8日 水曜日 午前11時15分 Introduction Connecting the Antennas Connecting the AM antenna 1 Set up the AM loop antenna (supplied). Insert the tab into the slot. 2 ■When radio reception with the supplied AM loop antenna is poor Electric wire: 3 - 5 m (commercially available) Twist together electric wire and the AM loop antenna cord. Stretch out the electric wire horizontally, preferably in a high place such as above a window or outdoors.
UX-Q3[A].book 7 ページ 2004年9月8日 水曜日 午前11時15分 (Continued) Connections Connect all necessary parts before connecting the power plug. Connecting the FM antenna ■When radio reception with the supplied FM antenna is poor, or when using a communal antenna Main unit (side view) Main unit (rear view) FM antenna (supplied) Main unit (side view) Stretch out the FM antenna to the best position for radio reception, and then fix it with adhesive tape.
UX-Q3[A].book 8 ページ 2004年9月8日 水曜日 午前11時15分 Introduction Preparation Connecting the Speakers After connecting the speakers, gently pull on the speaker cords to make sure the cords are firmly connected and do not pull out. There is no difference between the left and right speakers. Main unit (rear view) Speaker cord Speaker cord Speaker cord Red Black Black Red Left speaker (rear view) Right speaker (rear view) CAUTION • Do not short-circuit the and speaker terminals.
UX-Q3[A].book 9 ページ 2004年9月8日 水曜日 午前11時15分 (Continued) Connections Connect all necessary parts before connecting the power plug. Connecting Other Equipment Connecting the Power Plug AC outlet Main unit (rear view) Read this section when connecting other audio equipment to this product. Other audio equipment • After making all other necessary connections, connect in the power plug.
UX-Q3[A].book 10 ページ 2004年9月8日 水曜日 午前11時15分 Basic Operations About this manual • This manual explains the operations assuming that you will use the remote control. Some buttons on the main unit are the same as those on the remote control. You can use either button in this case. • Some diagrams in this manual are simplified or exaggerated for the purpose of explanation. • You can operate some functions differently from the explanation given in this manual.
UX-Q3[A].book 11 ページ 2004年9月8日 水曜日 午前11時15分 (Continued) Basic Operations Turning On/Off the Main Unit Press (or on the main unit). Sound Mode Press . • Each time you press gles as follows. • With the power off, pressing either button turns on the main unit. , the display tog- Remote control: : For sharp sound. Main unit: : For soft sound. Pressing one of these buttons other than changes the sound source. When a : For background music. CD or cassette tape has been loaded, playback starts.
12 ページ 2004年9月21日 火曜日 午後4時37分 NOTE • While the sound mode is activated, "NO OPERATE" is displayed and you cannot adjust the sound quality ( page 11). Canceling the sound mode returns both the bass and treble sounds to "0". Press α Sound Press Changing the Color Patterns for the Display Window and CD Tray (or on the main unit). • Each time you press gles as follows. . • Each time you press gles as follows. , the display tog- : For a rainbow-like pattern.
UX-Q3[A].book 13 ページ 2004年9月8日 水曜日 午前11時15分 (Continued) Basic Operations 3 Press to adjust the intensity of the component color. • You can adjust the color intensity within the range "0" to "3". You cannot set all three component colors (red, green, and blue) to "0" at the same time. NOTE Changing the brightness of the display window and CD tray (DIMMER) . • Each time you press gles as follows. , the display tog: Color pattern becomes dimmer. : Color pattern becomes darker, and switches to blue.
UX-Q3[A].book 14 ページ 2004年9月8日 水曜日 午前11時15分 Listening to Radio Broadcasts This product can receive FM and AM radio broadcasts. Number buttons Selecting a Radio Station 1 Press to select "FM" or "AM". Example: Display while an FM radio broadcast is received. Stereo indicator Preset number ( page 15) Frequency 2 Press or repeatedly to select a radio station (frequency). • You can also select a radio station using the automatic tuning.
UX-Q3[A].book 15 ページ 2004年9月8日 水曜日 午前11時15分 (Continued) Listening to Radio Broadcasts Storing Radio Stations (Preset) You can store up to 30 FM radio stations and up to 15 AM radio stations. ■While the broadcast from the radio station you want to preset is being received 1 Press . • The preset number flashes for approximately 5 seconds. 2 While the preset number is flashing, press the number buttons ( or ) to select the preset number you want to use.
16 ページ 2004年9月8日 水曜日 午前11時15分 Listening to CDs Listening to CDs This product can play back CDs and finalized CDRs/CD-RWs (recorded in audio CDs or MP3 format). 2 Place a CD on the CD tray. Listening to CDs UX-Q3[A].book Number buttons • When you want to listen to an 8 cm CD, place it on the inner hollow of the CD tray. 3 Press . ■Display during CD playback CD indicator (The CD indicator lights up while the CD is stopped. The CD indicator flashes while the CD is being played back or paused.
UX-Q3[A].book 17 ページ 2004年9月8日 水曜日 午前11時15分 (Continued) Listening to CDs Specifying the Track (Direct Track Selection) Press the number buttons to select the track you want to listen to. • Refer to "Using the number buttons" ( 10). page Program Playback This function allows you program up to 50 tracks. 1 2 Press , and then press . Press to select "PROGRAM". CD or MP3 Repeat Playback This function allows you to repeatedly listen to the same track.
18 ページ 2004年9月8日 水曜日 午前11時15分 Confirming the programmed track order While playback is stopped, press or repeatedly. • You can add a track as the last track in the program, or erase the last track. ( step 3 on page 17) Canceling the program playback While playback is stopped, press repeatedly to display an item other than "PROGRAM". • This operation does not erase the program. Erasing the all programmed tracks While playback is stopped, hold down .
UX-Q3[A].book 19 ページ 2004年9月8日 水曜日 午前11時15分 Listening to Cassette Tapes Listening to Cassette Tapes Cassette tape indicator (The cassette tape indicator lights up while the cassette tape is stopped. The cassette tape indicator flashes while the cassette tape is being played back.) Cassette tape playback direction ( : normal direction/ : opposite direction) Reverse mode CAUTION • Before using a cassette tape, wind up any slack in the cassette tape.
UX-Q3[A].book 20 ページ 2004年9月8日 水曜日 午前11時15分 Listening to Other Equipment Listening to Other Equipment 1 Press 2 Start other equipment playback. 3 Adjust the volume and make other necessary settings. Listening to Cassette Tapes/Listening to Other Equipment You can listen to sound from other audio equipment connected to the AUX terminals on the rear side of the main unit ( page 9). . • Refer to the operation manual for the connected equipment.
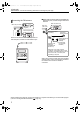
UX-Q3[A]-09.fm 21 ページ 2004年9月21日 火曜日 午後4時42分 Recording Sound to Cassette Tapes Recording Sound Main unit • When you want to use the cassette tape for recording again, cover the tag holes with adhesive tape. 1 Write protect tag for side B Insert a cassette tape for recording. • Before inserting the cassette tape, wind the tape past the leader part of the cassette tape. Remote control Magnetic tape (recordable part) 2 NOTE Press mode.
22 ページ 2004年9月8日 水曜日 午前11時15分 Example: Display while CD sound is recorded. • When all tracks from a CD or MP3 are recorded to the cassette tape or the cassette tape is fully wound, the recording stops automatically. • When you want to record sound from other equipment, start playback on the connected equipment. • When recording finishes, the color pattern of the display window and CD tray switches to the color pattern set in "MANUAL" to inform you that recording has finished ( pages 12 and 13).
UX-Q3[A].book 23 ページ 2004年9月8日 水曜日 午前11時15分 Using the Timers Convenient Functions Set the clock beforehand. ( Number buttons page 10) Confirming the sleep timer setting (remaining time) • With the sleep timer activated, press once. Recording Timer You can use the recording timer function to record FM/AM broadcasts or sound from other equipment to a cassette tape. You can enter up to three timer settings in total for the recording timer and the playback timer ( page 25).
6 24 ページ 2004年9月8日 水曜日 午前11時15分 Press or to select "ONCE" or "EVERYDAY". ONCE : The recording timer works once. EVERYDAY: The recording timer works every day. 7 8 Press • During operation, you can return to the previous step by pressing . You can quit the recording timer settings by pressing . The settings are not stored. . Press TIMER". or to select "REC • "REC" stands for "Recording". 9 Press 10 Press NOTE . or sound source.
UX-Q3[A].book 25 ページ 2004年9月8日 水曜日 午前11時15分 (Continued) Using the Timers 9 Playback Timer 1 Prepare the sound source you want to play back. CD or MP3 Make sure that a CD is loaded. ( page 16) Cassette tape Insert a cassette tape. ( Radio Preset the radio station whose broadcast you want to listen to. ( page 15) Other equipment Follow the operation manual for the equipment. 2 Press or to select the sound source you want to play back.
UX-Q3[A].book 26 ページ 2004年9月8日 水曜日 午前11時15分 CD Ejection Lock Convenient Functions NOTE • During operation, you can return to the previous step by pressing . You can quit the playback timer settings by pressing . The settings are not stored. • When the playback timer starts, the volume gradually increases to the selected level. Canceling the playback timer function You can prohibit ejection of a CD.
UX-Q3[A].book 27 ページ 2004年9月8日 水曜日 午前11時15分 Handling CDs/Cassette Tapes Reference Handling CDs Cleaning the main unit cabinet • Do not put adhesive tape or stickers, or write on a CD. • Do not bend a CD. • Be sure not to use heart/flower shaped CDs or other irregularly shaped CDs. The use of such CDs damages the main unit. Cleaning CDs Signal surface Wipe a CD from the center outward with a soft cloth. Scratches concentrated on a certain part cause sound dropout.
UX-Q3[A].book 28 ページ 2004年9月8日 水曜日 午前11時15分 CD Messages Meaning You are trying to play back an unplayable CD or a CD that has many scratches. Replace the CD. No CD is loaded. Place a CD on the CD tray. CD NO DISC Possible solution Reference CD message CANNOT PLAY Troubleshooting Check the following points before contacting the JVC service center. Problem No sound is produced from the speakers. Possible cause Possible solution Reference page Improper connection.
UX-Q3[A]-12.fm 29 ページ 2004年9月24日 金曜日 午前10時8分 Specifications Specifications are subject to change without prior notice. ■CD receiver (CA-UXQ3S) Amplifier Output power 20 W + 20 W at 4 Ω (10% THD) Input terminals AUX×1, 500 mV/47 kΩ:LEVEL1 250 mV/47 kΩ:LEVEL2 Output terminals Speaker×1, 20 W/4 Ω Impedance 4 Ω - 16 Ω Headphone (×1), 25 mW/32 Ω Impedance 16 Ω - 1 kΩ Tuner Frequency FM:87.50 MHz - 108.