UX-QX3W_A[A].book Page 1 Friday, July 21, 2006 4:37 PM MICRO COMPONENT SYSTEM UX-QX3W Consists of CA-UXQX3W and SP-UXQX1W UX-QX3A Consists of CA-UXQX3A and SP-UXQX1A To disable the demonstration display, refer to page 7.
UX-QX3W_A[A].book Page 1 Friday, July 21, 2006 4:37 PM Warnings, cautions and others CAUTION To reduce the risk of electrical shocks, fire, etc.: 1. Do not remove screws, covers or cabinet. 2. Do not expose this appliance to rain or moisture. CAUTION — F (STANDBY/ON) button! Disconnect the mains plug to shut the power off completely (the STANDBY lamp goes off). When installing the apparatus, ensure that the plug is easily accessible.
UX-QX3W_A[A].book Page 1 Friday, July 21, 2006 4:37 PM Introduction Listening to the Radio Notes on Operations............................. 2 Listening to the Radio..........................13 Installation ............................................... 2 Notes on Handling................................... 2 Moisture Condensation ........................... 2 Listener's Etiquette.................................. 2 About CDs/CD-Rs/CD-RWs.................... 2 Supplied Accessories......................
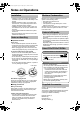
UX-QX3W_A[A].book Page 2 Friday, July 21, 2006 4:37 PM Notes on Operations Installation Moisture Condensation • Install the System in a location with adequate ventilation to prevent internal heat buildup in the System. • DO NOT install the System in a location near heat sources, or in a place subjected to direct sunlight, excessive dust or vibration. • Install the System in a place which is level, dry and neither too hot nor too cold—between 5°C and 35°C.
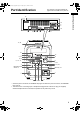
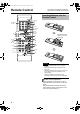
UX-QX3W_A[A].book Page 3 Friday, July 21, 2006 4:37 PM Introduction Part Identification Introduction/Preparation The numbers in the figure indicate the pages where the details of the parts are. 15 10 9 9 18 14 19, 20 22 12 16, 17 11, 22 10 15 * 11 9, 13 9,14 9 9, 15 - 17 9, 18 9, 15, 23 7 Remote control sensor: 4 Disc tray: 15 7 ** 13 - 15, 17 15, 23 13 - 15, 17 * When the power is turned off, the STANDBY lamp lights red. When the power is turned on, the STANDBY lamp goes off.
UX-QX3W_A[A].book Page 4 Friday, July 21, 2006 4:37 PM Remote Control The numbers in the figure indicate the pages where the details of the parts are. Inserting Batteries into the Remote Control 8, 14, 16, 17, 20 15 9, 18, 21 8 8, 17, 21 8, 14, 18, 20, 21 8, 14, 15, 17, 20, 21 15 18 16 9, 14 9, 15, 16, 17 16, 17 14 22 19 10 9 12 12 8, 20 9, 22 9 11 10 R6(UW)·UM-3(UW) R6·AA type dry-cell batteries (2) 11 9, 18 9, 10 CAUTION • Do not use a used battery and a new battery together.
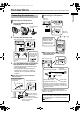
UX-QX3W_A[A].book Page 5 Friday, July 21, 2006 4:37 PM Introduction Connections Do not connect the AC power cord until all other connections have been made. Connecting the AM antenna 1 Connecting the FM antenna Preparation Connecting the Antennas Main unit (rear view) Set up the AM loop antenna (supplied). FM antenna (supplied) Insert the tab into the slot. Main unit (side view) 2 Connect the antenna cord.
UX-QX3W_A[A].book Page 6 Friday, July 21, 2006 4:37 PM Connections Connecting the Speakers There is no difference between the left and right speakers. After connecting the speakers, gently pull the speaker cords to make sure that they are firmly connected. Main unit (rear view) Speaker cord White White Black Black Right speaker (rear view) CAUTION NOTE • Do not short-circuit the and speaker terminals. Otherwise it may damage the System.
UX-QX3W_A[A].book Page 7 Friday, July 21, 2006 4:37 PM Introduction Do not connect the AC power cord until all other connections have been made.
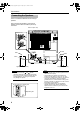
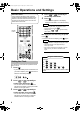
UX-QX3W_A[A].book Page 8 Friday, July 21, 2006 4:37 PM Basic Operations and Settings About this manual In this manual, operations mainly using the remote control are explained; however, some buttons on the main unit work the same way as those on the remote control. You can use either button in this case. 4 Press or repeatedly to set the day of the week. Press . 5 • "CLOCK SET!" appears on the display window and the built-in clock starts working.
Turning On/Off the System Press . • While the System is turned off, pressing one of the buttons below also turns on the System. Remote control: Main unit: The corresponding source will be selected by pressing one of these buttons except . Playback automatically starts if the selected source is ready. Adjusting the Volume Press Emphasizing Bass Sound (AHB PRO) . Press Sound Mode Sound mode A combination of JVC sound technologies enables you to select the desired sound pattern.
UX-QX3W_A[A].book Page 10 Friday, July 21, 2006 4:37 PM Basic Operations and Settings Adjusting the Tone NOTE • Before adjusting, set the sound mode to "SOUND MODE NORMAL" ( page 9). When the sound mode is set to any item other than "SOUND MODE NORMAL" and you press , "NO OPERATE" appears on the display window and you cannot adjust the tone. 1 Press repeatedly to display "BASS" or "TREBLE." : Adjusts the bass sound.
UX-QX3W_A[A].book Page 11 Friday, July 21, 2006 4:37 PM For the locations of remote control buttons, refer to page 8. Press repeatedly. Touch Illumination Basic Operations and Settings Changing the Illumination Color Even while the System is turned off, you can illuminate the front panel temporarily—Touch illumination.
UX-QX3W_A[A].book Page 12 Friday, July 21, 2006 4:37 PM Basic Operations and Settings Changing the Display Brightness (DIMMER) Press repeatedly. • Each time you press , the brightness of the front panel changes as follows: : Dims the display. : Dims the display more than DIMMER 1 and the front panel lights blue. Auto Standby The System is turned off (on standby) automatically with the Auto Standby function activated. While any source other than FM or AM is selected... Press • "A.
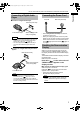
UX-QX3W_A[A].book Page 13 Friday, July 21, 2006 4:37 PM The System can receive FM and AM radio broadcasts. Setting the AM Tuner Spacing Before operating the tuner, it is required to select the appropriate AM space interval used for your area. On the main unit: Number buttons While the System is turned off... To select 10 kHz spacing, while holding down , press . "AM 10kHz STEP" appears on the display window. To select 9 kHz spacing, while holding down .
UX-QX3W_A[A].book Page 14 Friday, July 21, 2006 4:37 PM Listening to the Radio Tuning in to a Radio Station 1 Press or . Example: When FM is selected as the source Preset number ( right column) Storing (presetting) Radio Stations You can store up to 30 FM and 15 AM radio stations. • There is a time limit in doing the following steps. If the setting is canceled before you finish, start from step 1 again. 1 Tune in to a radio station you want to store.
UX-QX3W_A[A].book Page 15 Friday, July 21, 2006 4:37 PM The System can play back regular CDs and finalized CD-Rs/CD-RWs (recorded in audio CD or MP3 format). 3 Press to start playback. ■ While an audio CD is being played back... CD indicator (Lights while a disc is stopped and flashes while a disc is being played back or paused.) Elapsed playing time (Flashes while a disc is paused.) Track number Number buttons ■ While an audio CD is stopped...
UX-QX3W_A[A].book Page 16 Friday, July 21, 2006 4:37 PM Listening to Discs Specifying the Track (Direct Track Selection) Press the number buttons to select the track you want to listen to. • Refer to "Using the number buttons" ( 8). page Program Playback This function allows you to program up to 99 tracks. While playback is stopped... 1 Press repeatedly to select "PROGRAM." Repeat Playback Source display This function allows you to listen repeatedly to the same track (or group: only for MP3 disc).
UX-QX3W_A[A].book Page 17 Friday, July 21, 2006 4:37 PM ■ To confirm the programmed track order While playback is stopped... ■ To cancel the random playback While playback is stopped... Press or repeatedly. ■ To add tracks You can add a track as the last track in the program. While playback is stopped... Press the number buttons to select the track number you want to add. • Refer to "Using the number buttons" ( page 8). ■ To erase the last track While playback is stopped... Press Press .
UX-QX3W_A[A].book Page 18 Friday, July 21, 2006 4:37 PM Listening to a Digital Audio Player ■ How does the QP Link work? While the QP Link is activated, starting playback performs the following: – While listening to another source... Changes the source to LINE automatically. – While the System is turned off... Turns on the System and selects LINE as the source automatically. NOTE • When the sound signal from the Digital Audio Player is too weak, QP Link may not function correctly.
UX-QX3W_A[A].book Page 19 Friday, July 21, 2006 4:37 PM The System is equipped with the two timers: the sleep timer and the playback timer. You can enter up to three timer settings in total for the playback timer ( page 20). • The playback timer settings remain in memory until you change it. Set the clock beforehand ( page 8). Sleep Timer When the specified time passes, the System is automatically turned off. Press repeatedly.
UX-QX3W_A[A].book Page 20 Friday, July 21, 2006 4:37 PM Using the Timer 5 Playback Timer With the playback timer, you can wake up with your favorite music. 1 Operation CD Insert a disc ( FM/AM Preset the radio station you want to listen to ( page 14). LINE Set the playback timer function on the Digital Audio Player connected to the LINE IN jack. Follow the instruction manual for the Player.
7 Press or repeatedly to select the following, then press . When "FM" or "AM" is selected as the source in step 6: Select the preset number of the radio station you want ( page 14). When "CD/MP3" is selected as the source in step 6: Select the group (for only MP3 disc) and track number you want to play back first. • You can also use the number buttons to select the preset number, group number, and track number. Refer to "Using the number buttons" ( page 8).
UX-QX3W_A[A].book Page 22 Friday, July 21, 2006 4:37 PM Using the Snooze Function While the playback timer ( page 20) is working to play the selected source, you can turn off the sound temporarily by touching on the main unit. ■Using the snooze function Touch on the main unit while the playback timer is working and playing the selected source. The sound can be turned off up to three times. When you touch four times, the System will be turned off. After 5 minutes from when you touch ...
UX-QX3W_A[A].book Page 23 Friday, July 21, 2006 4:37 PM Maintenance You can prohibit disc ejection. Handling discs On the main unit ONLY: • When removing the disc from its case, hold it at the edge while pressing the center hole lightly. • Do not touch the shiny surface of the disc, or bend the disc. • Put the disc back in its case after use to prevent warping. • Be careful not to scratch the surface of the disc. • Avoid exposure to direct sunlight, extreme temperature, and moisture.
UX-QX3W_A[A].book Page 24 Friday, July 21, 2006 4:37 PM Warning Message Message CD NO DISC Meaning Disc is not loaded. Possible solution Place a disc. Disc is placed upside down. Place a disc with the label side up. Unplayable disc is loaded. Replace a disc. Troubleshooting Check the following points before contacting the JVC service center. Problem Possible cause No sound is produced from the Improper connection. speakers.
UX-QX3W_A[A].book Page 25 Friday, July 21, 2006 4:37 PM Specifications Design and specifications are subject to change without notice.
UX-QX3W_A[A].