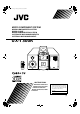
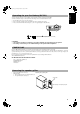
Cover.fm Page 1 Thursday, March 5, 1998 6:40 PM MICRO COMPONENT SYSTEM MIKRO-KOMPONENTEN-SYSTEM MICRO CHAINE MIKRO KOMPONENTENSYSTEEM SISTEMA DE MICROCOMPONENTES SISTEMA A MICROCOMPONENTI UX-T300R 1 2 4 3 5 6 SLEEP 7 8 9 DISPLAY 10 +10 AUTO PRESET STEREO AUTO/MONO TAPE TUNER CD AUX BAND REVERSE MODE FF MULTI CONTROL REW BEAT CUT PROGRAM RANDOM REPEAT PTY/EON SELECT DISPLAY MODE EON BASS AHB.
Warning.fm Page 1 Thursday, March 5, 1998 6:44 PM Warnings, Cautions and Others / Warnung, Achtung und sonstige Hinweise /Mises en garde, précautions et indications diverses /Waarschuwingen, voorzorgen en andere mededelingen/Avisos, precauciones y otras notas / Avvertenze e precauzioni da osservare Caution –– switch! Disconnect the mains plug to shut the power off completely. The switch in any position does not disconnect the mains line. The power can be remote controlled.
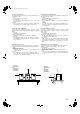
Warning.fm Page 2 Thursday, March 5, 1998 6:44 PM Caution: Proper Ventilation To avoid risk of electric shock and fire, and to prevent damage, locate the apparatus as follows: 1 Front: No obstructions and open spacing. 2 Sides/ Top/ Back: No obstructions should be placed in the areas shown by the dimensions below. 3 Bottom: Place on the level surface. Maintain an adequate air path for ventilation by placing on a stand with a height of 10 cm or more.
Warning.
UX-Eng.fm Page 1 Thursday, March 5, 1998 6:42 PM English Thank you for purchasing the JVC Micro Component System. We hope it will be a valued addition to your home, giving you years of enjoyment. Be sure to read this instruction manual carefully before operating your new stereo system. In it you will find all the information you need to set up and use the system. If you have a query that is not answered by the manual, please contact your dealer.
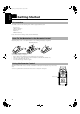
English UX-Eng.fm Page 2 Thursday, March 5, 1998 6:42 PM ■ ■ Getting Started Accessories Check that you have all of the following items, which are supplied with the System. Power Cord (1) AM Loop Antenna (1) Remote Control (1) Batteries (2) FM Wire Antenna (1) If any of these items are missing, contact your dealer immediately. How To Put Batteries In the Remote Control Match the polarity (+ and –) on the batteries with the + and – markings in the battery compartment.
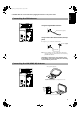
UX-Eng.fm Page 3 Thursday, March 5, 1998 6:42 PM English CAUTION: Make all connections before plugging the Unit into an AC power outlet. Connecting the FM Antenna R RIGHT L Using the Supplied Wire Antenna LEFT FM wire antenna (supplied) ~ AC IN Using an FM 75-Ohm Antenna Wire (Not Supplied) 12V DC IN If reception is poor, connect the outside antenna.
English UX-Eng.fm Page 4 Thursday, March 5, 1998 6:42 PM CAUTION: Make all connections before plugging the Unit into an AC power outlet. Connecting the Speakers For each speaker, connect one end of the speaker wire to the speaker terminals on the back of the System. 1. Open each of the terminals and insert the speaker wires firmly, then close the terminals. 2. Connect the red (+) and black (–) wires of the right side speaker to the red (+) and black (–) terminals marked RIGHT on the System.
UX-Eng.fm Page 5 Thursday, March 5, 1998 6:42 PM English Operating via your Car Battery (DC12V) You can operate the System on your car battery via the optional car adaptor (JVC model CA-R120E). You must connect the adaptor to the System in the following order to avoid accidental short circuit: 1. Be sure that the AC power cord is disconnected. 2. First, connect the car adaptor plug to the DC IN 12V jack on the back of the System. 3.
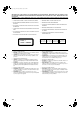
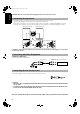
English UX-Eng.fm Page 6 Thursday, March 5, 1998 6:42 PM ■ ■ Common Operations STANDBY indicator DISPLAY AUX PHONES VOLUME+,– AUX BASS+ TREBLE+,– VOLUME+,– AHB (ACTIVE HYPER BASS) PRO Turning the Power On and Off Turning the System On —————— Press the button. The display comes on and the STANDBY indicator goes out. The System comes on ready to continue in the mode it was in when the power was last turned off.
TREBLE Control —————————— You can adjust the treble level (high frequency range level) between –6 and 6. (0: Flat) To emphasize the treble level, press the TREBLE+ button on the Remote Control. To lower the treble level, press the TREBLE– button on the Remote Control. 3. Start playing the auxiliary equipment. ■ 4. Adjust the VOLUME control to the desired ■ listening level. 5. Apply sound effects, if you wish.
English UX-Eng.fm Page 8 Thursday, March 5, 1998 6:42 PM 4. Repeat steps 1 - 3 for each station you ■ Tuning In a Station Press the TUNER/BAND button to turn on the radio. The Band and Frequency you were last tuned to appear on the display. Switching Frequency Bands ——— Press the TUNER/BAND button. Each time you press the button, the band alternates between FM and AM (MW/LW). want to store in memory with a preset number.
PS (Programme Service): While searching, “PS” appears, then station name is displayed. “NO PS” appears if no signal is sent. PTY (Programme Type): While searching, “PTY” appears, then broadcast programme type is displayed. “NO PTY” appears if no signal is sent. RT (Radio Text): While searching, “RT” appears, then a text message sent by the station is displayed. “NO RT” appears if no signal is sent.
English UX-Eng.fm Page 10 Thursday, March 5, 1998 6:42 PM To select a programme type PTY/EON SELECT PTY/EON 1 Press the EON button twice while listening to an FM station. The display alternates between “EON” and “SELECT”. 2 Select the programme type with the SELECT buttons within 10 seconds. The display shows a programme type in the following order: Traffic Announcement TA: News NEWS: Programmes on medical service, weather forecast, etc.
UX-Eng.fm Page 11 Thursday, March 5, 1998 6:42 PM Number keys English ■ ■ Using the CD Player Track number, Playing time, Step number CD 6 7 ¢ 4 CD Holder REPEAT RANDOM PROGRAM Play mode indicator Repeat indicator Track number indicators ¢ OVER indicator 7 Lights when the 4 track number of the set CD exceeds 16. When the System is in use, the display shows other items as well. For simplicity, we show here only the items described in this section.
English UX-Eng.fm Page 12 Thursday, March 5, 1998 6:42 PM Locating a Track with the Remote Control Directly —————————— Using the number keys on the Remote Control allows you to go directly to the beginning of any track. During playback, enter the number of the track you want to listen to using the number keys. The selected track starts playing. • Example: for track 5, press 5. For track 15, press +10 then 5. For track 20, press +10, then 10. For track 32, press +10 three times, then 2.
UX-Eng.fm Page 13 Thursday, March 5, 1998 6:42 PM English the Cassette Deck ■ ■ Using ■ ■ (Listening to a Tape) ¢ 7 4 TAPE 2 3 0 (EJECT) TAPE 2 3 REVERSE MODE Tape Direction indicator Reverse Mode indicator 4 REW ¢ FF 7 When the System is in use, the display shows other items as well. For simplicity, we show here only the items described in this section. The Cassette Deck allows you to play and record audio tapes.
English UX-Eng.fm Page 14 Thursday, March 5, 1998 6:42 PM the Cassette Deck ■ ■ Using ■ ■ (Recording) ONE TOUCH REC BEAT CUT 7 REC indicator When the System is in use, the display shows other items as well. For simplicity, we show here only the items described in this section. Recording onto a tape from any of the sound sources is simple. Just place a tape in the Cassette Deck, have the source ready, make one or two settings, and you're ready to record.
4. Prepare the source, by, for example, tuning ■ in a radio station or turning on connected auxiliary equipment. Note: For CD recording, refer to “CD Direct Recording” mentioned below. 7. Press the ONE TOUCH REC button on the ■ Unit. The “REC” indicator lights up and the System begins recording. • 5. Press the ONE TOUCH REC button on the ■ Unit. The “REC” indicator lights up and the System begins recording.
English UX-Eng.fm Page 16 Thursday, March 5, 1998 6:42 PM ■ ■ Using the Timers TIMER/SNOOZE CLOCK MULTI JOG dial Timer indicator SLEEP Clock, time-on time etc. When the System is in use, the display shows other items as well. For simplicity, we show here only the items described in this section. The timers let you control listening and recording functions automatically. Setting the Clock The clock must be correctly set for the timers to work. You can set the clock whether the Unit is on or off. 1.
5. Press the TIMER/SNOOZE ■ button. The volume level blinks on the display. 6. Turn the MULTI JOG dial to the right or left ■ to select the volume level (0 to 50). 7. Press the TIMER/SNOOZE button. ■ The timer setting is completed and the display returns to the display before you set the timer. 8. Before turning off the Unit, prepare the ■ music source selected in step 4. Tune to the desired station. TUNER: TUNER REC: Tune to the desired station and insert a cassette tape for recording the station.
English UX-Eng.fm Page 18 Thursday, March 5, 1998 6:42 PM ■ ■ Care And Maintenance Handle your CDs, cassette tapes, and Cassette Deck carefully, and they will last a long time. Cassette Tapes • If the tape is loose, it may get stretched, cut, or caught in the cassette. Take up the slack by inserting a pencil in one of the reels and rotating. • Do not touch the tape surface.
UX-Eng.fm Page 19 Thursday, March 5, 1998 6:42 PM • • English ■ ■ Troubleshooting If you are having a problem with your System, check this list for a possible solution before calling for service. If you cannot solve the problem from the hints given here, or the System has been physically damaged, call a qualified person, such as your dealer, for service. Symptom No sound is heard. Possible Cause Action • Connections are incorrect, or loose. • • Headphones are connected.
English UX-Eng.fm Page 20 Thursday, March 5, 1998 6:42 PM ■ ■ Specifications Amplifier Output Power 32 W (16 W + 16 W) at 4 ohms (Max.) 28 W (14 W + 14 W) at 4 ohms (10% THD) Input Sensitivity/Impedance (1 kHz) AUX 300 mV/47 kohms Speaker terminals 4 - 16 ohms Phones 16 ohm - 1 kohms 0 - 15 mW/ch output into 32 ohms Cassette Deck Frequency Response Type II (CrO2) : 60 - 15,000 Hz Wow And Flutter 0.
Back Cover.