
Micro Component System Instructions
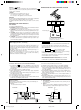
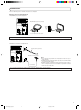
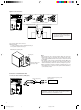
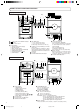
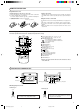
Table Of Contents
- CONTENTS
- FEATURES
- HANDLING PRECAUTIONS
- CONNECTIONS
- POWER SUPPLY
- NAMES OF PARTS AND THEIR FUNCTIONS
- REMOTE CONTROL UNIT
- SWITCHING THE POWER ON/OFF
- VOLUME,TONE AND OTHER CONTROLS
- HANDLING CDs
- PLAYING CDs
- HANDLING CASSETTE TAPES
- CASSETTE PLAYBACK
- RADIO RECEPTION
- RECORDING
- CLOCK ADJUSTMENT
- TIMER OPERATIONS
- MAINTENANCE
- TROUBLESHOOTING
- SPECIFICATIONS

2
CONNECTIONS
● Do not switch the power on until all connections are completed.
Antenna connection and adjustment
● AM (MW/LW) loop antenna adjustment
● Keep the loop antenna away from the unit and install it so that the best reception is obtained. (Do not leave the antenna wire in a bundle.)
ÓAC IN
RIGHT
R
L
LEFT
DC IN
12V
—
FM
AM LOOP
AM EXT
COAXIAL
75Ω
Insert in the direction of the arrow.
AM (MW/LW)loop antenna (provided)
ÓAC IN
RIGHT
R
L
LEFT
DC IN
12V
● FM antenna connections and adjustments
FM wire antenna (provided)
FM outdoor antenna (option)
Coaxial cable
Notes:
● Do not place the loop antenna on a metal desk or near a TV or per-
sonal computer.
● Installing an outdoor antenna requires expertise; we recommend that
you consult an audio dealer.
● Install the antenna cord away from the power and speaker cords as
these could generate noise. Do not install the loop antenna so that it
touches the rear of the unit.
● Use an outdoor antenna when stable reception cannot be obtained with the provided antenna.
UX-T550(B)_body.pm6 12/12/00, 3:11 PM2