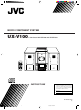
MICRO COMPONENT SYSTEM UX-V100 — Consists of CA-UXV100 and SP-UXV100. AUTO TAPE SELECTOR TAPE AUTO REVERSE COMPACT DIGITAL AUDIO VERTICAL DISC LOADING MECHANISM SLEEP AUX DISPLAY TAPE FM MODE FM/AM MICRO COMPONENT SYSTEM AUTO PRESET UX-V100 CD STANDBY CD AUX AHB PRO VOLUME REPEAT UP PROGRAM SET REC TIMER RANDOM DOWN REV.
Warnings, Cautions and Others IMPORTANT for the U.K. IMPORTANT FOR LASER PRODUCTS DO NOT cut off the mains plug from this equipment. If the plug fitted is not suitable for the power points in your home or the cable is too short to reach a power point, then obtain an appropriate safety approved extension lead or consult your dealer. REPRODUCTION OF LABELS 1 CLASSIFICATION LABEL, PLACED ON REAR ENCLOSURE BE SURE to replace the fuse only with an identical approved type, as originally fitted.
Caution: Proper Ventilation To avoid risk of electric shock and fire, and to prevent damage, locate the apparatus as follows: 1 Front: No obstructions and open spacing. 2 Sides/ Top/ Back: No obstructions should be placed in the areas shown by the dimensions below. 3 Bottom: Place on the level surface. Maintain an adequate air path for ventilation by placing on a stand with a height of 10 cm or more.
SAFETY INSTRUCTIONS “SOME DOS AND DON’TS ON THE SAFE USE OF EQUIPMENT” This equipment has been designed and manufactured to meet international safety standards but, like any electrical equipment, care must be taken if you are to obtain the best results and safety is to be assured. ✮✮✮✮✮✮✮✮✮✮✮✮✮✮✮✮✮✮✮✮✮✮✮✮✮✮✮✮✮✮✮✮✮✮✮✮✮✮✮✮✮✮✮✮✮✮✮ Do read the operating instructions before you attempt to use the equipment.
Thank you for purchasing the JVC Micro Component System. We hope it will be a valued addition to your home, giving you years of enjoyment. Be sure to read this instruction manual carefully before operating your new stereo system. In it you will find all the information you need to set up and use the system. If you have any query that is not answered by the manual, please contact your dealer. Features Here are some of the things that make your System both powerful and simple to use.
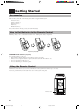
Getting Started Accessories Make sure that you have all of the following items, which are supplied with the System. AC Power Cord (1) AM Loop Antenna (1) Remote Control (1) Batteries (2) FM Wire Antenna (1) If any of these items are missing, contact your dealer immediately. How to Put Batteries in the Remote Control Match the polarity (+ and –) on the batteries with the + and – markings in the battery compartment. R6(SUM-3)/AA(15F) CAUTION: Handle batteries properly.
CAUTION: Make all connections before plugging the System into an AC power outlet. Connecting the FM Antenna Using the supplied Wire Antenna Rear Panel of the Unit FM Wire Antenna (supplied) R L Using the coaxial type connector (not supplied) A 75 Ω antenna with coaxial type connector (IEC or DIN 45325) should be connected to the FM (75 Ω) COAXIAL terminal. L R SPEAKERS IMPEDANCE MIN 4Ω If reception is poor, connect the outdoor antenna.
CAUTION: Make all connections before plugging the System into an AC power outlet. Connecting the Speakers For each speaker, connect one end of the speaker wire to the speaker terminals on the back of the System. 1. Open each of the terminals and insert the speaker wires firmly, then close the terminals. 2. Connect the red (+) and black (–) wires of the right side speaker to the red (+) and black (–) terminals marked R on the System.
Connecting the AC Power Cord Firmly insert the supplied AC power cord into the AC inlet on the back of the Unit. AC IN AC power cord CAUTIONS: • ONLY USE JVC POWER CORD PROVIDED WITH THIS SYSTEM TO AVOID MALFUNCTION OR DAMAGE TO THE SYSTEM. • BE SURE TO UNPLUG THE POWER CORD FROM THE OUTLET WHEN YOU ARE GOING OUT OR WHEN THE SYSTEM IS NOT IN USE FOR AN EXTENDED PERIOD OF TIME.
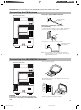
Common Operations SLEEP DISPLAY TAPE AUX FM MODE FM/AM AUTO PRESET CD DISPLAY CD BASS AHB PRO REPEAT UP PROGRAM SET DOWN RANDOM AHB PRO UP STANDBY lamp STANDBY AUX AHB PRO REC TIMER VOLUME REV MODE DOWN CLOCK CD BASS TREBLE CANCEL OPEN/CLOSE TAPE VOLUME TREBLE VOLUME +, – FM/AM AHB PRO VOLUME +, – CLOCK CD PHONES PHONES DOWN MULTI CONTROL UP REMOTE CONTROL RM-SUXV10E Turning the Power On and Off Turning the System on ––––––––––––––– Press the Press the VOLUME +
Reinforcing the Bass Sound (AHB PRO) You can reinforce the bass sound to maintain rich, full bass at low volume (you can use this effect only for playback): To get the effect, press the AHB (Active Hyper Bass) PRO button. The BASS indicator lights up on the display. To cancel the effect, press the button again. The BASS indicator goes out. Controlling the Tone (Bass/ Treble) You can control the tone by changing the bass and treble.
Using the Tuner STANDBY AUX AHB PRO REC TIMER VOLUME SLEEP DISPLAY TAPE AUX 4 UP < FM MODE FM MODE AUTO PRESET FM/AM ¢ AUTO PRESET CD FM/AM CD REPEAT UP PROGRAM SET RANDOM DOWN AHB PRO BASS TREBLE REV MODE CLOCK CD OPEN/CLOSE TAPE FM/AM CD PHONES DOWN MULTI CONTROL FM/AM ¢ 4 UP > SET DOWN CANCEL VOLUME FM mode indicators MONO STEREO REMOTE CONTROL RM-SUXV10E Band display, Frequency display, Preset channel When the System is in use, the display shows other items as w
4 Press the UP, DOWN, >, or < button within 5 seconds to select the preset number. UP or > button: Increases the preset number by 1. DOWN or < button: Decreases the preset number by 1. • When the > or < button is held down, the preset number changes rapidly. 5 Press the SET button within 5 seconds. “STORED” appears and after 2 seconds, the display returns to the broadcast frequency display. 6 Repeat above steps 1 to 5 for each station you want to store in memory with a preset number.
Using the CD Player DIGITAL AUDIO VERTICAL DISC LOADING MECHANISM CD Cover SLEEP 4 CD 0 REPEAT PROGRAM RANDOM < AUX DISPLAY TAPE FM MODE FM/AM AUTO PRESET CD CD REPEAT UP PROGRAM SET DOWN RANDOM AHB PRO BASS TREBLE CANCEL VOLUME 7 CD #¥8 ¢ UP > SET CANCEL DOWN MICRO COMPONENT SYSTEM UX-V100 STANDBY AUX AHB PRO REC TIMER VOLUME REV MODE CLOCK CD OPEN/CLOSE TAPE FM/AM CD PHONES DOWN MULTI CONTROL UP REMOTE CONTROL RM-SUXV10E CD OPEN/ CLOSE 0 CD #/8 ¢ 7 4 Track number,
Basics of Using the CD Player — Normal Play 4 Press the PROGRAM button. The System enters the programing mode and the PROGRAM indicator lights up. PROGRAM Playing a CD –––––––––––––––––––––––––– PROGRAM RANDOM 1 Insert a CD. 5 Press the > or < button to select the track to program. 2 Press the CD #/8 button. The first track of the CD begins playing. Track number • • > button: Increases the track number by 1. < button: Decreases the track number by 1.
Playing at Random The tracks will play in no particular order when you use this mode. Press the RANDOM button on the Remote Control. Locking the CD cover You can lock the CD cover and prohibit to unload the CD. • This operation is possible only using the buttons on the unit. The RANDOM indicator lights up on the display, and tracks will be played in random order. To prohibit unloading the CD, press the button while holding the 7 button. (If the CD cover is opened, close it first.
Using the Cassette Deck (Listening to a Tape) STANDBY AUX AHB PRO REC TIMER REV MODE CLOCK Cassette holder VOLUME REV.
Using the Cassette Deck (Recording) STANDBY AUX AHB PRO REC TIMER VOLUME SLEEP AUX TAPE @ # DISPLAY TAPE FM MODE FM/AM AUTO PRESET CD CD #¥8 7 CD REPEAT UP PROGRAM SET REV MODE CLOCK CD OPEN/CLOSE TAPE TAPE @ # FM/AM CD CD #¥8 PHONES DOWN MULTI CONTROL UP 7 Tape Direction indicator DOWN RANDOM AHB PRO REC REV. MODE BASS TREBLE CANCEL VOLUME REC indicator REC REMOTE CONTROL RM-SUXV10E When the System is in use, the display shows other items as well.
CD Direct Recording Everything on the CD goes onto the tape in the order it is on the CD, or according to the order you have set in a program. One track recording–––––––––––––––––– 1 Insert a blank or erasable tape into the Cassette Deck. 1 Insert a blank or erasable tape into the Cassette Deck. 2 Play the track on the CD you wish to record. 2 Insert a CD. 3 Press the REC button on the Unit. 3 Press the CD #/8 button.
Using External Equipment SLEEP AUX AUX DISPLAY TAPE FM MODE FM/AM AUTO PRESET CD CD REPEAT UP PROGRAM SET STANDBY AHB PRO AHB PRO BASS DOWN RANDOM BASS TREBLE CANCEL VOLUME AUX AHB PRO REC TIMER VOLUME AUX REV MODE TREBLE CLOCK CD OPEN/CLOSE TAPE FM/AM CD PHONES VOLUME +, – DOWN MULTI CONTROL REMOTE CONTROL RM-SUXV10E Listening to External Equipment You can connect an audio equipment — used only as a playback device.
Using the Timers Timer indicator STANDBY SLEEP SLEEP AUX DISPLAY TAPE FM MODE FM/AM AUTO PRESET AUX AHB PRO CD REC TIMER VOLUME REV MODE TIMER CLOCK CLOCK CD CD SLEEP ON OFF CLOCK OPEN/CLOSE REPEAT UP PROGRAM SET RANDOM DOWN DISPLAY MODE TAPE FM/AM CD PHONES DOWN AHB PRO BASS TREBLE MULTI CONTROL UP ¢ CANCEL 4 VOLUME REMOTE CONTROL RM-SUXV10E When the System is in use, the display shows other items as well.
4 Select the music source. 1. Press the TIMER button on the Unit. “TUNER” flashes on the display. 2. Press the ¢ or 4 button to select the music source you want to listen to. The display changes as shown below. 5 Set the volume level. 1. Press the TIMER button on the Unit. The current volume setting flashes on the display. 2. Press the ¢ or 4 button to select the volume level. -: The current volume level will be used.
7 Press the ¢ or 4 button until “TUNER” appears and the REC indicator lights up on the display. The display changes as shown below. 8 Set the volume level. 1. Press the TIMER button on the Unit. The current volume setting flashes on the display. 2. Press the ¢ or 4 button to select the volume level. -: The current volume level will be used. 0 to 40 : When the timer is turned on, the Volume will be automatically set to the selected level.
Care and Maintenance Handle your CDs carefully, and they will last a long time. • Compact Discs • If there are fingerprints, etc. on the lens, gently wipe clean with a cotton swab. Only CDs bearing this mark can be used with this System. However, continued use of irregular shape CDs (heart-shape, octagonal, etc.) can damage the System.
Troubleshooting • • If you are having a problem with your System, check this list for a possible solution before calling for service. If you cannot solve the problem from the hints given here, or the System has been physically damaged, call a qualified person, such as your dealer, for service. Possible Cause Symptom No sound is heard. Poor radio reception Action • Connections are incorrect, or loose. • • Headphones are connected. • • • Antennas are disconnected.
Specifications UX-V100 (CA-UXV100 and SP-UXV100) Amplifier Output Power Input Sensitivity/Impedance (1 kHz) LINE IN (AUX) Speaker terminals Phones 44 W (22 W + 22 W) at 4 Ω (Max.) 40 W (20 W + 20 W) at 4 Ω (10% THD) 400 mV/48 kΩ 4 Ω - 16 Ω 16 Ω - 1 kΩ 0 mW - 15 mW per channel output into 32 Ω Cassette Deck Frequency Response Type I (Normal) Type II (CrO2) Wow and Flutter 50 Hz - 14 kHz 50 Hz - 15 kHz 0.
VICTOR COMPANY OF JAPAN, LIMITED EN COVER.