UX-V6V(U)-Cover.fm Page 1 Thursday, August 5, 1999 2:59 PM MICRO COMPONENT SYSTEM UX-V6V UX-V6V REMOTE CONTROL RM-RXUV6V DIMMER SLEEP DISPLAY FM MODE AHB PRO AUTO PRESET PROGRAM RANDOM BASS DIGITAL ECHO TREBLE VCD NUMBER MD/AUX CD REPEAT CANCEL KEY CONTROL UP PREV SELECT NEXT SET DOWN ON SCREEN VCD NUMBER TAPE TUNER BAND V. INTRO CD VOLUME INSTRUCTIONS For Customer Use: Enter below the Model No. and Serial No. which are located either on the rear, bottom or side of the cabinet.
UX-V6V(U)-Warning.fm Page 1 Thursday, August 5, 1999 2:59 PM Warnings, Cautions and Others CAUTION To reduce the risk of electrical shocks, fire, etc.: 1. Do not remove screws, covers or cabinet. 2. Do not expose this appliance to rain or moisture. Caution –– % switch! Disconnect the mains plug to shut the power off completely. The % switch in any position does not disconnect the mains line. The power can be remote controlled.
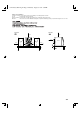
UX-V6V(U)-Warning.fm Page 2 Thursday, August 5, 1999 2:59 PM Caution: Proper Ventilation To avoid risk of electric shock and fire, and to prevent damage, locate the apparatus as follows: 1 Front: No obstructions and open spacing. 2 Sides/ Top/ Back: No obstructions should be placed in the areas shown by the dimensions below. 3 Bottom: Place on the level surface. Maintain an adequate air path for ventilation by placing on a stand with a height of 10 cm or more.
English UX-V6V(U)-eng.fm Page 1 Thursday, August 5, 1999 2:59 PM Thank you for purchasing the JVC Micro Component System. We hope it will be a valued addition to your home, giving you years of enjoyment. Be sure to read this instruction manual carefully before operating your new stereo system. In it you will find all the information you need to set up and use the system. If you have any questions about your System not answered in this manual, please contact your dealer.
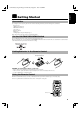
UX-V6V(U)-eng.fm Page 2 Thursday, August 5, 1999 2:59 PM English ■ ■ Getting Started Accessories As you unpack your new System, please check to make sure that along with the System the following items are included: Power Cord (1) AM/SW Loop Antenna (1) FM/SW Wire Antenna (1) Video Cord (1) Remote Control (1) Batteries (2) AC Plug Adaptor (except for Hong Kong) (1) If any of these items is missing, contact your dealer immediately.
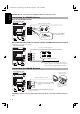
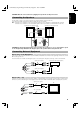
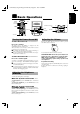
English UX-V6V(U)-eng.fm Page 3 Thursday, August 5, 1999 2:59 PM CAUTION: Make all connections before plugging the Unit into an AC power outlet. Connecting the FM/SW Antenna Using the Supplied Wire Antenna Rear Panel of the Unit FM/SW (7-21.85MHz) Wire Antenna OPTICAL DIGITAL OUT FM/SW 75Ω FM EXT L AM LOOP AM EXT R R Extend the supplied FM/SW Wire Antenna horizontally. L Strip vinyl shield from cut line, twist wire core. Using an FM 75-Ohm Antenna Wire (not Supplied) and SW (7-21.
UX-V6V(U)-eng.fm Page 4 Thursday, August 5, 1999 2:59 PM English CAUTION: Make all connections before plugging the System into an AC power outlet. Connecting the Speakers For each speaker, connect one end of the speaker wire to the speaker terminals on the back of the Unit. Open each of the terminals and insert the speaker wires firmly, then close the terminals. Note: Connect the red (+) and black (–) wires of the right side speaker to the red (+) and black (–) terminals marked R on the Unit.
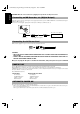
English UX-V6V(U)-eng.fm Page 5 Thursday, August 5, 1999 2:59 PM CAUTION: Make all connections before plugging the System into an AC power outlet. Connecting an MD Recorder, etc (Digital Output) Unplug the cap and connect an optical digital cord (not supplied) between the System’s OPTICAL DIGITAL OUT terminal and the input terminal of the MD recorder, etc. You can now record the digital output signal from the System’s CD Player to the MD recorder, etc. Cap MD recorder, etc.
UX-V6V(U)-eng.
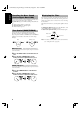
English UX-V6V(U)-eng.fm Page 7 Thursday, August 5, 1999 2:59 PM Boosting the Bass Sound (Active Hyper Bass PRO) Displaying the Time You can reinforce the bass sound to maintain rich, full bass at low volume (you can use this effect only for playback): To get the effect, press the AHB (Active Hyper Bass) PRO button. The “BASS” indicator lights up on the display. To cancel the effect, press the button again. The “BASS” indicator goes out.
UX-V6V(U)-eng.
English UX-V6V(U)-eng.fm Page 9 Thursday, August 5, 1999 2:59 PM Presetting Stations Auto Presetting You can preset up to 15 FM stations, up to 15 AM stations and up to 15 SW stations using the Remote Control. Note: Preset numbers may have been set to factory test frequencies prior to shipment. This is not a malfunction. You can preset the stations you want into memory by following one of the presetting methods below. (Using the Remote Control) In each band, you can automatically preset 15 stations.
UX-V6V(U)-eng.fm Page 10 Thursday, August 5, 1999 2:59 PM English ■ ■ Using the CD Player (Audio CDs) REMOTE CONTROL RM-RXUV6V PROGRAM RANDOM SET DIMMER SLEEP DISPLAY FM MODE AHB PRO AUTO PRESET PROGRAM RANDOM CD Cover MD/AUX CD REPEAT STANDBY/ON MD/AUX TAPE DIGITAL ECHO TREBLE VCD NUMBER CANCEL PREV CANCEL KEY CONTROL BAND TUNER CD OPEN/CLOSE CD SELECT DOWN BASS MULTI CONTROL PREV RETURN UP SELECT PHONES > DOWN ON SCREEN VCD NUMBER TAPE TUNER BAND V.
English UX-V6V(U)-eng.fm Page 11 Thursday, August 5, 1999 2:59 PM To stop playing the CD, press the 7 button. The following information for the CD is displayed. Total track number Total playback time To remove the CD, press the CD OPEN/CLOSE 0 button on the Unit or CD 0 button on the Remote Control to open the CD cover. To pause, press the CD #¥8 button. The playback time blinks on the display. To cancel pause, press the same button again. Play continues from the point where it was paused.
UX-V6V(U)-eng.
English UX-V6V(U)-eng.fm Page 13 Thursday, August 5, 1999 2:59 PM Playing Video CDs with PBC Function 3. To move through the next menu, press the ■ following button. On the Unit: Press the NEXT or PREV button. On the Remote Control: Press the NEXT or PREV button. The System provides a Playback Control (PBC) function which utilizes a procedure (menu selection) programmed in a video CD. What is the Playback Control (PBC) function? The PBC function allows you to enjoy the following features.
UX-V6V(U)-eng.fm Page 14 Thursday, August 5, 1999 2:59 PM 1 2 3 1 1 2 1 2 3 1 2 2 Moving picture 3 Moving picture 1 Moving picture Menu screen Press & RETURN (& 7). 3 Moving picture Press & RETURN (& 7). To next screen 2 Moving picture English Example of playback by the Playback Control (PBC) function Still picture Still picture Moving picture Moving picture To previous screen Press & RETURN (& 7). A selection menu is displayed when you start playing a video CD with the PBC function.
English UX-V6V(U)-eng.fm Page 15 Thursday, August 5, 1999 2:59 PM Various Functions to Enhance Your Enjoyment You can use the following features using the Remote Control. Frame-by-Frame Playback ————— Frame-by-Frame Playback is possible only when moving pictures (of the video CDs with or without the PBC function) are played. During playback, press the CD #¥8 button to pause the video CD and then press the ¢ button. Each time you press the ¢ button, the picture advances by one frame.
UX-V6V(U)-eng.fm Page 16 Thursday, August 5, 1999 2:59 PM English the Cassette Deck ■ ■ Using ■ ■ (Listening to a Tape) Cassette holder AUTO REVERSE AUTO TAPE SELECTOR REMOTE CONTROL RM-RXUV6V DIMMER SLEEP DISPLAY FM MODE AHB PRO AUTO PRESET ) (EJECT) STANDBY/ON MD/AUX MD/AUX TAPE CD BAND TUNER OPEN/CLOSE CD SELECT DOWN PREV CD MULTI CONTROL RETURN UP ¢ 7 4 NEXT PHONES PROGRAM RANDOM BASS DIGITAL ECHO TREBLE VCD NUMBER TAPE @ # REPEAT CANCEL REC REV. MODE REV.
English UX-V6V(U)-eng.fm Page 17 Thursday, August 5, 1999 2:59 PM the Cassette Deck ■ ■ Using ■ ■ (Recording) REMOTE CONTROL RM-RXUV6V DIMMER STANDBY/ON SLEEP MD/AUX TAPE BAND TUNER REC CD OPEN/CLOSE CD SELECT DOWN DISPLAY FM MODE AHB PRO AUTO PRESET PROGRAM RANDOM BASS DIGITAL ECHO TREBLE VCD NUMBER REC AHB PRO REV. KARAOKE VCD MODE MODE/MPX NUMBER VOLUME CLOCK TIMER/ SNOOZE REV.
Notes for using Reverse mode for recording • When recording in Reverse mode, the System automatically stops when it reaches the end of the reverse 2 direction. To record on both sides of a tape, make sure that the recording direction for the tape inserted is forward 3, and that the Tape Direction indicator is also forward 3, before you start recording. To Stop at Any Time During the Recording Process • Press the e button.
English UX-V6V(U)-eng.fm Page 19 Thursday, August 5, 1999 2:59 PM ■ ■ Using External Equipment REMOTE CONTROL RM-RXUV6V DIMMER SLEEP DISPLAY FM MODE AHB PRO AUTO PRESET PROGRAM RANDOM MD/AUX MD/AUX CD REPEAT STANDBY/ON BASS TREBLE CANCEL MD/AUX TAPE BAND TUNER CD MD/AUX OPEN/CLOSE CD SELECT DIGITAL ECHO VCD NUMBER DOWN KEY CONTROL PREV MULTI CONTROL RETURN UP NEXT UP PREV SELECT NEXT PHONES SET DOWN ON SCREEN VCD NUMBER TAPE TUNER BAND V.
UX-V6V(U)-eng.fm Page 20 Thursday, August 5, 1999 2:59 PM English ■ ■ Using the Timers AUTO TAPE SELECTOR REMOTE CONTROL RM-RXUV6V DIMMER STANDBY/ON SLEEP MD/AUX TAPE BAND TUNER CD OPEN/CLOSE CD SELECT DOWN DISPLAY FM MODE AHB PRO AUTO PRESET MD/AUX PREV SLEEP REC AHB PRO PROGRAM RANDOM BASS DIGITAL ECHO TREBLE VCD NUMBER REV.
English UX-V6V(U)-eng.fm Page 21 Thursday, August 5, 1999 2:59 PM 5. Setting the volume level. ■ 1. Press the TIMER/SNOOZE button on the Unit. The volume level set by the previous timer setting blinks on the display. 2. Press the ¢ or 4 button to select the volume level. -: The current volume level will be used. 0 to 50: When the timer is turned on, the Volume will be automatically set to the selected level.
UX-V6V(U)-eng.fm Page 22 Thursday, August 5, 1999 2:59 PM English ■ ■ Using the Microphone REMOTE CONTROL RM-RXUV6V PROGRAM DIMMER SLEEP DISPLAY FM MODE AHB PRO AUTO PRESET PROGRAM RANDOM BASS DIGITAL ECHO < PREV SELECT SET DIGITAL ECHO TREBLE VCD NUMBER MD/AUX CD REPEAT CANCEL KEY CONTROL UP PREV SELECT NEXT SET DOWN ON SCREEN VCD NUMBER TAPE V. INTRO TUNER BAND CD CD 0 MIC1 jack (Use a 3.5 mm diameter mini plug) MIC2 jack (Use a 3.
English UX-V6V(U)-eng.fm Page 23 Thursday, August 5, 1999 2:59 PM 4. Press the KARAOKE MODE/MPX button on ■ the Unit to select the Karaoke mode you want to use. Each time you press the button, Karaoke mode changes as follows. Lch MONO = Rch MONO = V.REPLACE = V.MASKING = NORMAL = (back to the beginning) Lch MONO: Only the left channel (instrumental parts) are played through both speakers. Rch MONO: Only the right channel (vocal parts) are played through both speakers. V.
UX-V6V(U)-eng.fm Page 24 Thursday, August 5, 1999 2:59 PM Handle your CDs carefully, and they will last a long time. • Compact Discs • Only CDs bearing this mark can be used with this System. However, continued use of irregularly shaped CDs (heart-shape, octagonal, etc.) can damage the System. • Remove the CD from its case by holding it at the edges while pressing the case’s center hole lightly. Do not touch the shiny surface of the CD, or bend the CD.
English UX-V6V(U)-eng.fm Page 25 Thursday, August 5, 1999 2:59 PM ■ ■ Troubleshooting • • If you are having a problem with your System, check this list for a possible solution before calling for service. If you cannot solve the problem from the hints given here, or the System is damaged, call a qualified person, such as your dealer, for service. Symptom You cannot hear any sound. Possible Cause Action • Connections are incorrect, or loose. • • Headphones are connected.
UX-V6V(U)-eng.fm Page 26 Thursday, August 5, 1999 2:59 PM English ■ ■ Specifications Amplifier Output Power Input Sensitivity/Impedance (1 kHz) LINE IN (AUX) MIC1/MIC2 Output Sensitivity/Impedance (1 kHz) LINE OUT Optical out Speaker terminals Phones 34 W (17 W + 17 W) at 4 ohms (Max.) 500 mV/65 kohms 200 ohms - 2 kohms 500 mV/4.3 kohms –21 dBm - –15 dBm 4 - 16 ohms 16 ohms - 1 kohm 0 - 15 mW/ch output into 32 ohms Video Out (composite) 1.
UX-V6V(U)-Back cover.fm Page 1 Thursday, August 5, 1999 2:58 PM Mains (AC) Line Instruction (not applicable for Europe, U.S.A., Canada, Australia, and U.K.) OPTICAL DIGITAL OUT L R R IMPORTANT for mains (AC) line BEFORE PLUGGING IN, do check that your mains (AC) line voltage corresponds with the position of the voltage selector switch provided on the outside of this equipment and, if different, reset the voltage selector switch, to prevent from a damage or risk of fire/electric shock.