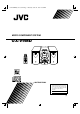
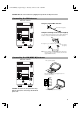
UX-V9MD(A)-Cover.fm Page 1 Tuesday, June 15, 1999 2:33 PM MICRO COMPONENT SYSTEM UX-V9MD REMOTE CONTROL RM-RXUV9MD DIMMER DISPLAY AHB PRO SLEEP FM MODE TAPE / AUX AUTO PRESET PROGRAM RANDOM BASS TREBLE EDIT / TITLE CD REPEAT CANCEL CHARA UP SET DOWN MD TUNER BAND CD VOLUME INSTRUCTIONS For Customer Use: Enter below the Model No. and Serial No. which are located either on the rear, bottom or side of the cabinet. Retain this information for future reference. Model No. Serial No.
UX-V9MD(A)-Warning.fm Page 1 Tuesday, June 15, 1999 2:33 PM Warnings, Cautions and Others Caution — switch! Disconnect the mains plug to shut the power off completely. The switch in any position does not disconnect the mains line. The power can be remote controlled. IMPORTANT FOR LASER PRODUCTS CAUTION To reduce the risk of electrical shocks, fire, etc.: 1 Do not remove screws, covers or cabinet. 2 Do not expose this appliance to rain or moisture.
UX-V9MD(A)-eng.fm Page 1 Tuesday, June 15, 1999 2:35 PM Thank you for purchasing the JVC Micro Component System. We hope it will be a valued addition to your home, giving you years of enjoyment. Be sure to read this instruction manual carefully before operating your new stereo system. In it you will find all the information you need to set up and use the system. If you have a query that is not answered by the manual, please contact your dealer.
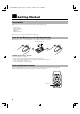
UX-V9MD(A)-eng.fm Page 2 Tuesday, June 15, 1999 2:35 PM ■ ■ Getting Started Accessories Make sure that you have all of the following items, which are supplied with the System. Power Cord (1) AM Loop Antenna (1) Remote Control (1) Batteries (2) FM Wire Antenna (1) If any of these items are missing, contact your dealer immediately. How To Put Batteries In the Remote Control Match the polarity (+ and –) on the batteries with the + and – markings in the battery compartment.
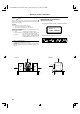
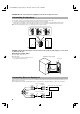
UX-V9MD(A)-eng.fm Page 3 Tuesday, June 15, 1999 2:35 PM CAUTION: Make all connections before plugging the System into an AC power outlet. Connecting the FM Antenna Rear Panel of the Unit Using the Supplied Wire Antenna FM wire antenna (supplied) OPTICAL DIGITAL IN (AUX2) Using the Coaxial Type Connector (Not Supplied) A 75-ohm antenna with coaxial type connector (IEC or DIN45 325) should be connected to the FM 75-ohm COAXIAL terminal. L R R L If reception is poor, connect the outdoor antenna.
UX-V9MD(A)-eng.fm Page 4 Tuesday, June 15, 1999 2:35 PM CAUTION: Make all connections before plugging the System into an AC power outlet. Connecting the Speakers For each speaker, connect one end of the speaker wire to the speaker terminals on the back of the System. 1. Open each of the terminals and insert the speaker wires firmly, then close the terminals. 2. Connect the red (+) and black (–) wires of the right side speaker to the red (+) and black (–) terminals marked R on the System.
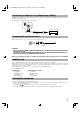
UX-V9MD(A)-eng.fm Page 5 Tuesday, June 15, 1999 2:35 PM Connecting a CD Player, etc (Digital Input (AUX2)) Unplug the cap and connect an (not supplied) optical digital cord between the System’s OPTICAL DIGITAL IN (AUX2) terminal and the output terminal of the CD player, etc. You can listen to the digital input signal from the CD player, etc. Cap CD player, etc.
UX-V9MD(A)-eng.
UX-V9MD(A)-eng.fm Page 7 Tuesday, June 15, 1999 2:35 PM Reinforcing the Bass Sound (AHB PRO) Showing the Time (DISPLAY) You can reinforce the bass sound to maintain rich, full bass at low volume (you can use this effect only for playback): To get the effect, press the AHB (Active Hyper Bass) PRO button. The “BASS” indicator lights up on the display. To cancel the effect, press the button again. The “BASS” indicator goes out.
UX-V9MD(A)-eng.
UX-V9MD(A)-eng.fm Page 9 Tuesday, June 15, 1999 2:35 PM 4. Press the UP, DOWN, >, or < button within 5 ■ seconds to select the preset number. UP or > button: Increases the preset number by 1. DOWN or < button: Decreases the preset number by 1. • When the > or < button is kept pressing, the preset number changes rapidly. 5. Press the SET button within 5 seconds. ■ “STORED” appears and after 2 seconds, the display returns to the broadcast frequency display. 6.
UX-V9MD(A)-eng.
UX-V9MD(A)-eng.fm Page 11 Tuesday, June 15, 1999 2:35 PM To stop playing the CD, press the 7 button. The following information for the CD is displayed. Total track number Total playback time To stop playing and remove the CD, press the CD OPEN/ CLOSE 0 button on the Unit or CD 0 button on the Remote Control to open the CD cover. To pause, press the CD #¥8 button. The playback time blinks on the display. To cancel pause, press the same button again. Play continues from the point where it was paused.
UX-V9MD(A)-eng.
UX-V9MD(A)-eng.fm Page 13 Tuesday, June 15, 1999 2:35 PM To Select a Track or Passage within a Track —————————————— During playback, press the 4 or ¢ (< or >) button to select the track you want. The selected track starts playing. • Press the ¢ button once to skip to the beginning of the next track. • Press the 4 button to skip to the beginning of the track being played. Press twice quickly to skip to the beginning of the previous track.
UX-V9MD(A)-eng.
UX-V9MD(A)-eng.fm Page 15 Tuesday, June 15, 1999 2:35 PM • ■ You can also start recording by pressing the MD REC button and then the MD #¥8 button. When you record a signal from a DAT through the AUX2 terminal, two track numbers (track marks) are added for one track. This is not fault. Join both tracks using the Join function. (See page 18.) 5. Press the 7 button to stop recording. ■ “UTOCwriting” appears on the display, indicating that the recording is successfully completed. Then, the MD stops.
UX-V9MD(A)-eng.fm Page 16 Tuesday, June 15, 1999 2:35 PM ■ ■ Using the MD Player (Editing) In addition to its recording and play functions, the MD Player comes with editing functions. You can divide, join, move, or erase the recorded tracks in the MD as required. Also, you can give a disc title to the MD and track titles to the tracks in the MD.
UX-V9MD(A)-eng.fm Page 17 Tuesday, June 15, 1999 2:35 PM Dividing Tracks (DIVIDE Function) ■ Use the Remote Control to carry out this function. 1. Insert an MD to be edited with its label side ■ up. 2. Press the MD #8 button and then 7 button ■ to set the function to MD. 9. Press the MD 0 button to complete editing. ■ The MD is ejected after “UTOCwriting” is displayed. • You can also complete editing operation by pressing the button to turn off the power.
UX-V9MD(A)-eng.fm Page 18 Tuesday, June 15, 1999 2:35 PM Joining Tracks (JOIN Function) ■ 3. Press the EDIT/TITLE button until “MOVE ?” ■ is displayed. The “EDIT” indicator appears on the display. Use the Remote Control to carry out this function. 1. Insert an MD to be edited with its label side up. ■ 2. Press the MD #8 button. ■ • You can also perform this function in Stop mode. EDIT /TITLE DIVIDE=JOIN=MOVE=ERASE=ALL ERASE =DISC TITLE*=TITLE=(Back to the beginning) *: Displayed in Stop mode only.
UX-V9MD(A)-eng.fm Page 19 Tuesday, June 15, 1999 2:35 PM 2. Press the MD #8 button. ■ • You can also perform this function in Stop mode. 3. Press the EDIT/TITLE button until “ERASE ?” ■ is displayed. The “EDIT” indicator appears on the display. EDIT /TITLE DIVIDE=JOIN=MOVE=ERASE =ALL ERASE =DISC TITLE*=TITLE=(Back to the beginning) *: Displayed in Stop mode only. 5. Press the EDIT/TITLE button. ■ All the tracks in the MD are erased and “BLANK DISC” is kept displayed.
UX-V9MD(A)-eng.fm Page 20 Tuesday, June 15, 1999 2:35 PM 5. Input a preferred title (up to 64 charac■ 3. Press the SET button. The letter N is now displayed in the title area. ters). Use the following buttons to input a title. [Title editing buttons and their functions] (see below) Button CHARA 4. Select “(space)” and press the SET button. 5. Press the CHARA button until the numbers are displayed. 6. Select “1” and press the SET button. The title name “N(space)1” will be displayed.
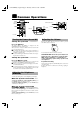
UX-V9MD(A)-eng.fm Page 21 Tuesday, June 15, 1999 2:35 PM ■ ■ Using External Equipment REMOTE CONTROL RM-RXUV9MD DIMMER DISPLAY AHB PRO SLEEP FM MODE TAPE / AUX AUTO PRESET PROGRAM RANDOM TAPE/AUX CD REPEAT STANDBY / ON BASS TREBLE CANCEL TAPE / AUX EDIT / TITLE DOWN CHARA MD BAND TUNER MULTI CONTROL CD TAPE/AUX OPEN / CLOSE CD UP MD EJECT UP SET PHONES DOWN MD TUNER BAND CD VOLUME Listening to External Equipment You can listen to external equipment.
UX-V9MD(A)-eng.
UX-V9MD(A)-eng.fm Page 23 Tuesday, June 15, 1999 2:35 PM 5. Setting the volume level. ■ 1. Press the TIMER/SNOOZE button on the Unit. The volume level set by the previous timer setting blinks on the display. 2. Press the ¢ or 4 button to select the volume level. -: The current volume level will be used. 0 to 50: When the timer is turned on, the Volume will be automatically set to the selected level.
UX-V9MD(A)-eng.fm Page 24 Tuesday, June 15, 1999 2:35 PM ■ ■ Information on MDs (Minidiscs) This is a new digital audio disc format: it has a diameter of 64 mm and enables up to 80 minutes of playback and recording. The cartridge The diameter of the disc itself is 64 mm, smaller than a CD single. The disc sits inside a 68 ✕ 72 mm cartridge, which also being pocket size, makes minidiscs extremely handy for carrying and storage.
UX-V9MD(A)-eng.fm Page 25 Tuesday, June 15, 1999 2:35 PM ■ ■ MD (Minidisc) Messages Message Meaning Action A disc has been inserted with nothing recorded on it. Except when making a new recording, replace the disc with one which has been recorded on. CANNOT JOIN You have tried to join tracks which cannot be joined. This is a limitation of the minidisc system. See “Minidisc limitations” below. DISC ERROR There is a problem (damage) with the disc. Replace the disc.
UX-V9MD(A)-eng.fm Page 26 Tuesday, June 15, 1999 2:35 PM ■ ■ Rules of Digital Dubbing The following rules regarding copyright exist for dubbing to MDs from CDs or DATs through digital terminals. SCMS (Serial Copy Management System) Minidiscs can record clear sound with low loss of quality from CDs or DATs through each component’s digital input/output terminal. However, minidiscs are set up so that a disc recorded in this way cannot be recorded onto another minidisc through digital input/output terminals.
UX-V9MD(A)-eng.fm Page 27 Tuesday, June 15, 1999 2:35 PM ■ ■ Troubleshooting • • If you are having a problem with your System, check this list for a possible solution before calling for service. If you cannot solve the problem from the hints given here, or the System has been physically damaged, call a qualified person, such as your dealer, for service. Symptom Possible Cause Action No sound is heard. • Connections are incorrect, or loose. • Poor radio reception • • • Headphones are connected.
UX-V9MD(A)-eng.fm Page 28 Tuesday, June 15, 1999 2:35 PM ■ ■ Specifications Amplifier Output Power 36 W (18 W + 18 W) at 4 ohms (Max.) 28 W (14 W + 14 W) at 4 ohms (10% THD) Input Sensitivity/Impedance (1 kHz) LINE IN (AUX1) 500 mV/65 kohms Optical In (AUX2) –24 dBm - –15 dBm Output Sensitivity/Impedance (1 kHz) LINE OUT 500 mV/4.
UX-V9MD(A)-Back cover.