
User Manual


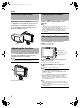
Table Of Contents

6
Setup
Mounting the Hood Cover (Provided)
1 Align the hood cover with the groove on top of
the viewfinder screen and insert from the top.
2 Secure with the screw located at the center,
below the viewfinder screen.
1 Loosen the panning and tilt lock handle to adjust
the angle of the viewfinder and secure it at an
appropriate angle for easy viewing.
Memo:
● It may be difficult to view the LCD screen at some angles.
View from the direct front angle of the screen.
1 Set the POWER switch on remote control unit or
camera to AONB, to display the image on the
viewfinder.
Memo:
● Depending on the system environment, it may take up to
10 seconds before the image is displayed.
● Select the image to display using [INPUT SOURCE] in the
[VIDEO FORMAT] menu. (Image from the camera’s
viewfinder or this viewfinder’s [SDI INPUT] terminal)
(A Page 11)
1 Turn the [BRIGHT] control to adjust the
brightness of the screen.
To brighten, turn to the right.
2 Turn the [CONTRAST] control to adjust the
contrast of the screen.
To increase the contrast, turn to the right.
3 Turn the [PEAKING] control to adjust the
peaking.
To sharpen the contour, turn to the right.
Memo:
● You can set the frequency band where the contour is
emphasized with the [PEAKING] control in
[PEAKING FREQ.] of the [SHOOTING ASSIST] menu
screen. (A Page 11)
● You can adjust the brightness of the LCD backlight using
[BACK LIGHT] in the [OTHERS] menu. (A Page 12)
● When this viewfinder is used, its display is always on
regardless of the [LCD+VF] setting in the [LCD+VF] menu
of the GY-HM790 series.
Note:
● After switching off the power on the camera or remote
control unit, wait for 10 seconds or more before turning on
the power switch again.
● Turning ON/OFF the power switch in quick succession may
cause malfunction.
Installation (continued)
Adjusting the Position
Screw
Panning
Tilt
Panning and Tilt Lock Handle
Displaying the Images
Adjusting the Picture Quality
MENU
STATUS
BRIGHT
CONTRAST
PEAKING
1:1
FOCUS
ASSIST
5
6
4
5
6
4
[BRIGHT] Control
[CONTRAST] Control
[PEAKING] Control
VF-HP790G_EN.book Page 6 Tuesday, March 26, 2013 4:06 PM