Video Management Software VN-RS800U Setup Manual LST0572-001G
Getting Started Thank you for using the VN-RS800U video management software (henceforth VN-RS800). The VN-RS800 video management software is comprised of the various groups of services that provide the different functions, the [VN-RS800Viewer] viewer application software, and the [VN-RS800Setup] setup tool. This setup manual provides descriptions on procedures to install and set up VN-RS800. Refer to the “VN-RS800 Viewer User’s Guide” on procedures to operate the viewer application.
Please carefully read this End-User License Agreement ("Agreement") before installing or using the Video Management Software [VN-RS800] ("Software") on your PC. The right to use the Software is granted by Victor Company of Japan, Limited ("JVC") to You only on the condition that You agree to the following Agreement. If You do not agree to the terms of the Agreement, you may not install the Software. INSTALLING OR USING THE SOFTWARE INDICATES YOUR ACCEPTANCE OF THESE TERMS AND CONDITIONS.
SOFTWARE. YOU WILL INDEMNIFY AND HOLD HARMLESS JVC FROM ANY LOSS, LIABILITY OR COSTS ARISING OUT OF OR IN ANY WAY CONNECTED TO CLAIMS FROM ANY OTHER PERSONS RELATING TO THE USE OF THE SOFTWARE. 6.Term This Agreement will become effective on the date when You install the Software onto Your machine, and continue to be in effect until the termination under the reasons as below: Should You breach any provision of this Agreement, JVC may terminate this Agreement without giving any notice to You.
Content 1. 2. Software Installation ..........................................................................................................................6 1.1. Setup..........................................................................................................................................6 1.2. Installation..................................................................................................................................6 1.3. Uninstallation...........................
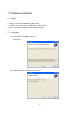
1. Software Installation 1.1. Setup * Log on as an authorized Windows administrator. * Install the new version after uninstalling the existing version. * Please uninstall VR-TS500 when VR-TS500 is installed. 1.2. Installation (1) Execute the VN-RS800U Installer.msi. Click [Next]. (2) Install by following instructions on the screen.
(3) After installation is successfully completed, the installation complete screen appears. Click [Close] to end the wizard. Installation of VN-RS800 is complete. 1.3. Uninstallation * To uninstall VN-RS800, do so using [Add or Remove Programs] of the Control Panel.
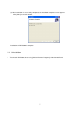
2. Software Settings 2.1. Starting Up the Setup Tool * Double-click the “RS800Setup” icon on the Desktop, or click [Start] – [All Programs] – [JVC] – [VN-RS800] – [RS800Setup]. * Upon loading the setting data, the password entry screen appears. System Password Password Entry Screen * Enter the system password, followed by clicking the “OK” button. (Set the system password according to “2.2. System Setting”.
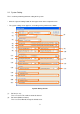
2.2. System Setting This is used for performing common setting of the system. * Click the “System Setting” button on the upper center of the setup tool screen. * The system setting screen appears, and setting can be performed as follows. (1) (2) (3) (4) (5) (6) (7) (8) (9) (10) (11) (12) (13) (14) (15) (16) (17) (18) (19) (20) (21) System Setting Screen (1) RS No. (0 – 16) This is reserved. This number cannot be altered. (2) RS Name (Within 32 letters) This is reserved.
(3) System Password (Within 8 letters) The system password is used for the startup check of the setup tool and verification of the various services. (4) Title Name (Within 32 letters) The title Name of the viewer application is displayed. (The title name of the setup tool may also be displayed.) (5) Still Image Folder This is used for setting the folder for storing still image files when saving the images from the viewer application.
(17) Log File Keeping Period (0 – 365 day[s]) The keeping period of the log file is set. If "0" is specified, the keeping period becomes unrestricted. Please set it for 1 - 365 day(s) usually. (18) Enable Alarm Sound When the alarm is received, the sound file is played back. (19) Alarm Sound File The sound file when the alarm is received is set. (20) Enable Error Sound When the error occurs, the sound file is played back. (21) Error Sound File The sound file when the error occurs is set.
2.3. Unit Registration This is used for registering the unit to be used with VN-RS800. * Select the “Unit Registration” tab. Delete Button Register Button Modify Button Unit Registration Tab Unit List When the unit registration tab is selected * Only registered units are displayed in the “Unit List”.
* To register a new unit, click the “Register” button. * The “Unit Registration” screen appears. IP Address “Next” Button Unit Type Unit Registration Screen * Enter the “IP Address” and select the “Unit Type”. * Click the “Next” button. The setting screen corresponding to the unit type is displayed, which allows setting as shown below. [For VN-E4] (4) (1) (2) (5) (3).
For entering the password for logging into the unit. (4) Unit Name (Within 32 letters) For entering the name of the unit. (5) Video CH [1 – 4] Turning on the “Use” check box enables use of the corresponding video channel. (6) Audio Monitor The audio input to VN-E4 that the check box is turned on can be monitored and be recorded on the PC side. Only one “Audio Monitor” is turned on among from Video CH1 to CH4.
[For unit types other than VN-E4] (1) (2) (3) (15) (4) (5) (6) (7) (8) (9) (10) (11) (12) (13) (14) Setting Screen for Units Other Than VN-E4 (1) IP Address For setting the IP address of the unit. (2) User Name (admin / operator / user) For entering the user name for logging into the unit. * It is displayed only for VN-V26/V686/X35. (3) Password (Within 8 letters) For entering the password for logging into the unit. * Password setting is not available for VN-C20/C215/V25.
Alarm Setting” (to be explained later). (7) Request Mode (Normal / High Speed) When "High Speed" is selected, the image is acquired in the high-speed mode. * It is displayed only for VN-C625/C655/C205. * Please note the following points when you select "High Speed". - The frame rate of the image transmitted from the camera to VN-RS800 reaches the value set by "Settings"-"View settings"-"Frame Rate" of the Web Setting screen of the unit.
* When setting is complete, click the “OK” button to close the “Unit Setting” screen. * To change the settings of a registered unit, select the unit to alter from the unit list, followed by clicking the “Modify” button. * Screens and procedures when changing settings are similar to those for unit registration. * To delete a registered unit, select the unit to delete from the unit list, followed by clicking the “Delete” button. 2.3.1.
2.4. Camera Setting * This used to perform various settings for video input units on the screen where the “Camera Setting” tab is selected. Camera Setting Tab Property Button Camera Display/Position Registration Button Up Button Down Button Camera List When the Camera Setting tab is selected * Video channels that are registered via “Unit Registration” are displayed on the “Camera List”. * The order of this list indicates the order of display on the viewer application.
2.4.1. Camera Property Setting * To alter the camera settings, select a camera, and click the “Property” button. Doing so enables setting as follows. (1) (2) (3) (4) (5) (6) Camera Property Screen (1) Live Maximum Rate (From -60 to 30 fps, except 0) Enter the maximum frame rate during live display. (2) Enable Cont. Recording Tick to enable continuous recording. (3) Cont. Recording Rate (From -60 to 30 fps, except 0) Enter the frame rate for continuous recording.
2.4.2. Camera Display/Position Registration * Select a camera from the list, followed by clicking the “Camera Display/Position Registration” button to display the “Camera Display/Position Registration” screen for checking the video images.
* To close the “Camera Display/Position Registration” screen, click the “Close” button. (Precautions) * In the case of VN-V686, the HOME position uses setting of the camera side. Each value of "Pan”, ”Tilt”, and ”Zoom" cannot be set though "Position Name" can be set. Moreover, the HOME position cannot be deleted. Refer to "Instructions" of VN-V686 for the method of setting the HOME position of the camera side. * In the case of VN-X35, "Digital PTZ function" is used in the camera control function.
2.5. Alarm Event Registration * This is used to control camera recording actions that are associated with alarm occurrences as “alarm events”. * Register alarm events on the screen where the “Alarm Event Registration” tab is selected. Delete Button Register Button Alarm Event Registration Tab Modify Button Alarm Event List When the Alarm Event Registration tab is selected * Alarm events that are registered in the “Alarm Event List” are displayed. * To add a new alarm event, click the “Register” button.
(1) (2) (4) (3) (5) Alarm Event Registration Screen (1) Alarm List Select the alarm for which recording is to be triggered. (2) Camera List Select the camera to perform recording when an alarm occurs.
Set the time for displaying the alarm message on the live screen of the viewer application. (4) Frame Rate (1 – 30 fps) Set the frame rate for alarm recording. (5) Recording Time (10 – 3600 seconds) Set the time for alarm recording. * When setting is complete, click the “Add” button to add the alarm event. * Repeat the same setting procedures to add subsequent alarm events. * When adding is complete, click the “End” button to close the “Alarm Event Registration” screen.
2.6. Schedule Registration * This is used to manage the schedule for performing automatic recording on a specified date/time. * Register the schedule on the screen where the “Schedule Registration” tab is selected. Schedule Registration Tab Delete Button Modify Button Register Button Schedule List When the Schedule Registration tab is selected * Schedules that are registered in the “Schedule List” are displayed.
* To add a new schedule, click the “Register” button. The “Schedule Registration” screen appears. Register the recording schedule by setting as follows. (1) (2) (3) (4) (6) (5) (7) Schedule Registration Screen (1) Duration Select either “Do not specify” or “Specify”. (2) Start Day Select the date for starting the scheduled action. This is enabled only when the Duration item is set to “Specify”.
Select the camera to perform the scheduled recording. * When setting is complete, click the “OK” button to close the “Schedule Registration” screen. * To change the settings of a registered schedule, select the schedule to alter from the list, followed by clicking the “Modify” button. * Screens and procedures when changing settings are similar to those for schedule registration. * To delete a registered schedule, select the schedule to delete from the list, followed by clicking the “Delete” button.
2.7. User Registration * Register the user on the screen where the “User Registration” tab is selected. * Use the user name and password registered here to start up the viewer application. User Registration Tab Delete Button Modify Button Register Button User List When the User Registration tab is selected * Users that are registered in the “User List” are displayed.
* To add a new user, click the “Register” button. The “User Registration” screen appears. Register the user by setting as follows. (1) (2) (3) (4) (5) (6) (7) User Registration Screen (1) User Name (Within 8 letters) Enter the name of the user to be registered. (2) Windows Authentication The viewer application can be started without inputting the password when the login user name of Windows is corresponding to the user name of (1).
* To delete a registered user, select the user to delete from the user list, followed by clicking the “Delete” button. 2.8. Reflection of Settings Setting Start Button * When the settings are complete, click the “Setting Start” button to reflect the settings. * Setting is complete when the “Output in progress. Please wait for a moment...” screen disappears. 2.9. Exiting the Setup Tool End Button * Use the “End” button to exit the setup tool. 2.10.
3. Other Controls 3.1. Restarting the Service * One of the emergency measures to take when system abnormalities occur, such as when images are not renewed or recorded, is to restart the various groups of services. * To restart the various groups of services, click [Start] – [All Programs] – [JVC] – [VN-RS800] – [RestartService]. 3.2. Terminating (Starting) the Service * To stop recording or transmission, such as during maintenance of the disk or network, terminate the various groups of services.
4. Backup and restoration Please kindly refer to the instruction manual of each backup software regarding the detailed procedure both backup and restoration. When you use VN-RS800 together backup software at the same time, you are strongly required to use it after evaluating the actual performance once. 4.1. Files to be backed up The search and playback of recording data at the backup are possible by backup and restoring the following files.
(The alarm data base is backed up.) ・ It is necessary to stop the service of the data base of VN-RS800 once. (Time that the alarm between a few seconds cannot record before it backs up is needed.) * Refer to 4.3 (1), (2) (Restoration and Search) ・ While VN-RS800 operation, backup data not allowed to restore, search and playback. You are strongly recommended to restore, search and playback by other PC.
VN-RS800. ・ Please execute "UninstallPlayOnly.bat" of "C:¥Program Files¥JVC¥SCoF¥bin¥" to return the regular version the VN-RS800 playback-only version. (4) Method of restarting all services ・ It is necessary to restart service to reflect the setting in service after the configuration file is restored. ・ To restart the various groups of services, click [Start] – [All Programs] – [JVC] – [VN-RS800] – [RestartService]. 4.4.
5. Operating Suggestions 5.1. Personal computer setting Do not set your computer to enter “System standby” or “System hibernates” mode when VN-RS800 is in operation. The operation of VN-RS800 during “System standby” or “System hibernates” mode is not guaranteed. The “System standby” and “System hibernates” modes can be set under the Power Options in Control Panel. 5.2.
COPYRIGHT © 2008 Victor Company of Japan, Limited 36