LT-32/26A61BJ/SJ / LCT1999-001A-U / All Cover LT-32&26A61BJSJ_Eng.
LT-32/26A61BJ/SJ / LCT1999-001A-U / English LT-32&26A61BJSJ_Eng.book Page 2 Friday, October 14, 2005 1:40 PM Warning DO NOT cut off the mains plug from this equipment. If the plug fitted is not suitable for the power points in your home or the cable is too short to reach a power point, then obtain an appropriate safety approved extension lead or adaptor or consult your dealer.
LT-32/26A61BJ/SJ / LCT1999-001A-U / English LT-32&26A61BJSJ_Eng.book Page 1 Friday, October 14, 2005 1:40 PM Thank you for buying this JVC LCD flat television. To make sure you understand how to use your new TV, please read this manual thoroughly before you begin. (“LCD” stands for Liquid Crystal Display.) WARNING: TO PREVENT FIRE OR SHOCK HAZARD, DO NOT EXPOSE THIS APPLIANCE TO RAIN OR MOISTURE. WARNING • The TV may fall causing injuries.
LT-32/26A61BJ/SJ / LCT1999-001A-U / English LT-32&26A61BJSJ_Eng.book Page 2 Friday, October 14, 2005 1:40 PM Failure to take the following precautions may cause damage to the television or remote control. DO NOT block the TV’s ventilation openings or holes. (If the ventilation openings or holes are blocked by a newspaper or cloth, etc., the heat may not be able to get out.) DO NOT place anything on top of the TV. (such as cosmetics or medicines, flower vases, potted plants, cups, etc.
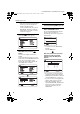
LT-32/26A61BJ/SJ / LCT1999-001A-U / English LT-32&26A61BJSJ_Eng.book Page 3 Friday, October 14, 2005 1:40 PM CONTENTS Setting up your TV ...................................4 PICTURE menu ...................................... 25 Installation.................................................. 4 Using the stand .......................................... 4 Removing the terminal cover ..................... 5 Connecting the aerial and video cassette recorder (VCR) .......................................
LT-32/26A61BJ/SJ / LCT1999-001A-U / English LT-32&26A61BJSJ_Eng.book Page 4 Friday, October 14, 2005 1:40 PM Setting up your TV • When you install the TV on the wall, only use a JVC wall mounting unit (optional) which is designed for this TV. • Make sure that the TV is installed on the wall by a skilled installer. Installation Cautions for installation • Install the TV in a corner on a wall or on the floor so as to keep cords out of the way. • The TV will generate a slight amount of heat during operation.
LT-32/26A61BJ/SJ / LCT1999-001A-U / English LT-32&26A61BJSJ_Eng.book Page 5 Friday, October 14, 2005 1:40 PM Setting up your TV Removing the terminal cover There are connection terminals behind the cover on the rear of the TV. Remove the cover before connecting an antenna or VCR. Remove the cover by removing the hooks. When replacing the cover, place the side of the cover against the TV and insert the hooks. • Leave the cover off if they do not fit properly. Do not force to replace the cover.
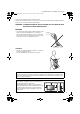
LT-32/26A61BJ/SJ / LCT1999-001A-U / English LT-32&26A61BJSJ_Eng.book Page 6 Friday, October 14, 2005 1:40 PM Setting up your TV Connecting the aerial and video cassette recorder (VCR) • The connecting cables are not provided. • For further details, refer to the manuals provided with the devices to be connected. Caution • Turn off all the equipment including the TV before connecting anything. If you are connecting a VCR, follow A → B → C in the diagram opposite.
LT-32/26A61BJ/SJ / LCT1999-001A-U / English LT-32&26A61BJSJ_Eng.book Page 7 Friday, October 14, 2005 1:40 PM Setting up your TV Connecting the power cord to the AC outlet Insert the AC plug on the power cord from the TV into an AC outlet. Caution Initial settings When the TV is first turned on, it goes into the initial settings mode, and you will see the JVC logo. Follow the instructions on the screen display to make the initial settings.
LT-32/26A61BJ/SJ / LCT1999-001A-U / English LT-32&26A61BJSJ_Eng.book Page 8 Friday, October 14, 2005 1:40 PM Setting up your TV • If the JVC logo does not appear this is because your TV has already been turned on for the first time: use the “LANGUAGE” and “AUTO PROGRAM” functions to make the initial settings. For details, see “SET UP menu” on page 32. 3 Press the a button The LANGUAGE menu appears.
LT-32/26A61BJ/SJ / LCT1999-001A-U / English LT-32&26A61BJSJ_Eng.book Page 9 Friday, October 14, 2005 1:40 PM Setting up your TV 7 Press the a button to display the T-V LINK menu T-V LINK DOWNLOAD TV RECORDING DEVICE EXIT OK For users in the UK: If you have any problems setting up your new TV, please call the Helpline on 0870 330 5000. For users in the Republic of Ireland: If you have any problems setting up your new TV, please call the Helpline on 1890-582500.
LT-32/26A61BJ/SJ / LCT1999-001A-U / English LT-32&26A61BJSJ_Eng.book Page 10 Friday, October 14, 2005 1:40 PM Setting up your TV Downloading the data to VCR You can transmit to the latest Programme numbers (PR) data to a VCR with the T-V LINK function. Caution • This only works when a T-V LINK compatible VCR is connected to the EXT-2 terminal. • This only works when the T-V LINK menu is being displayed.
LT-32/26A61BJ/SJ / LCT1999-001A-U / English LT-32&26A61BJSJ_Eng.book Page 11 Friday, October 14, 2005 1:40 PM Setting up your TV Pre-set download The VCR will automatically download the registered data on the TV channels from the TV. This means you do not need to set up the program channels on your VCR manually. The preset download function automatically begins when the initial setting is complete or whenever you carry out the AUTO PROGRAM or EDIT/MANUAL functions.
LT-32/26A61BJ/SJ / LCT1999-001A-U / English LT-32&26A61BJSJ_Eng.book Page 12 Friday, October 14, 2005 1:40 PM TV buttons and functions Turn the TV on from standby mode Press the A button or the P p buttons to turn the TV on from standby mode. When the TV is turned on, the power lamp lights blue. To turn the TV off: Press the A button again. The power lamp goes off. Caution • The A button on the TV does not fully isolate the TV from the AC supply.
LT-32/26A61BJ/SJ / LCT1999-001A-U / English LT-32&26A61BJSJ_Eng.book Page 13 Friday, October 14, 2005 1:40 PM TV buttons and functions Adjust the volume Press the r (Volume) q buttons The volume level indicator appears. Using the Menu Use the MENU/OK button Refer to “Using the TV’s menu” (see page 24) for details of using the menu.
LT-32/26A61BJ/SJ / LCT1999-001A-U / English LT-32&26A61BJSJ_Eng.
LT-32/26A61BJ/SJ / LCT1999-001A-U / English LT-32&26A61BJSJ_Eng.book Page 15 Friday, October 14, 2005 1:40 PM Remote control buttons and functions Choose a TV channel and watch images from external devices Use the number buttons: Enter the programme number (PR) of the channel using the number buttons. Example: • PR 6 → press 6 • PR 12 → press 1 and 2 Use the p p buttons: Press the p p buttons to choose the programme number (PR) you want or an EXT terminal.
LT-32/26A61BJ/SJ / LCT1999-001A-U / English LT-32&26A61BJSJ_Eng.book Page 16 Friday, October 14, 2005 1:40 PM Remote control buttons and functions Adjust the volume Press the r q buttons to adjust the volume. The volume level indicator appears and the volume changes as you press the r q buttons. Muting the sound Press the l (muting) button to turn off the sound. Pressing the l (muting) button again restores the previous volume level.
LT-32/26A61BJ/SJ / LCT1999-001A-U / English LT-32&26A61BJSJ_Eng.book Page 17 Friday, October 14, 2005 1:40 PM Remote control buttons and functions ZOOM function You can change the screen size according to the picture aspect ratio. Choose the optimum one from the following ZOOM modes. • The ZOOM mode is fixed at FULL when you are using the TV as a PC screen.
LT-32/26A61BJ/SJ / LCT1999-001A-U / English LT-32&26A61BJSJ_Eng.book Page 18 Friday, October 14, 2005 1:40 PM Remote control buttons and functions Adjusting the visible area of the picture If subtitles or the top (or bottom) of the picture are cut off, you can adjust the visible area of the picture manually. 1 Press the c button The ZOOM menu appears. 2 Press the a button to display the ZOOM mode indicator The indicator appears.
LT-32/26A61BJ/SJ / LCT1999-001A-U / English LT-32&26A61BJSJ_Eng.book Page 19 Friday, October 14, 2005 1:40 PM Remote control buttons and functions Favourite channel function You can register your favourite TV channels (PR 1 – PR 99) in the number buttons 1 to 4. After registering, the channel can be called by pressing the d (favourite) button and a number button 1 to 4.
LT-32/26A61BJ/SJ / LCT1999-001A-U / English LT-32&26A61BJSJ_Eng.book Page 20 Friday, October 14, 2005 1:40 PM Remote control buttons and functions Operating a JVC brand VCR or DVD player These buttons will operate a JVC brand VCR or DVD player. Pressing a button that looks the same as the device’s original remote control button has the same effect as the original remote control. 1 Set the VCR/TV/DVD Switch to the VCR or DVD position VCR: When you are operating the VCR, set the switch to the VCR position.
LT-32/26A61BJ/SJ / LCT1999-001A-U / English LT-32&26A61BJSJ_Eng.
LT-32/26A61BJ/SJ / LCT1999-001A-U / English LT-32&26A61BJSJ_Eng.book Page 22 Friday, October 14, 2005 1:40 PM Teletext function 2 Press a colour button to choose a position. Then press the number buttons to enter the page number Sub-page Some teletext pages include sub-pages that are automatically displayed. You can hold any sub-page, or view it at any time.
LT-32/26A61BJ/SJ / LCT1999-001A-U / English LT-32&26A61BJSJ_Eng.book Page 23 Friday, October 14, 2005 1:40 PM Teletext function Index You can return to the index page instantly. Press the G (Index) button Returns to page 100 or a previously specified page. Cancel You can search for a teletext page while watching TV. 1 Press the number button to enter a page number, or press a colour button The TV searches for a teletext page. 2 Press H (Cancel) button The TV programme appears.
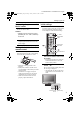
LT-32/26A61BJ/SJ / LCT1999-001A-U / English LT-32&26A61BJSJ_Eng.book Page 24 Friday, October 14, 2005 1:40 PM Using the TV’s menu This TV has a number of functions you can operate using menus. To use all your TV’s functions, you need to understand the basic menu operating techniques fully. Types of menu D0106 Buttons used to operate the menus D0107 D0108 D0109 PICTURE menu Choose to set the screen settings. SOUND menu Choose to set the sound settings.
LT-32/26A61BJ/SJ / LCT1999-001A-U / English LT-32&26A61BJSJ_Eng.book Page 25 Friday, October 14, 2005 1:40 PM PICTURE menu BRIGHT-1 PICTURE PICTURE MODE BRIGHT-1 CONTRAST BRIGHT-2 SHARP COLOUR HUE COLOUR TEMP. FEATURES STANDARD You can adjust the back light. 2 : darker 3 : brighter COOL RESET OK D0014-EN • While the PICTURE menu is displayed, pressing the blue button will set the BRIGHT-1, CONTRAST, BRIGHT-2, SHARP, COLOUR, HUE settings to their default settings.
LT-32/26A61BJ/SJ / LCT1999-001A-U / English LT-32&26A61BJSJ_Eng.book Page 26 Friday, October 14, 2005 1:40 PM PICTURE menu COOL: A bluish white. Using this mode when watching bright pictures allows you to enjoy a more vivid and bright picture. NORMAL: The normal white colour. WARM: A reddish white. Using this mode when watching films allows you to enjoy colours that are characteristic of films. COLOUR SYSTEM The colour system is chosen automatically.
LT-32/26A61BJ/SJ / LCT1999-001A-U / English LT-32&26A61BJSJ_Eng.book Page 27 Friday, October 14, 2005 1:40 PM PICTURE menu 4:3 AUTO ASPECT You can choose one of three ZOOM modes, REGULAR, PANORAMIC or 14:9 ZOOM, as the ZOOM mode for the normal picture (4:3 aspect ratio).
LT-32/26A61BJ/SJ / LCT1999-001A-U / English LT-32&26A61BJSJ_Eng.book Page 28 Friday, October 14, 2005 1:40 PM SOUND menu BALANCE SOUND STEREO/ BASS TREBLE BALANCE 3D SOUND OFF OK D0019-EN • When the headphones are connected, only “STEREO / I • II” can be used. STEREO / I • II When you are viewing a bilingual broadcast programme, you can choose the sound from Bilingual I (Sub I) or Bilingual II (Sub II).
LT-32/26A61BJ/SJ / LCT1999-001A-U / English LT-32&26A61BJSJ_Eng.book Page 29 Friday, October 14, 2005 1:40 PM FEATURES menu FEATURES SLEEP TIMER CHILD LOCK APPEARANCE BLUE BACK FAVOURITE SETTING TYPE A ON To cancel the SLEEP TIMER function: Press the 2 button to set the period of time to “OFF”. CHILD LOCK OK D0023-EN SLEEP TIMER You can set the TV to automatically turn off after a set period of time. 1 Choose SLEEP TIMER. Then press the a or 3 button A Sub-menu of the SLEEP TIMER function appears.
LT-32/26A61BJ/SJ / LCT1999-001A-U / English LT-32&26A61BJSJ_Eng.book Page 30 Friday, October 14, 2005 1:40 PM FEATURES menu 4 Press the 6 buttons to choose a TV channel Every time you press the 6 buttons, the Programme number (PR) changes, and the picture of the TV channel registered in the Programme number (PR) is displayed on the screen. 5 Press the blue button and set the CHILD LOCK function. Then press the a button n (CHILD LOCK) appears and the TV channel is locked.
LT-32/26A61BJ/SJ / LCT1999-001A-U / English LT-32&26A61BJSJ_Eng.book Page 31 Friday, October 14, 2005 1:40 PM FEATURES menu FAVOURITE SETTING Chose when deleting the favourite channels registered in the buttons 1 to 4. 1 Choose FAVOURITE SETTING, then press the a or 3 button The FAVOURITE SETTING menu appears.
LT-32/26A61BJ/SJ / LCT1999-001A-U / English LT-32&26A61BJSJ_Eng.book Page 32 Friday, October 14, 2005 1:40 PM SET UP menu EDIT/MANUAL SET UP AUTO PROGRAM EDIT/MANUAL LANGUAGE DECODER(EXT-2) EXT SETTING OFF OK D0029-EN AUTO PROGRAM You can again perform the AUTO PROGRAM function TV channel automatic registration which was performed in the “Initial settings” (page 7). 1 Choose AUTO PROGRAM, then press the a or 3 button The COUNTRY menu appears as a submenu of the AUTO PROGRAM function.
LT-32/26A61BJ/SJ / LCT1999-001A-U / English LT-32&26A61BJSJ_Eng.book Page 33 Friday, October 14, 2005 1:40 PM SET UP menu • Using the MANUAL function for a TV channel for which the DECODER (EXT-2) function has been set to ON returns the setting of the DECODER (EXT-2) function for that channel to OFF. • When a TV channel has already been registered in PR 99, using the INSERT function deletes that TV channel. Basic operation 1 Choose EDIT/MANUAL, then press the a or 3 button The EDIT menu appears.
LT-32/26A61BJ/SJ / LCT1999-001A-U / English LT-32&26A61BJSJ_Eng.
LT-32/26A61BJ/SJ / LCT1999-001A-U / English LT-32&26A61BJSJ_Eng.
LT-32/26A61BJ/SJ / LCT1999-001A-U / English LT-32&26A61BJSJ_Eng.book Page 36 Friday, October 14, 2005 1:40 PM SET UP menu 4 Press the green or red button to search for a TV channel Scanning stops when the TV finds a TV channel. Then the TV channel is displayed. 5 Press the green or red button repeatedly until the TV channel you want appears If the TV channel reception is poor: Press the blue or yellow button to finetune the TV channel.
LT-32/26A61BJ/SJ / LCT1999-001A-U / English LT-32&26A61BJSJ_Eng.book Page 37 Friday, October 14, 2005 1:40 PM SET UP menu 6 Turn on the VCR, and then press the a button to transmit the data to VCR The T-V LINK menu disappears once the data transmission ends.
LT-32/26A61BJ/SJ / LCT1999-001A-U / English LT-32&26A61BJSJ_Eng.book Page 38 Friday, October 14, 2005 1:40 PM SET UP menu 1 Press the 5 or 6 buttons to choose an EXT terminal > EXT SETTING EXT-1 DUBBING EXT-2 EXT-3 TV DUBBING You can choose a signal source to be output from the EXT-2 terminal. You can do this with the output signals of the devices connected to other EXT terminals, or with the picture and sound from a TV channel you are currently viewing.
LT-32/26A61BJ/SJ / LCT1999-001A-U / English LT-32&26A61BJSJ_Eng.book Page 39 Friday, October 14, 2005 1:40 PM SET UP menu • During dubbing, you cannot turn off the TV. Turning off the TV also turns off the output from the EXT-2 terminal. • When you choose an EXT terminal as an output, you can view a TV programme or a picture from the other EXT terminal while dubbing the picture from a device connected to the EXT terminal onto a VCR connected to the EXT-2 terminal.
LT-32/26A61BJ/SJ / LCT1999-001A-U / English LT-32&26A61BJSJ_Eng.book Page 40 Friday, October 14, 2005 1:40 PM Additional preparation Connecting external equipment Connect the equipment to the TV, making the correct rear panel and front panel connections. Before connecting anything: • Read the manuals that came with the equipment. Depending on the equipment, the connection method may be different from the diagram. Also, the equipment settings may need to change depending on the connection method.
LT-32/26A61BJ/SJ / LCT1999-001A-U / English LT-32&26A61BJSJ_Eng.
LT-32/26A61BJ/SJ / LCT1999-001A-U / English LT-32&26A61BJSJ_Eng.book Page 42 Friday, October 14, 2005 1:40 PM Additional preparation Equipment which can output the S-VIDEO signal (Y/C signal) such as an S-VHS VCR Connect the equipment to an EXT-2 terminal. You can choose between an S-VIDEO signal (Y/C signal) and a regular video signal (composite signal). For details of how to operate the equipment, see “S-IN (S-VIDEO input)” on page 37.
LT-32/26A61BJ/SJ / LCT1999-001A-U / English LT-32&26A61BJSJ_Eng.book Page 43 Friday, October 14, 2005 1:40 PM Additional preparation This TV is compatible with the following PC signals. Resolution Vertical frequency (Hz) Horizontal frequency (kHz) 640 × 480 (VGA) 60.0 31.5 1024 × 768 (XGA) 60.0 42.0 • Only the above formats are supported. • Even with the above formats and at 60 Hz, some problems may be experienced depending on the quality of the synchronous signal.
LT-32/26A61BJ/SJ / LCT1999-001A-U / English LT-32&26A61BJSJ_Eng.book Page 44 Friday, October 14, 2005 1:40 PM CH/CC numbers When you want to use the INSERT function on page 35, find the CH/CC number corresponding to the Channel number of the TV channel from this table.
LT-32/26A61BJ/SJ / LCT1999-001A-U / English LT-32&26A61BJSJ_Eng.book Page 45 Friday, October 14, 2005 1:40 PM CH/CC numbers • When two CH/CC numbers correspond to one Channel number, choose either one according to the current COUNTRY setting. When the COUNTRY setting is other than FRANCE, choose a two-digit CH/CC number. When the COUNTRY setting is FRANCE, choose a three-digit CH/ CC number.
LT-32/26A61BJ/SJ / LCT1999-001A-U / English LT-32&26A61BJSJ_Eng.book Page 46 Friday, October 14, 2005 1:40 PM Troubleshooting If a problem arises while you are using the TV, please read this troubleshooting guide carefully before you ask to have the TV repaired. You may be able to fix it easily by yourself. For example, if the mains plug is disconnected from the mains outlet, or the TV aerial has problems, you may think there is a problem with the TV itself.
LT-32/26A61BJ/SJ / LCT1999-001A-U / English LT-32&26A61BJSJ_Eng.book Page 47 Friday, October 14, 2005 1:40 PM Troubleshooting • Videotaping teletext is not recommended because it may not record correctly. • When viewing images from commercially available video software products, or videos from videotapes which have been recorded improperly, the top of the image may be distorted. This is due to the condition of the video signal. There is nothing wrong with the TV.
LT-32/26A61BJ/SJ / LCT1999-001A-U / English LT-32&26A61BJSJ_Eng.book Page 48 Friday, October 14, 2005 1:40 PM Troubleshooting • The top of the TV and the screen may become hot during use but this has no affect on the performance of the TV. Make sure that the ventilation holes are not blocked. • When the picture is unstable, the screen may become white for a moment. This happens when the signal which drives the liquid crystal is missing. This is not a fault.
LT-32/26A61BJ/SJ / LCT1999-001A-U / English LT-32&26A61BJSJ_Eng.
LT-32A62/26A63BJ/SJ / LCT1999-001A-U / All Cover Cover4.
LT-32/26A61BU/SU / LCT1996-001A-U / All Cover LCT1996-001A-U_Cover.
LT-32/26A61BU/SU / LCT1996-001A-U / English LT-32&26A61BUSU_Eng.book Page 1 Tuesday, October 11, 2005 6:07 PM Thank you for buying this JVC LCD flat television. To make sure you understand how to use your new TV, please read this manual thoroughly before you begin. (“LCD” stands for Liquid Crystal Display.) WARNING: TO PREVENT FIRE OR SHOCK HAZARD, DO NOT EXPOSE THIS APPLIANCE TO RAIN OR MOISTURE. WARNING ENGLISH • The TV may fall causing injuries.
LT-32/26A61BU/SU / LCT1996-001A-U / English LT-32&26A61BUSU_Eng.book Page 2 Tuesday, October 11, 2005 6:07 PM Failure to take the following precautions may cause damage to the television or remote control. DO NOT block the TV’s ventilation openings or holes. (If the ventilation openings or holes are blocked by a newspaper or cloth, etc., the heat may not be able to get out.) DO NOT place anything on top of the TV. (such as cosmetics or medicines, flower vases, potted plants, cups, etc.
LT-32/26A61BU/SU / LCT1996-001A-U / English LT-32&26A61BUSU_Eng.book Page 3 Tuesday, October 11, 2005 6:07 PM CONTENTS PICTURE menu ...................................... 25 Installation.................................................. 4 Using the stand .......................................... 4 Removing the terminal cover ..................... 5 Connecting the aerial and video cassette recorder (VCR) ....................................... 6 Connecting the power cord to the AC outlet..................
LT-32/26A61BU/SU / LCT1996-001A-U / English LT-32&26A61BUSU_Eng.book Page 4 Tuesday, October 11, 2005 6:07 PM Setting up your TV • When you install the TV on the wall, only use a JVC wall mounting unit (optional) which is designed for this TV. • Make sure that the TV is installed on the wall by a skilled installer. Installation Cautions for installation • Install the TV in a corner on a wall or on the floor so as to keep cords out of the way.
LT-32/26A61BU/SU / LCT1996-001A-U / English LT-32&26A61BUSU_Eng.book Page 5 Tuesday, October 11, 2005 6:07 PM Setting up your TV Removing the terminal cover There are connection terminals behind the cover on the rear of the TV. Remove the cover before connecting an antenna or VCR. ENGLISH Remove the cover by removing the hooks. When replacing the cover, place the side of the cover against the TV and insert the hooks. • Leave the cover off if they do not fit properly. Do not force to replace the cover.
LT-32/26A61BU/SU / LCT1996-001A-U / English LT-32&26A61BUSU_Eng.book Page 6 Tuesday, October 11, 2005 6:07 PM Setting up your TV Connecting the aerial and video cassette recorder (VCR) • The connecting cables are not provided. • For further details, refer to the manuals provided with the devices to be connected. Caution • Turn off all the equipment including the TV before connecting anything. If you are connecting a VCR, follow A → B → C in the diagram opposite.
LT-32/26A61BU/SU / LCT1996-001A-U / English LT-32&26A61BUSU_Eng.book Page 7 Tuesday, October 11, 2005 6:07 PM Setting up your TV Connecting the power cord to the AC outlet Insert the AC plug on the power cord from the TV into an AC outlet. Caution Initial settings When the TV is first turned on, it goes into the initial settings mode, and you will see the JVC logo. Follow the instructions on the screen display to make the initial settings.
LT-32/26A61BU/SU / LCT1996-001A-U / English LT-32&26A61BUSU_Eng.book Page 8 Tuesday, October 11, 2005 6:07 PM Setting up your TV • If the JVC logo does not appear this is because your TV has already been turned on for the first time: use the “LANGUAGE” and “AUTO PROGRAM” functions to make the initial settings. For details, see “SET UP menu” on page 32. 3 Press the a button The LANGUAGE menu appears.
LT-32/26A61BU/SU / LCT1996-001A-U / English LT-32&26A61BUSU_Eng.book Page 9 Tuesday, October 11, 2005 6:07 PM Setting up your TV 7 Press the a button to display the T-V LINK menu T-V LINK DOWNLOAD TV RECORDING DEVICE D0005-EN If you do not have a T-V LINK compatible VCR connected: Press the b button to exit the T-V LINK menu. The T-V LINK menu disappears.
LT-32/26A61BU/SU / LCT1996-001A-U / English LT-32&26A61BUSU_Eng.book Page 10 Tuesday, October 11, 2005 6:07 PM Setting up your TV Downloading the data to VCR You can transmit to the latest Programme numbers (PR) data to a VCR with the T-V LINK function. Caution • This only works when a T-V LINK compatible VCR is connected to the EXT-2 terminal. • This only works when the T-V LINK menu is being displayed.
LT-32/26A61BU/SU / LCT1996-001A-U / English LT-32&26A61BUSU_Eng.book Page 11 Tuesday, October 11, 2005 6:07 PM Setting up your TV Pre-set download When “FEATURE NOT AVAILABLE” is displayed: If “FEATURE NOT AVAILABLE” is displayed, the download was not performed correctly. Before trying to download again, check that: • the VCR power is turned on • the VCR is T-V LINK compatible • the VCR is connected to the EXT-2 terminal • the SCART cable is fully wired.
LT-32/26A61BU/SU / LCT1996-001A-U / English Body_Eng.fm Page 12 Thursday, October 20, 2005 1:22 PM TV buttons and functions Turn the TV on from standby mode Press the A button or the P p buttons to turn the TV on from standby mode. When the TV is turned on, the power lamp lights blue. To turn the TV off: Press the A button again. The power lamp goes off. Caution • The A button on the TV does not fully isolate the TV from the AC supply.
LT-32/26A61BU/SU / LCT1996-001A-U / English LT-32&26A61BUSU_Eng.book Page 13 Tuesday, October 11, 2005 6:07 PM TV buttons and functions Adjust the volume Press the r (Volume) q buttons The volume level indicator appears. Using the Menu ENGLISH Use the MENU/OK button Refer to “Using the TV’s menu” (see page 24) for details of using the menu.
LT-32/26A61BU/SU / LCT1996-001A-U / English LT-32&26A61BUSU_Eng.
LT-32/26A61BU/SU / LCT1996-001A-U / English LT-32&26A61BUSU_Eng.book Page 15 Tuesday, October 11, 2005 6:07 PM Remote control buttons and functions Choose a TV channel and watch images from external devices Example: • PR 6 → press 6 • PR 12 → press 1 and 2 Use the p p buttons: Press the p p buttons to choose the programme number (PR) you want or an EXT terminal. Use the AV button: Press the AV button to choose an EXT terminal.
LT-32/26A61BU/SU / LCT1996-001A-U / English LT-32&26A61BUSU_Eng.book Page 16 Tuesday, October 11, 2005 6:07 PM Remote control buttons and functions Adjust the volume Press the r q buttons to adjust the volume. The volume level indicator appears and the volume changes as you press the r q buttons. Muting the sound Press the l (muting) button to turn off the sound. Pressing the l (muting) button again restores the previous volume level.
LT-32/26A61BU/SU / LCT1996-001A-U / English LT-32&26A61BUSU_Eng.book Page 17 Tuesday, October 11, 2005 6:07 PM Remote control buttons and functions ZOOM function You can change the screen size according to the picture aspect ratio. Choose the optimum one from the following ZOOM modes. • The ZOOM mode is fixed at FULL when you are using the TV as a PC screen. REGULAR: Use to view a normal picture (4:3 aspect ratio) as this is its original shape.
LT-32/26A61BU/SU / LCT1996-001A-U / English LT-32&26A61BUSU_Eng.book Page 18 Tuesday, October 11, 2005 6:07 PM Remote control buttons and functions Adjusting the visible area of the picture If subtitles or the top (or bottom) of the picture are cut off, you can adjust the visible area of the picture manually. 1 Press the c button The ZOOM menu appears. 2 Press the a button to display the ZOOM mode indicator The indicator appears.
LT-32/26A61BU/SU / LCT1996-001A-U / English LT-32&26A61BUSU_Eng.book Page 19 Tuesday, October 11, 2005 6:07 PM Remote control buttons and functions Favourite channel function You can register your favourite TV channels (PR 1 – PR 99) in the number buttons 1 to 4. After registering, the channel can be called by pressing the d (favourite) button and a number button 1 to 4.
LT-32/26A61BU/SU / LCT1996-001A-U / English LT-32&26A61BUSU_Eng.book Page 20 Tuesday, October 11, 2005 6:07 PM Remote control buttons and functions Operating a JVC brand VCR or DVD player These buttons will operate a JVC brand VCR or DVD player. Pressing a button that looks the same as the device’s original remote control button has the same effect as the original remote control. 1 Set the VCR/TV/DVD Switch to the VCR or DVD position VCR: When you are operating the VCR, set the switch to the VCR position.
LT-32/26A61BU/SU / LCT1996-001A-U / English LT-32&26A61BUSU_Eng.book Page 21 Tuesday, October 11, 2005 6:07 PM Teletext function VCR/TV/ DVD 1 Choose a TV channel with a teletext broadcast 2 Set the VCR/TV/DVD switch to the TV position 3 Press g (Text) button to display the teletext Pressing g (Text) button changes the mode as follows: TEXT --TEXT --- To return to the TV mode: Press the b button or g (Text) button.
LT-32/26A61BU/SU / LCT1996-001A-U / English LT-32&26A61BUSU_Eng.book Page 22 Tuesday, October 11, 2005 6:07 PM Teletext function 2 Press a colour button to choose a position. Then press the number buttons to enter the page number Sub-page Some teletext pages include sub-pages that are automatically displayed. You can hold any sub-page, or view it at any time.
LT-32/26A61BU/SU / LCT1996-001A-U / English LT-32&26A61BUSU_Eng.book Page 23 Tuesday, October 11, 2005 6:07 PM Teletext function Index You can return to the index page instantly. Press the G (Index) button Returns to page 100 or a previously specified page. You can search for a teletext page while watching TV. ENGLISH Cancel 1 Press the number button to enter a page number, or press a colour button The TV searches for a teletext page. 2 Press H (Cancel) button The TV programme appears.
LT-32/26A61BU/SU / LCT1996-001A-U / English LT-32&26A61BUSU_Eng.book Page 24 Tuesday, October 11, 2005 6:07 PM Using the TV’s menu This TV has a number of functions you can operate using menus. To use all your TV’s functions, you need to understand the basic menu operating techniques fully. Types of menu D0106 Buttons used to operate the menus D0107 D0108 D0109 PICTURE menu Choose to set the screen settings. SOUND menu Choose to set the sound settings.
LT-32/26A61BU/SU / LCT1996-001A-U / English LT-32&26A61BUSU_Eng.book Page 25 Tuesday, October 11, 2005 6:07 PM PICTURE menu BRIGHT-1 PICTURE PICTURE MODE BRIGHT-1 CONTRAST BRIGHT-2 SHARP COLOUR HUE COLOUR TEMP. FEATURES STANDARD You can adjust the back light. 2 : darker 3 : brighter COOL D0014-EN • While the PICTURE menu is displayed, pressing the blue button will set the BRIGHT-1, CONTRAST, BRIGHT-2, SHARP, COLOUR, HUE settings to their default settings.
LT-32/26A61BU/SU / LCT1996-001A-U / English LT-32&26A61BUSU_Eng.book Page 26 Tuesday, October 11, 2005 6:07 PM PICTURE menu COOL: A bluish white. Using this mode when watching bright pictures allows you to enjoy a more vivid and bright picture. NORMAL: The normal white colour. WARM: A reddish white. Using this mode when watching films allows you to enjoy colours that are characteristic of films. COLOUR SYSTEM The colour system is chosen automatically.
LT-32/26A61BU/SU / LCT1996-001A-U / English LT-32&26A61BUSU_Eng.book Page 27 Tuesday, October 11, 2005 6:07 PM PICTURE menu 4:3 AUTO ASPECT You can choose one of three ZOOM modes, REGULAR, PANORAMIC or 14:9 ZOOM, as the ZOOM mode for the normal picture (4:3 aspect ratio).
LT-32/26A61BU/SU / LCT1996-001A-U / English LT-32&26A61BUSU_Eng.book Page 28 Tuesday, October 11, 2005 6:07 PM SOUND menu BALANCE SOUND STEREO/ BASS TREBLE BALANCE 3D SOUND OFF OK D0019-EN • When the headphones are connected, only “STEREO / I • II” can be used. STEREO / I • II When you are viewing a bilingual broadcast programme, you can choose the sound from Bilingual I (Sub I) or Bilingual II (Sub II).
LT-32/26A61BU/SU / LCT1996-001A-U / English LT-32&26A61BUSU_Eng.book Page 29 Tuesday, October 11, 2005 6:07 PM FEATURES menu FEATURES SLEEP TIMER CHILD LOCK APPEARANCE BLUE BACK FAVOURITE SETTING TYPE A ON To cancel the SLEEP TIMER function: Press the 2 button to set the period of time to “OFF”. CHILD LOCK OK SLEEP TIMER You can set the TV to automatically turn off after a set period of time. 1 Choose SLEEP TIMER. Then press the a or 3 button A Sub-menu of the SLEEP TIMER function appears.
LT-32/26A61BU/SU / LCT1996-001A-U / English LT-32&26A61BUSU_Eng.book Page 30 Tuesday, October 11, 2005 6:07 PM FEATURES menu 4 Press the 6 buttons to choose a TV channel Every time you press the 6 buttons, the Programme number (PR) changes, and the picture of the TV channel registered in the Programme number (PR) is displayed on the screen. 5 Press the blue button and set the CHILD LOCK function. Then press the a button n (CHILD LOCK) appears and the TV channel is locked.
LT-32/26A61BU/SU / LCT1996-001A-U / English LT-32&26A61BUSU_Eng.book Page 31 Tuesday, October 11, 2005 6:07 PM FEATURES menu FAVOURITE SETTING Chose when deleting the favourite channels registered in the buttons 1 to 4. FAVOURITE SETTING 1 PR 07 2 PR 01 3 PR 01 4 PR 01 ENGLISH 1 Choose FAVOURITE SETTING, then press the a or 3 button The FAVOURITE SETTING menu appears.
LT-32/26A61BU/SU / LCT1996-001A-U / English LT-32&26A61BUSU_Eng.book Page 32 Tuesday, October 11, 2005 6:07 PM SET UP menu EDIT/MANUAL SET UP AUTO PROGRAM EDIT/MANUAL LANGUAGE DECODER(EXT-2) EXT SETTING OFF OK D0029-EN AUTO PROGRAM You can again perform the AUTO PROGRAM function TV channel automatic registration which was performed in the “Initial settings” (page 7). 1 Choose AUTO PROGRAM, then press the a or 3 button The COUNTRY menu appears as a submenu of the AUTO PROGRAM function.
LT-32/26A61BU/SU / LCT1996-001A-U / English LT-32&26A61BUSU_Eng.book Page 33 Tuesday, October 11, 2005 6:07 PM SET UP menu Basic operation 1 Choose EDIT/MANUAL, then press the a or 3 button The EDIT menu appears.
LT-32/26A61BU/SU / LCT1996-001A-U / English LT-32&26A61BUSU_Eng.
LT-32/26A61BU/SU / LCT1996-001A-U / English LT-32&26A61BUSU_Eng.book Page 35 Tuesday, October 11, 2005 6:07 PM SET UP menu INSERT MANUAL 1 Press the 6 buttons to choose a programme number (PR) for a new TV channel 2 Press the green button and start the INSERT function 2 Press the blue button to activate the MANUAL function At the right side following the CH/CC number, the SYSTEM (broadcasting system) of the TV channel appears.
LT-32/26A61BU/SU / LCT1996-001A-U / English LT-32&26A61BUSU_Eng.book Page 36 Tuesday, October 11, 2005 6:07 PM SET UP menu 4 Press the green or red button to search for a TV channel Scanning stops when the TV finds a TV channel. Then the TV channel is displayed. 5 Press the green or red button repeatedly until the TV channel you want appears If the TV channel reception is poor: Press the blue or yellow button to finetune the TV channel.
LT-32/26A61BU/SU / LCT1996-001A-U / English LT-32&26A61BUSU_Eng.book Page 37 Tuesday, October 11, 2005 6:07 PM SET UP menu 6 Turn on the VCR, and then press the a button to transmit the data to VCR The T-V LINK menu disappears once the data transmission ends. 1 Choose EXT SETTING, then press the a or 3 button The EXT SETTING menu appears.
LT-32/26A61BU/SU / LCT1996-001A-U / English LT-32&26A61BUSU_Eng.book Page 38 Tuesday, October 11, 2005 6:07 PM SET UP menu 1 Press the 5 or 6 buttons to choose an EXT terminal > EXT SETTING EXT-1 DUBBING EXT-2 EXT-3 TV DUBBING You can choose a signal source to be output from the EXT-2 terminal. You can do this with the output signals of the devices connected to other EXT terminals, or with the picture and sound from a TV channel you are currently viewing.
LT-32/26A61BU/SU / LCT1996-001A-U / English LT-32&26A61BUSU_Eng.book Page 39 Tuesday, October 11, 2005 6:07 PM SET UP menu ENGLISH • During dubbing, you cannot turn off the TV. Turning off the TV also turns off the output from the EXT-2 terminal. • When you choose an EXT terminal as an output, you can view a TV programme or a picture from the other EXT terminal while dubbing the picture from a device connected to the EXT terminal onto a VCR connected to the EXT-2 terminal.
LT-32/26A61BU/SU / LCT1996-001A-U / English LT-32&26A61BUSU_Eng.book Page 40 Tuesday, October 11, 2005 6:07 PM Additional preparation Connecting external equipment Connect the equipment to the TV, making the correct rear panel and front panel connections. Before connecting anything: • Read the manuals that came with the equipment. Depending on the equipment, the connection method may be different from the diagram. Also, the equipment settings may need to change depending on the connection method.
LT-32/26A61BU/SU / LCT1996-001A-U / English LT-32&26A61BUSU_Eng.
LT-32/26A61BU/SU / LCT1996-001A-U / English LT-32&26A61BUSU_Eng.book Page 42 Tuesday, October 11, 2005 6:07 PM Additional preparation Equipment which can output the S-VIDEO signal (Y/C signal) such as an S-VHS VCR Connect the equipment to an EXT-2 terminal. You can choose between an S-VIDEO signal (Y/C signal) and a regular video signal (composite signal). For details of how to operate the equipment, see “S-IN (S-VIDEO input)” on page 37.
LT-32/26A61BU/SU / LCT1996-001A-U / English LT-32&26A61BUSU_Eng.book Page 43 Tuesday, October 11, 2005 6:07 PM Additional preparation This TV is compatible with the following PC signals. Vertical frequency (Hz) Horizontal frequency (kHz) 640 × 480 (VGA) 60.0 31.5 1024 × 768 (XGA) 60.0 42.0 • Only the above formats are supported. • Even with the above formats and at 60 Hz, some problems may be experienced depending on the quality of the synchronous signal.
LT-32/26A61BU/SU / LCT1996-001A-U / English LT-32&26A61BUSU_Eng.book Page 44 Tuesday, October 11, 2005 6:07 PM CH/CC numbers When you want to use the INSERT function on page 35, find the CH/CC number corresponding to the Channel number of the TV channel from this table.
LT-32/26A61BU/SU / LCT1996-001A-U / English LT-32&26A61BUSU_Eng.book Page 45 Tuesday, October 11, 2005 6:07 PM CH/CC numbers ENGLISH • When two CH/CC numbers correspond to one Channel number, choose either one according to the current COUNTRY setting. When the COUNTRY setting is other than FRANCE, choose a two-digit CH/CC number. When the COUNTRY setting is FRANCE, choose a three-digit CH/ CC number.
LT-32/26A61BU/SU / LCT1996-001A-U / English LT-32&26A61BUSU_Eng.book Page 46 Tuesday, October 11, 2005 6:07 PM Troubleshooting If a problem arises while you are using the TV, please read this troubleshooting guide carefully before you ask to have the TV repaired. You may be able to fix it easily by yourself. For example, if the mains plug is disconnected from the mains outlet, or the TV aerial has problems, you may think there is a problem with the TV itself.
LT-32/26A61BU/SU / LCT1996-001A-U / English Body_Eng.fm Page 47 Wednesday, October 12, 2005 1:29 PM Troubleshooting Poor sound • Have you adjusted BASS or TREBLE properly? If not, follow the description “BASS” or “TREBLE” on page 28. • When TV channel reception is poor, it can be hard to hear stereo or bilingual sound. In this case, follow the description “STEREO / I • II” on page 28 to hear the sound more easily by changing it to a mono sound.
LT-32/26A61BU/SU / LCT1996-001A-U / English LT-32&26A61BUSU_Eng.book Page 48 Tuesday, October 11, 2005 6:07 PM Troubleshooting • The top of the TV and the screen may become hot during use but this has no affect on the performance of the TV. Make sure that the ventilation holes are not blocked. • When the picture is unstable, the screen may become white for a moment. This happens when the signal which drives the liquid crystal is missing. This is not a fault.
LT-32/26A61BU/SU / LCT1996-001A-U / English LT-32&26A61BUSU_Eng.
LT-32/26A61BU/SU / LCT1996-001A-U / English Body_Eng.
LT-32/26A61BU/SU / LCT1996-001A-U / All Cover LCT1996-001A-U_Cover.