Eng.
Eng.book Page 1 Monday, May 28, 2001 9:46 AM Warnings, Cautions and Others WARNING: TO REDUCE THE RISK OF FIRE OR ELECTRIC SHOCK, DO NOT EXPOSE THIS APPLIANCE TO RAIN OR MOISTURE. CAUTION RISK OF ELECTRIC SHOCK DO NOT OPEN CAUTION: TO REDUCE THE RISK OF ELECTRIC SHOCK, DO NOT REMOVE COVER (OR BACK). NO USER SERVICEABLE PARTS INSIDE. REFER SERVICING TO QUALIFIED SERVICE PERSONNEL.
Eng.book Page 1 Monday, May 28, 2001 9:46 AM Warnings, Cautions and Others...................................................1 Precautions ......................................................... 2 Features .............................................................. 2 Connections ........................................................ 3 Analog Connections ....................................................................3 Digital Connections..........................................................
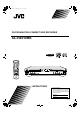
Eng.book Page 2 Monday, May 28, 2001 9:46 AM Precautions Features Thank you for purchasing the XL-R2010BK CD/CDR Multiple Compact Disc Recorder. Please read these instructions thoroughly and carefully before using the unit to ensure that you will obtain optimum performance and a long service life. The following is a list of some of the functions and conveniences obtained by having a CD player changer and CDR combined in a single unit.
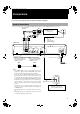
Eng.book Page 3 Monday, May 28, 2001 9:46 AM English Connections Do not turn on the power until all connections have been completed. Analog Connections Use the accessory pin cables to connect this unit’s LINE terminals with those for the TAPE/CD/VCR on the receiver, etc. Recording signals (line input) TAPE /CDR Amplifier, receiver etc.
Eng.book Page 4 Monday, May 28, 2001 9:46 AM Digital Connections Notes • Connect an external digital recording device to the digital output terminal on an amplifier or receiver, and then connect the amplifier or receiver to this unit. • The sound from an external device cannot be digitally output from this unit. To listen to the sound from the external device, connect an amplifier or receiver to the LINE OUT (PLAY) terminal on this unit.
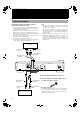
Eng.book Page 5 Monday, May 28, 2001 9:46 AM English Components Main Unit XL-R2010 STANDBY MULTI JOG/REC LEVEL CD/CDR MULTIPLE COMPACT DISC RECORDER OPEN/CLOSE REC SOURCE DIGITAL CD LINE OPEN/CLOSE MIC + – STANDBY/ON LEVEL MIN PLAY MODE CD EDIT CD REC STOP PLAY PAUSE SYNCHRO MENU SET CANCEL FINALIZE STOP PLAY PAUSE PHONES MIX BLANCE REC SOURCE SELECTOR MAX Description (For details, refer to page in parentheses.
Eng.book Page 6 Monday, May 28, 2001 9:46 AM Display Window 1 2 3 4 5 6 7 8 9 10 11 12 13 14 15 16 ANALOG DIGITAL 32 kHz 44.1kHz 48 kHz CD PROG 1 RND L EDIT P EDIT Music calendar Indicates the number of tracks on the currently selected CD or CDR, and the track on the disc that is being played or recorded. Recording type indicators and sampling frequency indicators Light to indicate whether the recording is analog or digital.
Eng.book Page 7 Monday, May 28, 2001 9:46 AM English Using the Remote Control Remote Control STANDBY/ON CD REC FINALIZE DISPLAY 1 2 3 4 5 6 7 8 9 10 +10 PLAY MODE • CD EDIT CONTROL REPEAT REC CD CDR FADE SYNCHRO 7 (stop) Button Press to stop playback of the currently selected disc in the CD player or stop playback/recording of the disc in the CDR. (see page 12) 3 (play) Button Press to play the currently selected CD.
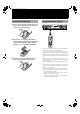
Eng.book Page 8 Monday, May 28, 2001 9:46 AM Inserting the Batteries 1 Press down on the point shown by the arrow at the top of the compartment cover, and lift the cover to open the compartment.
• The unit can be put into the standby mode by pressing the Turning the Power On and Standby Mode STANDBY/ON ( 0 ) XL-R2010 STANDBY 0 MULTI JOG/REC LEVEL CD/CDR MULTIPLE COMPACT DISC RECORDER OPEN/CLOSE REC SOURCE DIGITAL CD LINE English Eng.book Page 9 Monday, May 28, 2001 9:46 AM OPEN/CLOSE MIC STANDBY/ON button. If the STANDBY/ON button is pressed during a recording operation, the standby lamp flashes while the unit brings the operation to an end.
Eng.book Page 10 Monday, May 28, 2001 9:46 AM Listening to CDs CD player Continuous Playback Compatible CDs The CD player can be used to play back general audio CDs, CD-R and CD-RW media. Stopping CD playback To stop playback at any time • Stop playback of a disc in the CD player by pressing the CD Control STOP 7 button. The total number of tracks and playing time is shown in the information display.
To stop CDR playback CDR Playback Operations The CDR can play general audio CDs, CD-R and CD-RW media. 2 XL-R2010 STANDBY 1 REC SOURCE DIGITAL CD LINE • Stop playback of a disc in the CDR by pressing the CDR Control STOP 7 button. The total number of tracks and play time will be shown in the information display. STOP MULTI JOG/REC LEVEL CD/CDR MULTIPLE COMPACT DISC RECORDER OPEN/CLOSE English Eng.
Eng.book Page 12 Monday, May 28, 2001 9:46 AM • Using the Remote Control to Control Playback The buttons on the remote control can be used to control CD player playback and CDR recording and playback. When using the remote control, be sure to point it directly at the front lefthand side of the main unit (facing you) when pressing the buttons. Direct Playback of a Specific Track CD playback can be started from a specific track by pressing the corresponding number button(s) on the remote control.
Direct Track Selection (selecting another track during playback) Press the number button(s) corresponding to the track to be played (Step 2). The display will change to indicate the corresponding track number, playback of the current track will stop and playback of the newly selected track will begin. • To select a track on a CD in another tray, repeat steps 1 and 2.
Eng.book Page 14 Monday, May 28, 2001 9:46 AM • Repeat Playback Random Playback The repeat playback mode can be selected by pressing the REPEAT button on the remote control when the main unit is set to either CD player or CDR function.
Eng.book Page 15 Monday, May 28, 2001 9:46 AM English • CD Playback Pitch Control There are 3 CD pitch control buttons on the remote control that can be used to vary the speed of CD playback up to 12% faster or slower than the standard playback speed. This function can be useful in changing the pitch when adding vocals to a recording using the microphone input or when matching the playback speed of the CD with another source. Note • Pitch control cannot be used for the CDR.
Eng.book Page 16 Monday, May 28, 2001 9:46 AM 4 Programming Playback Using Main Unit Controls MULTI JOG / REC LEVEL It is possible to select your own program (order of tracks being played) using the program playback mode. Any of the tracks (1-99) on the CD in the tray of the CD player can be selected. If you want to program and record tracks, see “Program Edit Recording” on page 26. 1 XL-R2010 STANDBY REC SOURCE CD LINE SET + 2. Enter the selection.
To change the contents of the program In the CD stop mode, press the SET button followed by the CANCEL button. Programmed tracks will be erased in the reverse order of when they were entered (starting from the last track programmed). Press the CANCEL button twice to erase one track. Continue erasing in this manner until all of the tracks you wanted to remove are erased. Enter new tracks into the program by following programming Step 4. English Eng.
Eng.book Page 18 Monday, May 28, 2001 9:46 AM 6 Repeat Step 5 to program up to a maximum of 32 steps. • If you try to program over 32 steps, “MEMORY FULL” will be shown in the information display, and the programming function ends automatically. • Pressing the 7 (stop) button ends the programming function. • Operation stops automatically when all of the programmed tracks have been played. 7 Press the 3 button to start program play.
Eng.book Page 19 Monday, May 28, 2001 9:46 AM Notes on Recording • Do not use CD-R or CD-RW discs with dust and/or scratches on the surface as this may cause the recording to sound rough and may cause skipping when played backed. It may even cause the unit to malfunction. • When using a recording function (one of the recording indicators in the display window is illuminated), do not subject the unit to any shock or vibration.
Eng.book Page 20 Monday, May 28, 2001 9:46 AM To disable/enable the Add Finalize feature with the remote control 1 2 3 4 5 Press the MENU button. Press the 2 or 3 button to select "FINALIZE". Press the SET button. Press the 2 or 3 button to select "OFF" or "ON". Press the SET button. Sampling rate converter The main unit is equipped with a sampling rate converter to ensure that the original digital signals will be recorded regardless of the sampling frequency (32kHz, 44.
• ** MIX (combined) source recording is only possible in analog. • If a source has already been selected, the corresponding lamp will light and the selection will be shown in the display window. • When playback is stopped and the CDR is selected, press the DISPLAY button on the remote control repeatedly to show the recording time remaining on the disc. • High-speed recording is not possible when recording manually.
Eng.book Page 22 Monday, May 28, 2001 9:46 AM AUTO TRACK function off • Manual track marking offers you the flexibility of placing track marks anywhere you like in the recording. • Manual track marking is not possible when the AUTO TRACK function is on.
Eng.book Page 23 Monday, May 28, 2001 9:46 AM 1 Stop the CD to be recorded. 2 To stop the recording at any time Press the CDR or CD Control STOP 7 button on the main unit or the 7 (stop) button on the remote control. “STOP DUBBING” flashes in the information display, and the unit stops recording. STOP PLAY Load a recordable CD-R or CD-RW disc into the CDR and close the tray. • The disc is read if required. 3 Press the CD REC button (main unit/remote control) to strart recording.
Eng.book Page 24 Monday, May 28, 2001 9:46 AM 1 Start playback the CD to be recorded. PLAY 2 Insert a recordable CD-R or CD-RW disc in the CDR disc tray. • The disc is read. 3 While the disc is playing back the track you want to record or if that track is being paused, press CD REC (main unit/remote control). Main Unit Remote Control CD REC CD REC Notes • There is no need to adjust the recording level.
5 3 Press the SET button. “DISC DUBBING” is shown in the information display. • When a blank disc is in the CDR tray, “UPDATE OPC” is shown following “DISC DUBBING”. The CD player and CDR start simultaneously. • Recording starts from the first track of the CD. When recording completes, “STOP DUBBING” flashes and recording automatically stops. Notes • Recording can only start if the total time of the tracks on the source disc is less than the time remaining on the disc being recorded to.
Eng.book Page 26 Monday, May 28, 2001 9:46 AM Note • Up to 32 steps can be included in the programming. The same track cannot be programmed twice. When there is not much recording time left on the CD-R or CDRW disc, tracks that are longer than the remaining time (pre-calculated) can be programmed but “NO REM” is shown in the information display. Program Edit Recording This type of recording allows you to make a program of your favorite tracks on the CD loaded in the CD player in any order you like.
• If tracks have already been programmed for the CDs, “LAST PPG OK?” is shown in the information display. Press the SET button on either the remote control or the main unit or press the PLAY button on the main unit to record the same programmed tracks. Recording starts. To program new tracks, press the CANCEL button and then proceed to step 4. • If you press the CANCEL button, the playing time remaining time on the CD-R or CD-RW disc in the CDR is shown in the information display. 4 English Eng.
Eng.book Page 28 Monday, May 28, 2001 9:46 AM Setting the Unit for High-speed Recording High-speed recording is only possible for digital recording from the CD player to the CDR.
4 Turn the MULTI JOG control or press the 2¥3 (menu) button on the remote control and choose the setting “TR SPACE ON” or “TR SPACE OFF”. • Synchronized recording to the CDR from an external source. 1 • Press the CANCEL button (main unit/remote control) to cancel the procedure and return to the normal display. 5 Press the SET button. Notes • There is no indicator to show the status of this function.
Eng.book Page 30 Monday, May 28, 2001 9:46 AM Setting the START or START&STOP function for synchronized recording from an external source If the signal is going be recorded from CD, MD or DAT player, it is possible to set the unit to perform synchronized start and stop. This only applies for recording sources that are connected to the DIGITAL IN (DIGITAL IN OPTICAL) terminal. With other types of digital audio equipment only synchronized start of recording is possible.
• Select “CD + LINE” to mix and record a CD loaded in the CD player with the signals from an external source via the LINE IN terminal. • Select “CD + MIC” to mix and record a CD loaded in the CD player with the signals from a microphone plugged into the MIC jack. • Select “LINE + MIC” to mix and record the signals from an external source connected via the LINE IN terminal and those from a microphone plugged into the MIC jack. 3 5 6 Start playback of the sources to be recorded.
Eng.book Page 32 Monday, May 28, 2001 9:46 AM Special Recording Edit Operations Skipping a Recorded Track on a CD-R or CD-RW (Track Skip) Occasionally, there may be tracks on a disc that are partial, repeated, or are otherwise unwanted. Before a CD-R or CD-RW is finalized, it is possible to enter a skip marker for that track in the PMA (Program Memory Area). A maximum of 21 skip marks can be inserted on one disc.
4 Press the SET button (main unit/remote control). • “ERASE (start track) – (last track)?” is flashed in the information display. (Initially, the start track and last track are both the last track number recorded on the CD-RW.) • Press the CANCEL button (main unit/remote control) if you do not wish to perform this procedure. Caution If the disc is damaged or there is disc related trouble, this function may not be possible.
Eng.book Page 34 Monday, May 28, 2001 9:46 AM Finalizing a Disc Finalizing a disc marks the final process in recording on a CD-R or CD-RW disc. In this process, a TOC (Table Of Contents) is written to the disc. When this procedure is completed, it will be possible to play the CD-R or CD-RW disc on CD players compatible with CDR and/or CD-RW discs. • Please note that once a CD-R disc has been finalized, it is no longer possible to record to that disc.
5 English Eng.book Page 35 Monday, May 28, 2001 9:46 AM Press the SET button again to confirm the operation. • “UNFINALIZE” is shown in the information display as the unfinalizing procedure is performed. The procedure takes about 2 minutes, and the level meter is used to indicate approximately how much time is remaining until unfinalization is complete. Upon completion, the normal display is shown.
Eng.book Page 36 Monday, May 28, 2001 9:46 AM Setting Up Synchronized Start Recording for External Digital Sources (CD, MD, and DAT only) When performing digital synchronized start recording of an externally connected digital source, synchronized start recording begins when a digital signal is encountered in the record pause mode.
Eng.book Page 37 Monday, May 28, 2001 9:46 AM English SLEEP TIMER Automatically switches the power to standby after the specified time interval. This function operates when playing back a disc on the CD player or CDR deck.
Eng.book Page 38 Monday, May 28, 2001 9:46 AM COMPU LINK Function What is COMPU LINK? The COMPU LINK Remote Control System (or, simply, “COMPU LINK”) serves to enable the kind of simple operations provided by an integrated system to be performed even though this unit is a separate component. These simple operations can be performed by connecting the COMPU LINK-4 SYNCHRO, COMPU LINK-3 SYNCHRO or COMPU LINK1 SYNCHRO connector on each of the components involved.
Eng.book Page 39 Monday, May 28, 2001 9:46 AM English CD and CDR Messages Note: Items with ( ) marks are confirmation displays CD Messages Message Significance Remedy CD NO DISC There is no disc in the tray. If no disc has been inserted, insert a CD-ROM (CD-DA formatted) or a CD-R or CD-RW disc. CD DISC NG Disc related trouble has occurred and the disc in the tray cannot be played. Replace the disc. ALL SKIP TR All the tracks on the disc have TRACK SKIP markers.
Eng.book Page 40 Monday, May 28, 2001 9:46 AM Message Significance Remedy NO R/RW DISC The disc inserted is a CD for computer data. Recording and erase functions are not possible. Check to see if the CD-ROM is recorded in audio for mat. If not, replace with a disc recorded using the CD-DA format. DISC FULL The CD-R or CD-RW has no available time. Replace with another recordable CD-R or CD-RW. Finalization of the disc is recommended. TNO FULL 99 tracks have been recorded on the disc.
Eng.book Page 41 Monday, May 28, 2001 9:46 AM Glossary SCMS (Serial Copy Management System) The following is a brief description of some of the acronyms used in this manual. The digital quality of CDs and other digital media can be recorded to CD-R and CD-RW using the CDR function of this unit. However, it is not possible to make a second generation digital copy from a first generation copy.
Eng.book Page 42 Monday, May 28, 2001 9:46 AM Troubleshooting Remedial action/check Ref • A CD-R or CD-RW with nothing recorded on it has been inserted. (“BLANK DISC” is displayed.) • Replace the disc with one on which tracks have been recorded. Play fails to start • The CD has been inserted upside down. • Insert it properly with the label side facing up. 10 • Condensation has formed on the lens. • Turn on the power and wait for a couple of hours. 2 Specific parts are not played properly.
Eng.book Page 43 Monday, May 28, 2001 9:46 AM The unit’s specifications and exterior are subject to change without notice due to improvements. CD Player Section System Pitch control Signal-to-noise ratio Dynamic range (1 kHz) Frequency response Wow and flutter Total harmonic distortion Compact disc digital audio system ±12% 97dB 93dB 20 - 20kHz Less than measurable limit 0.0063% CDR Section Compact disc digital audio recording system Sampling frequency 44.
Eng.
Eng.