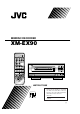
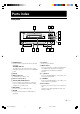
English MINIDISC RECORDER XM-EX90 POWER 1 2 6 7 3 4 5 8 9 10 FM MODE / MUTING TUNER AUX CD 2 CD 3 +10 SLEEP CLOCK / TIMER SET CANCEL UP DOWN XM-EX90 MINIDISC RECORDER CD CONTROL PLAY MODE REPEAT CD 1 /CANCEL PLAY MODE REPEAT DISPLAY INPUT DISC LOADING MECHANISM MD CONTROL TRACK MARKING REC PAUSE TAPE CONTROL SAMPLING RATE CONVERTER REC LEVEL STANDBY BASS TREBLE BALANCE CD REC –/L +/R POWER FADE MUTING S.A.
Warnings, Cautions and Others CAUTION RISK OF ELECTRIC SHOCK DO NOT OPEN CAUTION: TO REDUCE THE RISK OF ELECTRIC SHOCK. DO NOT REMOVE COVER (OR BACK) NO USER SERVICEABLE PARTS INSIDE. REFER SERVICING TO QUALIFIED SERVICE PERSONNEL. CAUTION To reduce the risk of electrical shocks, fire, etc.: 1. Do not remove screws, covers or cabinet. 2. Do not expose this appliance to rain or moisture.
Welcome ! We would like to thank you for purchasing one of our JVC products. Before connecting this unit to the wall outlet, please read the instructions carefully to ensure that you obtain the best possible performance. If you have any questions, please consult your JVC dealer. Important cautions Installation of the Unit • • • • • • Select a place which is level, dry and neither too hot nor too cold (Between 5˚C and 35˚C or 41˚F95˚F). Leave sufficient distance between the Unit and a TV.
Table of Contents Welcome ! .......................................................... 3 Important cautions .............................................. 3 For safe use, observe the following ................... 3 Parts Index ......................................................... 5 Front Panel .......................................................... 5 Display ................................................................ 6 Rear Panel ...........................................................
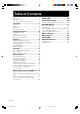
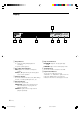
Parts Index Front panel 11 10 12 XM-EX90 9 MINIDISC RECORDER /CANCEL INPUT DISC LOADING MECHANISM REC PAUSE 8 CD REC 7 SAMPLING RATE CONVERTER REC LEVEL STANDBY 6 POWER 2 1 3 1 POWER button 4 5 80 Press to switch the power between ON and STANDBY. STANDBY indicator The indicator is off while the power is ON and lights up when the power is in STANDBY mode. 2 Display 3 MD insertion slot button Press to eject the MD.
Display 7 REC LEVEL DIGITAL12 1 2 3 4 5 REPEAT PROGRAM 6 7 8 9 10 ALL 1 RANDOM 11 12 13 14 15 L R 2 1 3 1 Play indicators 4 2 Recording status indicators REC: Lights in record and record-pause modes. LEVEL, L, R: Lights during the analog input level control operation. 3 Character display Shows the track information, title, MD editing function, recording-editing function, etc. PROGRAM: Lights in the program play mode. RANDOM: Lights in the random play mode.
Rear panel LEFT RIGHT DIGITAL IN 1 – OPTICAL – 2 IN (REC) 1 ANALOG OUT (PLAY) COMPU LINK - 3 (SYNCHRO) 2 AC POWER CORD 3 1 ANALOG input/output jacks Connect to the MD output/input jacks of the amplifier/tuner using the provided audio pin cords. Connect the IN (REC) jacks with the amplifier/tuner’s OUT (REC) jacks, and the OUT (PLAY) jacks with its IN (PLAY) jacks. 4 4 AC POWER CORD receptacle Connect the provided AC power cord.
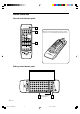
Remote control unit Normal control button panel 1 POWER 1 2 3 4 5 6 7 8 9 10 FM MODE / MUTING TUNER AUX CD 2 CD 3 2 Open the normal control button panel as shown below to access the editing control button panel. +10 SLEEP CLOCK / TIMER SET CANCEL PLAY MODE REPEAT UP DOWN CD CONTROL CD 1 MD CONTROL PLAY MODE REPEAT 3 TRACK MARKING DISPLAY TAPE CONTROL BASS TREBLE BALANCE –/L +/R FADE MUTING S.A.
1 POWER button 4 MD editing control buttons Press to switch the power mode between ON and STANDBY. 2 Numeric keys Press to select a desired track number directly. Press MD CONTROL £ before pressing this button. To select track No. 5: Press 5. To select track No. 15: Press +10 then 5. To select track No. 20: Press +10 then 10. To select track No. 32: Press +10 three times then press 2. 3 MD CONTROL buttons Used to control the MD recorder. £: Starts playback.
Setting Up the System Supplied Accesories Power cord x 1 Audio pin cords x 2 Optical digital cable x 1 Remote control unit x 1 Compu Link cable x 1 Batteries (R03 (UM-4)/AAA (24F)) x 2 Cautions for Placement Do not place in any of the following ares. • Near a heater or other heat emmitting appliance. • In direct sunlight. • Do not place the CD player on top of the amplifer/tuner. • In a place warmer than 35°C (95F°). • In a bathroom, kitchen or other area with steam, humidity, or hot water.
Connection Amplifier/Tuner INTEGRATED AMPLIFIER / TUNER VOLUME BAND S. A. BASS INPUT DIRECT PHONES DOWN UP KEY MODE STANDBY POWER Audio pin cords Connect to the MD jacks of the amplifier/tuner. Always connect the jacks with the plugs of the same colors so as not to mistake the L (Left) and R (Right) connections. Connect the OUT (PLAY) jacks to the IN (PLAY) jacks of the amplifier/ tuner, and the IN (REC) jacks to its OUT (REC) jacks.
Remote control batteries Load the supplied batteries (2) into the remote control. 1 Open the battery case. Push down and pull the lid in the direction of the arrow. 2 Load the batteries. Insert two R03 (UM-4)/AAA(24F) batteries. Match the polarity (+ and –) of the batteries with the + and – marks inside the battery compartment. 3 Close the battery case. Operating the Remote Control Point the remote control toward the remote sensor on the front panel.
Remote control operation The remote control unit has a two-panel configuration, and opening the normal control button panel allows you to access the editing control button panel. Use the normal control buttons for playback and recording operations, and use the editing control buttons for editing and title input operations.
Playback MD playback (Basic operation) The basic operation for playing an MD is described below. If you use the remote control unit, use the MD CONTROL buttons on the normal control button panel. 1 Load an MD (Mini Disc). Hold an MD with the side on which an arrow is marked facing up, and insert it into the slot in the direction of the arrow. The MD will be pulled in automatically from the middle.
To let playback pause temporarily: Press ‹/8. The * indicator lights up. Pressing the button again resumes playback from the position where it has paused. /CANCEL Lights. Main unit To skip to the beginning of a track: Press ¢ once to skip to the beginning of the next track. Press 4 once to skip to the beginning of the current track being played. • Each press skips an additional track.
Switching the displayed information The display can show the disc title, track title and remaining time (recording time available when a recordable MD is loaded) information. The displayed information can be switched using DISPLAY of the MD CONTROL buttons of the remote control unit. Press DISPLAY in stop mode. DISPLAY Each press of DISPLAY switches the displayed information as follows.
Repeat playback Repeat playback is possible in two modes. Repeat playback can be set or canceled whether the MD is in stop or play mode. Use the MD CONTROL buttons on the normal control button panel of the remote control unit. 1 Press REPEAT to select the repeat play mode. Each press of REPEAT switches the repeat play modes as follows. REPEAT REPEAT ALL REPEAT 1 Off (Repeat playback canceled) REPEAT ALL: Plays all tracks repeatedly. REPEAT 1: Plays a single track repeatedly.
Program playback Desired MD tracks can be selected and played in the desired order. Use the MD CONTROL buttons on the normal control button panel of the remote control unit. 1 Load an MD. See “MD playback (Basic operation)” on page 14. 2 Press £ then immediately press 7. This sets the numeric keys to the MD mode. 3 Press PLAY MODE to select PROGRAM. The display shows “PROGRAM” and the PROGRAM indicator lights up.
5 Press £. /CANCEL Program playback starts. • If you are operating the main unit, press ‹/8. Program playback stops after having played all programmed tracks. Main unit Remote control unit To check the programmed tracks and their order: Press 4 or ¢ on the remote control unit in stop mode. Pressing ¢ shows programmed track numbers in the order they are programmed (if a track has a title, the title is displayed before the track number). Pressing 4 shows them in the reverse order.
Random playback Tracks in an MD be played in a randomly selected order by the MD recorder. The random playback may bring you a surprising effect by playing tracks in a different order every time. Use the MD CONTROL buttons on the normal control button panel of the remote control unit. 1 Load an MD. See “MD playback (Basic operation)” on page 14. 2 Press PLAY MODE to select RANDOM. The display shows “RANDOM” and the RANDOM indicator lights up. PLAY MODE 1 2 3 4 5 6 RANDOM Lights.
Recording MD recording (Basic operation) Audio from a variety of sources can be recorded by using either digital or analog input as required. For the remote control operation, use the MD CONTROL buttons on the normal control button panel of the remote control unit. 1 Load a recordable MD (Mini Disc). 2 Press REC PAUSE. REC PAUSE The MD recorder enters record-pause mode. • If you are operating the remote control unit, press ¶. CD REC Blinks.
To stop recording Press &/CANCEL to stop recording. /CANCEL To let recording pause temporarily: REC PAUSE Press REC PAUSE. To resume recording, press ‹/8 or £ of the remote control unit. CD REC To adjust the analog input level Main unit Remote control unit REC LEVEL The input level should be adjusted when the analog input is recorded. Start playing the source before proceeding to the level control. 1 In record-pause mode, press 4 or ¢. The level control display appears.
Track marking: The track numbers on an MD (Mini Disc) are marked at the beginning of each track. The track numbers are identified by these “track markings” and each section between two track markings are considered as a track. This MD recorder can record the track markings either automatically (AUTO) or manually (MANUAL). • Track markings can be recorded during audio recording.
CD recording The digital input from CDs can be recorded with a simple, one-touch operation by switching the input automatically. This method is available only when the Compu Link connection has been made among other optional the components equipped with the Compu Link remote control system. 1 Load a recordable MD (Mini Disc). 2 Prepare the CD player. Load CDs, press CD 1, CD 2 or CD 3 according to the disc you want to record, then immediately press 7 of the CD player. This selects the played CD.
Radio or tape recording The analog input from an analog source component can be recorded on an MD as described below. If you are operating the remote control unit, use the MD CONTROL buttons on the normal control button panel. 1 Load a recordable MD (Mini Disc). 2 Prepare the amplifier/tuner or cassette deck. With the amplifier/tuner, receive the station to be recorded. With the cassette deck, load the tape to be recorded. Switch the reverse mode on if you want to record the playback of both sides.
English Deutsch Editing Functions MD editing functions A recorded MD can be edited in many ways. The editing functions include the division, joining, moving, erasing a single track, erasing the entire disc and assigning titles to the disc and tracks, and more than one of them can be combined as required. Use the editing control button panel of the remote control unit. Dividing a track (DIVIDE) Page 28 2nd 1st A B C 3rd D 4th E Track No.
Combining editing functions Part to be erased 1st 2nd B A English By combining “DIVIDE”, “ERASE” and “JOIN”, for example, it is possible to erase only a part of existing track. 3rd C Track No. Dividing track A into 3 tracks 2nd A a 3rd 4th 5th A b c C B Deutsch 1st A Track No. Erasing track b 1st A 4th 3rd 2nd A a c C B Track No. Joining a and c 2nd 1st A a 3rd Français tracks A c C B Assigning titles A title can be assigned to a track or disc.
English Dividing a track (DIVIDE) A track can be divided into desired number of tracks by adding track markings in the middle, in the desired points or where you want to search later. This makes it possible to assign track numbers after recording medley music or FM broadcast. The track numbers after the divided track are incremented automatically. 1 Press EDIT to select “DIVIDE”. Deutsch EDIT Each press of EDIT switches the editing functions as follows.
pressing . The track marking position can be fine-adjusted in the range of ±128 positions (approx. ±8 sec.). As you press the button, the track marking displaces slightly and the 3-second section from the newly divided point will be played repeatedly. English 5 Fine-adjust the track marking position by To correct a previously fine-adjusted track marking position: 1 Press CANCEL. 2 Select the track number by pressing and press £. 3 Return to step 4.
English Joining tracks (JOIN) Two adjacent tracks can be joined into a single track by deleting the unnecessary track marking. This also makes it possible to join more than two tracks into a single track or a piece of music divided into multiple tracks into a single piece. The track numbers after the joined tracks are decremented automatically. 1 Press EDIT to select “JOIN”. Deutsch EDIT Each press of EDIT switches the editing functions as follows.
5 Press ENTER. English The change made above is entered temporarily in the memory. The display shows “EDITING”. ENTER 1 2 3 4 5 Decrements by 1. The data in the memory is written in the MD before it is ejected. The display shows “UTOC writing” during MD write operation. Français • Be careful not to apply impact to the MD recorder during writing data in the memory in the MD. Otherwise the recording may be unplayable later.
English Moving a track (MOVE) A track can be moved to the desired position by selecting its track number and the destination track number. 1 Press EDIT to select “MOVE”. Each press of EDIT switches the editing functions as follows. EDIT DIVIDE JOIN MOVE Deutsch MD total playing time display ERASE ALL ERASE 1 2 3 4 5 6 Blinks. 2 Press SET. “1” for track number 1 blinks on the display. SET Blinks. Français 1 2 3 4 5 6 Blinks. 3 Select the track number to be moved, then SET press SET.
The change made above is entered temporarily in the memory. The display shows “EDITING”. 1 2 3 4 5 6 English 5 Press ENTER. ENTER The data in the memory is written in the MD before it is ejected. The display shows “UTOC writing” during MD write operation. Français • Be careful not to apply impact to the MD recorder during writing data in the memory in the MD. Otherwise the recording may be unplayable later.
English Erasing a track (ERASE) A desired track can be erased from the MD. The track numbers after the erased track are decremented automatically. 1 Press EDIT to select “ERASE”. Each press of EDIT switches the editing functions as follows. EDIT DIVIDE JOIN MOVE Deutsch MD total playing time display ERASE ALL ERASE 1 2 3 4 5 6 Blinks. 2 Press SET. “1” for track number 1 blinks on the display. SET Blinks. Français 1 2 3 4 5 6 Blinks. Blinks.
The change made above is entered temporarily in the memory. The display shows “EDITING”. 1 2 3 4 5 Decrements by 1. 5 Press 0 to eject the MD. The data in the memory is written in the MD before it is ejected. The display shows “UTOC writing” during MD write operation. Français • Be careful not to apply impact to the MD recorder during writing data in the memory in the MD. Otherwise the recording may be unplayable later.
English Erasing all tracks in an MD (ALL ERASE) The data recorded in an MD can be erased entirely to turn the MD into a blank disc. 1 Press EDIT to select “ALL ERASE”. EDIT Each press of EDIT switches the editing functions as follows. DIVIDE JOIN MOVE Deutsch MD total playing time display ERASE ALL ERASE 1 2 3 4 5 6 Blinks. 2 Press SET. SET 1 2 3 4 5 6 Français Blinks.
• Be careful not to apply impact to the MD recorder during writing data in the memory in the MD. Otherwise the recording may be unplayable later. • The data in the memory is written in the MD also when the power is switched to the STANDBY mode while “EDITING” is being displayed. To exit editing: Français Press EDIT before pressing ENTER in step 3. Deutsch The data in the memory is written in the MD before it is ejected. The display shows “UTOC writing” during MD write operation.
English Assigning titles to an MD and its tracks Titles can be assigned to a recorded MD and tracks selected from it. This operation is possible while the MD recorder is in stop mode. 1 Load a recorded MD (Mini Disc). 2 Press TITLE. The display shows “DISC/NO TITLE”. TITLE Deutsch 1 2 3 4 5 6 Blinks. Scrolled. • If a disc title has already been assigned, the title is displayed. If you want to assign only the disc title, go to step 3.
SPACE 5 Press ENTER. ENTER The characters input above are entered temporarily in the memory. The display shows “EDITING”, then scrolls the input title, and finally shows the number of tracks and total playing time of the MD. 1 2 3 4 5 6 Blinks. Display before ENTER is pressed Français Deutsch 1 Select the character case. Each press of SMALL LETTER switches the character case. Lowercase letters can be input when the button is lit in green, and uppercase letters can be input when the button is not lit.
6 Press 0 to eject the MD. The data in the memory is written in the MD before it is ejected. The display shows “UTOC writing” during MD write operation. English INPUT Deutsch • Be careful not to apply impact to the MD recorder during writing data in the memory in the MD. Otherwise the recording may be unplayable later. • The data in the memory is written in the MD also when the power is switched to the STANDBY mode while “EDITING” is being displayed.
Track titles can be assigned as you play or record the tracks. 1 After start of playback or recording of a track, press TITLE. TITLE English Assigning titles while playback or recording 1 2 3 4 5 6 1 Select the character case. Each press of SMALL LETTER switches the character case. Lowercase letters can be input when the button is lit in green, and uppercase letters can be input when the button is not lit. 2 Input characters by pressing the character input keys.
English To correct input characters: CANCEL Characters can be corrected only before ENTER is pressed. 1 Press to move the cursor to the character to be corrected. 2 Press CANCEL to erase the character. 3 Input the correct character. To cancel all input characters: Deutsch Characters can be cleared only before ENTER is pressed. Press CANCEL to erase all characters then press TITLE. To exit editing: Français Press TITLE before pressing ENTER. 42 XM-EX90 EN26-42.XM-EX90[J]/1 42 98.6.
The remote control unit provided with the MD recorder can be used to control the amplifier/tuner CD player and cassette deck equipped with the Compu Link remote control system. The amplifier/tuner is controlled directly while the CD player and cassette deck are controlled with the help of the Compu Link system (page 48). Point the remote control unit to the remote control sensor of the amplifier/tuner to operate other components. RX-EX70 INTEGRATED AMPLIFIER / TUNER VOLUME BAND S. A.
The remote control unit can control the amplifier/tuner equipped with the Compu Link remote control system directly. Deutsch English Remote controlling the amplifier/tuner Français POWER 1 2 6 7 3 4 5 8 9 10 FM MODE / MUTING TUNER AUX CD 2 CD 3 +10 SLEEP CLOCK / TIMER UP SET CANCEL DOWN Amplifier/tuner control buttons CD CONTROL PLAY MODE REPEAT CD 1 MD CONTROL PLAY MODE REPEAT DISPLAY TRACK MARKING TAPE CONTROL BASS TREBLE BALANCE –/L +/R FADE MUTING S.A.
VOLUME +/–: Adjust the volume. Pressing + increases the volume and pressing – decreases it. FADE MUTING: Sets the volume to 0. Pressing again returns to the original volume. English POWER: Switches the power between ON and STANDBY. • Before remote controlling the amplifier/ tuner, set the POWER control mode to the amplifier/tuner mode (see page 43). TUNER: Press to select the tuner as the sound source and set the numeric keys (1 to 10 , +10) on the remote control unit to operate the tuner.
English Remote controlling the CD player and cassette deck The remote control unit can control CD player and cassette deck equipped with the Compu Link remote control system (page 48). Always point the remote control unit to the remote control sensor on the amplifier/tuner. CD player control buttons Français Deutsch £: Starts playback. 7: Stops playback or recording. 4, ¢: Skips to the beginning of a track. PLAY MODE: Switches the play modes. REPEAT: Switches the repeat play modes.
Program playback of CDs 1 Press £ then immediately press 7. This sets the numeric keys of the remote control unit to the CD mode. English Operation Examples PLAY MODE Deutsch 2 While the CD player is in stop mode, press PLAY MODE to select “PROGRAM”. CD 1 CD 2 CD 3 3 Select a disc number. 1 2 3 4 5 6 7 8 9 10 4 Select a track number using the numeric keys. Français Press CD 1, CD 2 or CD 3. +10 5 Program other tracks by repeating steps 3 and 4. 6 Press £. Program playback starts.
English COMPU LINK Linked Operation of the Other Optional Components (Compu Link) Français Deutsch The EX series components can be controlled under linked operation provided by the JVC’s Compu Link remote control system. What is Compu Link The world of single components, in which you purchase a cassette deck, CD player, amplifier and other components separately and enjoy your own composition, is an effective means for pursuit of high-quality reproduction.
Simply selecting an input source of the amplifier/tuner starts playback of the selected source component (CD player, MD recorder or cassette deck). Also, even if you do not touch the amplifier/tuner, starting playback of a source component sets the amplifier’s input source automatically to the played component. *Refer to the instruction manual of amplifier/tuner. English Shortcut playback The remote control unit provided with the amplifier/tuner can also be used to control the CD player or cassette deck.
English Deutsch Rule on Digital Copying The digital audio equipment exchange audio signals in the digital forms through digital input/output jacks, and include the CD (Compact Disc) player, MD (Mini Disc) recorder and DAT (Digital Audio Tape) recorder. The digital audio equipment allows digital copy of signals with little deterioration of music signals. This has made it necessary to have a copy restriction rule for protecting the copyright, and the SCMS has been established as a result.
The MD (Mini Disc) is a new digital audio medium using a disc with a diameter of 64 millimeters. In spite of the small size, the MD has multiple functions, high audio quality and recording/playback capabilities for up to 74 minutes. English About MD (Mini Disc) Cartridge Disc The MD cartridge has a pocket size of 68 mm x 72 mm with a thickness of 5 mm. The cartridge accommodates the 64 mm diameter disc for ease of transportation and storage.
English ATRAC (Adaptive TRansform Acoustic Coding) The MD (Mini Disc) has half the size of the CD but can record data for the same period of time. This has been made possible by the newly developed ATRAC (Adaptive TRansform Acoustic Coding), which compresses data by cutting the audio components that are inaudible to the human sense of audition. This technology reduces the recorded data to about 1/5 the original data quantity and enables recording/playback of data for up to 74 minutes.
Description Treatment BLANK DISC The loaded disc is a non-recorded disc. Use a recorded disc unless you want to start recording on a blank disc. CANNOT JOIN An attempt is made to join tracks that cannot be joined. This is one of system restrictions on the MD. [See page 54.] DISC ERROR The MD is abnormal (damaged). Use another MD. DISC FULL The disc has no available space or the number of tracks has reached 254. Use another recordable MD.
English Deutsch Français MD Restrictions The MD uses a unique data recording format that is different from the formats used by Cassettes tape and DAT. Due to the restrictions imposed by this MD recording format, following symptoms may be observed. Note that these symptoms do not indicate malfunction of the product. Symptom Cause “DISC FULL” is displayed before the available recording time indicated on the disc has been used.
To maintain high quality audio for a long period Since the disc is accommodated inside a cartridge, it can be handled easily without caring about dust and dirt. However, to maintain the high audio quality for an extended period, use care in the following points. Installation location Do not install the MD in following places. • In a place subject to direct sunlight or where the temperature rises, for example in a closed automobile. The disc may be warped and unusable in these places.
English Additional Information Troubleshooting Deutsch In case of difficulty, check the following before calling for service. Symptom Cause Treatment Sound is not heard. • Cables are not connected properly. • Connect cables properly by referring to “Connection”. • The power cord is unplugged from the power outlet. • Plug the power cord securely into the power outlet. • A playback-only MD is loaded. • Use a recordable MD.
Input terminals (Analog) (Digital) Output terminal (Analog) Power requirements Power consumption Demensions Mass Accessories Deutsch Sampling frequency Compression/expansion method Number of channels Frequency Response S/N ratio Dynamic range Wow/flutter Minidisc digital audio system Magnetic modulation overwrite format Non-contacting optical method by semiconductor laser (λ=780nm) 44.1 kHz ATRAC (Adaptive Transform Acoustic Coding) method 2 channels 5 Hz to 20,000Hz (±0.
QUALITY SERVICE HOW TO LOCATE YOUR JVC SERVICE CENTER TOLL FREE : 1-800-537-5722 Dear customer: In order to receive the most satisfaction from your purchase, read the instruction booklet before operating the unit. In the event that repair is necessary, or for the address nearest your location, please refer to the factory service center list below or within the Continental United States, Call 1-800-537—5722 for your authorized servicer. Remember to retain you Bill of Sale for Warranty Service.
LIMITED WARRANTY AUDIO-1 JVC COMPANY OF AMERICA warrants this product and all parts thereof, except as set forth below ONLY TO THE ORIGINAL PURCHASER AT RETAIL to be FREE FROM DEFECTIVE MATERIAL AND WORKMANSHIP from the date of original retail purchase for the period as shown below. (“The Warranty Period.”) PARTS LABOR 1YR 1YR THIS LIMITED WARRANTY IS VALID ONLY IN THE FIFTY(50) UNITED STATES, THE DISTRICT OF COLUMBIA AND IN COMMONWEALTH OF PUERTO RICO.
VICTOR COMPANY OF JAPAN, LIMITED V EN. EN43-60.XM-EX90[J]/1 J 60 98.6.