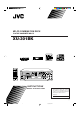
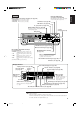
MD-CD COMBINATION DECK PLATINE COMBINÉE MD-CD XU-301BK XU-301 CD 32kHz MD-CD COMBINATION DECK DIGITAL INPUT 44.
Warnings, Cautions and Others/Mises en garde, précautions et indications diverses CAUTION RISK OF ELECTRIC SHOCK DO NOT OPEN CAUTION “TO REDUCE THE RISK OF ELECTRIC SHOCK DO NOT REMOVE COVER (OR BACK) NO USER SERVICEABLE PARTS INSIDE REFER SERVICING TO QUALIFIED SERVICE PERSONNEL” To reduce the risk of electrical shocks, fire, etc.: 1. Do not remove screws, covers or cabinet. 2. Do not expose this appliance to rain or moisture.
English Thank you for purchasing this JVC product. Please read these instructions through carefully before starting operation to ensure that you will derive the optimum performance and a long service life from your unit. Table of Contents BEFORE OPERATION Precautions .................................................................................................................................................................................... 2 Features ..................................................
English Precautions 1. Safeguarding against electric shocks, fire hazards and damage 1) A very low current will still flow even when the POWER button is set at STANDBY. To save power and ensure safety when the unit is not going to be used for an extended period of time, disconnect the power cords from the household AC outlet. 2) Do not handle the power cord with wet hands.
English Features • 3CD + MD combination deck • • • CD-TEXT facility supported Simultaneous copying of CD-TEXT characters (track titles, etc.) onto MDs Input of CD disc titles and names of artists enabled • Full complement of input/output facilities including optical digital, LINE and MIC • Sampling rate converter which supports 3 digital sources incorporated • 32 kHz, 44.
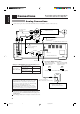
Do not turn on the power until all the connections have been completed. English Connections Analog Connections Use the accessory pin cords to connect the unit’s LINE connectors with the MD connectors on the receiver, etc. TAPE /MD Recording signals (line input) Amplifier, receiver etc.
Before proceeding, check whether the optical digital cable can be connected. Connect the stereo amplifier and source component to the DIGITAL (OPTICAL) connectors on the unit using the optical digital cable. One connecting cable is used to transmit the stereo signals (L/R) as the digital signals. • How to use the OPTICAL connectors for the connections 1 Remove the protective cap. • When the connector is not going to be used, fit this protective cap back in position. CD player, etc.
English Names of the Parts CD Parts/Common Parts CD1, CD2, CD3 buttons, lamps and 0 buttons (See pages 11, 12, 13) These are used to listen to CDs. When the 0 button is pressed, the corresponding tray is opened or closed. POWER button and STANDBY lamp (See page 11) This sets the power to ON from the OFF (standby mode), or vice versa. EDIT button (See page 18) TIMER/CLOCK button (See pages 45, 46) This is used for setting the clock and programming the timer.
DISPLAY/CHARA button (See pages 17, 21, 29, 42) This button changes the contents of the display window and the character input mode. MD recording control buttons and lamp (See page 28) • REC PAUSE: This is used to pause recording. • REC START: This is used to start recording. • REC STOP: This is used to stop recording.
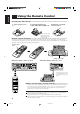
English Using the Remote Control Installing the dry batteries ——————————————————————————— 2 Install the dry batteries (Size “AAA”, R03 or UM4 x 2). 1 Slide open the cover. 3 Slide the cover back into position. • Align the polarities with the markings inside the battery compartment of the remote control, and install.
Names of the buttons (regular control panel) ————————————————— Number buttons ( ~ , ) (See pages 15, 20) POWER button These are used for CD or MD direct play operation. They are also used for MD editing operations. MIX PROGRAM , and buttons (See page 25) CD1, CD2 and CD3 buttons These are used to establish the MIX program play mode. REPEAT button (See pages 16, 23) NORMAL button (See pages 16, 23, 25) This is used to listen to a CD or MD repeatedly.
English Names of the buttons (editing control panel) ————————————————— Character input buttons (See page 43) TITLE button These enables characters to be input directly when titles are to be given to a CD or MD. EDIT button SET button ENTER button (See page 43) This is used to enter the editing modes. Not used Upper/lower-case letter selector button (See page 43) • Upper-case letters are input when this button’s lamp is off. • Lower-case letters are input when this button’s lamp is lighted.
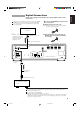
English Power ON/OFF Operations Power ON/OFF operations CD1, CD2, CD3 buttons CD1, CD2, CD3 buttons XU-301 CD 3 CD 2 CD 1 32kHz MD-CD COMBINATION DECK DIGITAL INPUT 44.
Operate by following the steps below in numerical order. English Listening to CDs Continuous Play (playing CD1, CD2 and CD3 through once each) 1 · 2 XU-301 CD 3 CD 2 CD 1 3 32kHz MD-CD COMBINATION DECK DIGITAL INPUT 44.
English • Playing CDs using the 6 button CD • First set the function to “CD.” Stopping CD play When the above button is then pressed, play starts from the CD on the tray for which “ ” is displayed. ————————————————————— • Stopping play at any time • When the button on the left is pressed after the function has been set to “CD,” the track number and play time appear on the display. When all the tracks on a CD have been played through, play will stop automatically.
English CD PITCH CONTROL ———————————————————— The CD PITCH CONTROL buttons and can be used to vary the CD playback speed by up to ±12%. The CD play signals are output to any other device from DIGITAL OUT OPTICAL only when the play speed is set to NORMAL. Normally, NORMAL SPEED should be set. CD Text——————————————————————————— “CD Text” is a new function featured by music CDs which CDs available to date did not have: it displays the album title, names of the tracks and artists, and other information.
English Direct Play (starting play from a specific track) CD play can be started from a specific track by pressing the corresponding number button(s) on the remote control. 2 1 1 Press the CD button. • Press the button corresponding to the CD whose track is to be heard. 2 Press the number button(s). • To play a track from No.1 to No.10 Press the number button ( ~ ) corresponding to the track. • To play track No.11 or above First press the button, and then press one of the number buttons ( ~ ).
English Skipping Tracks • To skip to the previous or next track with this unit, turn the jog dial. With the remote control, tap the ¢ or 4 button once. When the operation is performed while the last track on the CD is playing, play moves on to the next CD.
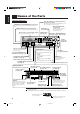
English Giving a title to a CD The CD can be given a title as well as the name of the artist and genre of music using up to 32 characters. 2 · 6 1 XU-301 CD 3 CD 2 CD 1 32kHz MD-CD COMBINATION DECK DIGITAL INPUT 44.
English 5 Input the title (using up to 32 characters). SET To return to a previous character To advance to a later character 2 Enter the selection. 1 Select the characters. Example : Disc title CD DISC TITLE MD L R • • • • 40 30 20 15 10 6 3 0 If the wrong character has been input, clear it using the CANCEL button. The title of your choosing is input by repeating steps 4 and 5.
English List of Music Genres ———————————————————— Genre ADULT CONTEMPORARY ALTERNATIVE ROCK CHILDRENS MUSIC CLASSICAL CONTEMPORARY CHRISTIAN COUNTRY DANCE EASY LISTENING EROTIC FOLK GOSPEL HIP HOP JAZZ LATIN MUSICAL NEW AGE OPERA OPERETTA POP MUSIC RAP REGGAE ROCK MUSIC RHYTHM EFFECTS SOUND EFFECTS SOUND TRACK SPOKEN WORD WORLD MUSIC Disc Lock Function To prevent children from taking out or inserting CDs A Disc Lock function can be engaged to make it impossible for children to take CDs out or insert other
Operate by following the steps below in numerical order. English Listening to MDs Playing all tracks 3 XU-301 CD 3 CD 2 CD 1 1 32kHz MD-CD COMBINATION DECK DIGITAL INPUT 44.
English When the MD has been placed inside ——————————— MD • When the button on the left is pressed, the power turns on, and play starts. Lamp lights. • To eject the MD Press the MD 0 button. “MD EJECT” appears in the display window, and the MD is ejected. The display is cleared. The MD can be ejected even when the power is off. In this case, as soon as the MD is ejected, the power is automatically turned off.
Keep MDs away from the following locations! English Do not place or keep MDs in any of the following locations. • Any location exposed to direct sunlight, inside a car or wherever the temperature may increase to a very high level Such locations will warp the discs and render them unusable. • A bathroom or other extremely humid location The disc may rust. • A beach, sandbox or other sandy location Fine particles will enter through the gaps in the cartridge, dirtying or scratching the disc surface.
• To skip to the previous or next track with this unit, turn the jog dial. With the remote control, tap the ¢ or 4 button once. Remote control Main unit To skip to the start of the current or previous track To skip to the start of the current or previous track To skip to the start of the next track. To skip to the start of the next track Direct play cannot be initiated by pressing the ( ) button alone: this button must be used with one of the number buttons ( ~ ).
Operate by following the steps below in numerical order. English MIX PROGRAM Play Up to 16 tracks can be programmed in programs 1, 2 and 3. Any tracks on the MD, CD1, CD2 and CD3 can be selected. 7 1 XU-301 CD 3 CD 2 CD 1 32kHz MD-CD COMBINATION DECK DIGITAL INPUT 44.
• The tracks on the MD alone or only the tracks on the CDs can be programmed also. 7 Press the 6 button to start MIX PROGRAM play. • - The numbers of the tracks which have been played are cleared from the music calendar, and they are displayed when play is completed. Operation stops automatically when all the programmed tracks have been played. The same operating procedure is followed for programs 2 and 3. To cancel the programming Press the CANCEL button. The last program setting is canceled.
English 5 Select and enter the track. SET 1 Select the track. 2 Enter the selection. 6 Repeat steps 4 and 5 (this procedure can be repeated for up to 16 tracks). • The tracks on the MD alone or only the tracks on the CDs can be programmed also. 7 Press the £ button to start MIX PROGRAM play. Operation stops automatically when all the programmed tracks have been played. The same operating procedure is followed for programs 2 and 3.
• Recording the numbers automatically With CD digital recordings, the numbers are added automatically following the numbers in the recording source. • Adding your own numbers (at any time except during synchro REC) When MANUAL is set using the TRACK MARKING button and the SET button on the main unit or remote control is pressed during recording, a number can be added exactly where desired.
English Manual Recording 6 2 XU-301 CD 3 CD 2 CD 1 1 32kHz MD-CD COMBINATION DECK 3 DIGITAL INPUT 44.
CD Recording (single-action recording) CD play and MD recording are started simultaneously. 1 -1 3 XU-301 CD 3 CD 2 CD 1 2 32kHz MD-CD COMBINATION DECK 1 -2 DIGITAL INPUT 44.
• To stop the recording at any time English Press the 7 (stop) button. The recording mode is released after “UTOC WRITING” is displayed. There is no need to adjust the recording level (for a digital recording). Recording is not possible while a CD or MD is playing. When the CD REC button is pressed, the function is automatically switched to “CD.” This means that when the CD to be recorded has been selected, recording can proceed straightaway.
CD Recording (LISTENING EDIT recording) Selected tracks can be programmed and recorded. 3 · 4 XU-301 CD 3 CD 2 CD 1 4 a 1 b 1 2 -1 32kHz MD-CD COMBINATION DECK DIGITAL INPUT 44.
English When there is not much recording time left on the MD, the tracks which can be recorded are automatically searched (on all the CDs). • If a track which can be recorded is found, its play time is displayed. Press the LISTENING EDIT button to program the track. • If no track which can be recorded is found, recording will start from program 1. When up to 32 tracks are programmed, recording starts from program 1. The same applies when the programming for all the CDs is completed.
Flashing 3 Select two recording sources. LINE CD + LINE CD + MIC LINE + MIC : To mix and record CD and line input signals : To mix and record CD and mic input signals : To mix and record line input and mic input signals • • The lamps of the selected sources stop flashing and light. The other lamp goes off. Since analog signals are recorded, the REC LEVEL and MIX BALANCE lamps light.
English MD Editing Functions Operate by following the steps below in numeical order. In addition to its recording and play functions, the MD part of this combination unit comes with editing functions. Recorded tracks can be joined, divided or erased exactly where required.
1 -1 XU-301 CD 32kHz MD-CD COMBINATION DECK DIGITAL INPUT 44.
EDIT 6 Press the EDIT button. English • “EDITING” appears, and the track number is incremented by 1. The change is stored in the memory IC. Play stops automatically. • 7 Eject the MD. \ The editing mode is now exited. • • After “UTOC WRITING” is displayed, the MD is ejected. The data in the memory IC has been recorded on the MD. The editing mode can also be exited by pressing the POWER button in step 7 to turn off the power.
Example: When joining the second track English 5 Press the SET button. Flashing SET MD MD EDIT JOIN L R EDIT 40 30 20 15 10 3 6 0 6 Press the EDIT button. • “EDITING” appears, and the track number is decremented by 1. The change is stored in the memory IC. Play stops automatically. • 7 Eject the MD. \ The editing mode is now exited. • • After “UTOC WRITING” is displayed, the MD is ejected. The data in the memory IC has been recorded on the MD.
English 4 Select the track to be moved. SET Example: When the second track has been selected Flashing MD 1 Select the track. 2 Enter the track selection. • MD EDIT MOVE L R 40 30 20 15 10 6 3 0 When the track to be moved is selected using the number button on the remote control corresponding to the track number, the track is played directly. 5 Select the destination to which the track is to be moved. SET Example: When moving the track to the fourth track Track No.4 flashes.
1 -1 XU-301 CD 3 CD 2 CD 1 32kHz MD-CD COMBINATION DECK 2 · 6 7 DIGITAL INPUT 44.
7 Eject the MD. \ The editing mode is now exited. English • • After “UTOC WRITING” is displayed, the MD is ejected. The data in the memory IC has been recorded on the MD. The editing mode can also be exited by pressing the POWER button in step 7 to turn off the power. Once a track is erased, the recording cannot be restored. Keep the accidental erasure prevention knob on an MD containing important recordings to the open position. \ See page 27.
• • After “UTOC WRITING” is displayed, the MD is ejected. The data in the memory IC has been recorded on the MD. The editing mode can also be exited by pressing the POWER button in step 5 to turn off the power. To stop the ALL ERASE operation at any time Press the EDIT button. Do not disconnect the power cord or subject the unit to the vibration while “UTOC WRITING” appears. Doing so may make it impossible to play the MD.
English 4 Select the type of characters to be used for the title. DISPLAY /CHARA \ Upper-case letters/symbols ≠ Lower-case letters/symbols ≠ Each time this is pressed, the character type changes. (The input characters appear in the display window.) Numbers For details, refer to the character layout table on page 44. 5 Input the title (using up to 32 characters). SET To return to a previous character To advance to a later character 1 Select the characters. DISC TITLE 2 Enter the selection.
Buttons bearing the same markings as those on the main unit function in exactly the same way as their main unit counterparts. This section describes how to use the buttons on the remote control which are not provided on the main unit. : This is used to enter the editing modes. : These are used to select a track number or move the cursor while characters are being input Lamp off Lamp on* Characters can be input as uppercase letters. Characters can be input as lower-case letters.
English Character Layout Table This unit enables the titles of the album and tracks to be written for the disc and tracks which have been recorded. The characters which can be used for this purpose are shown below. Upper-case letters Lower-case letters Numbers A B C D E a b c d e 0 1 2 3 4 F G H J f g h i j 5 6 7 8 9 K L M N O k l m n o P Q R S T p q r s t U V W X Y u v w x y Z z ! ” # $ I ! ” # $ % & ’ ( ) % & ’ ( ) * + , – . * + , – .
English Setting the Clock Setting the Present Time (to be performed when the unit is to be used for the first time) 1 XU-301 CD 3 CD 2 CD 1 2 32kHz MD-CD COMBINATION DECK DIGITAL INPUT 44.
• To ascertain the correct time English Use the time display on your TV screen or call the speaking clock. • When a power failure has occurred or the power cord has been disconnected ” flashing display is returned. In a case like this, The time display is cleared, and the “ re-set the time by previous steps 1 and 2. When the power cord is left disconnected for an extended period of time, the time display returns to “ .
3 Press the SET button. The start time flashes. English SET 4 Set the timer start time (this unit uses a 12-hour clock). Example: When timer play is to start at 7:15AM SET To put back the time To advance the time 1 Use the dial to align the “hour” display ”. with “ 2 Press the SET button. “ ” is displayed. SET 3 Use the dial to align the “minute” display with “ ”. 4 Press the SET button. “ ” is displayed. The end time flashes. 5 Set the timer end time.
English Timer Play (wake-up play) 8 (continued) 6 7 XU-301 CD 3 CD 2 CD 1 32kHz MD-CD COMBINATION DECK DIGITAL INPUT 44.
6 · 7 8 9 XU-301 CD 3 CD 2 CD 1 32kHz MD-CD COMBINATION DECK DIGITAL INPUT 44.
English COMPU LINK Function • What is COMPU LINK? The COMPU LINK remote control system (or, simply, “COMPU LINK”) serves to enable the kind of simple operations provided by an integrated component to be conducted even though this unit is a discrete component. These simple operations can be performed by connecting the COMPU LINK-3 SYNCHRO or COMPU LINK-1 SYNCHRO connector on each of the components involved.
This system transfers text information back and forth between the individual components of an audio system, and it enables CD text and MD text information to be displayed on the receiver (or amplifier) or on the TV screen, in which case it uses the on-screen display function of the receiver (or amplifier). The following operations can be performed by connecting the unit using the TEXT COMPU LINK function. • Tracks can be selected by checking their disc and track titles displayed on the TV screen.
English Information on MDs (Minidiscs) This is a new digital audio disc format: it has a diameter of 64 mm and enables up to 74 minutes of playback and recording. Function of the cartridge The diameter of the actual disc is 64 mm, making it slightly smaller than CD singles. Each disc is housed in a cartridge. The pocketsize cartridge measures 68 x 72 mm and is 5 mm thick. It is easy to carry about and store.
Error message Significance English MD (Minidisc) Error Messages Remedy MD BLANK DISC An MD with nothing recorded on it has been inserted. Replace with a pre-recorded MD unless something is to be recorded onto the blank MD. CANNOT JOIN An attempt has been made to join tracks which cannot be joined. This is due to limitations on the MD system. (See page 54.) DISC ERROR Trouble with MD (damage). Replace the MD. DISC FULL The MD does not have enough available time.
English Restrictions Imposed by MDs (Minidiscs) MDs use their own system to record information which is different from conventional cassette tapes and DAT tapes. This system has a number of restrictions which sometimes give rise to the following symptoms. These symptoms do not, however, indicate that something is wrong with the product. Symptom Cause “DISC FULL” is displayed even though the recording time displayed for the MD has not been used up.
REMOTE CONTROL TIMER MD RECORDER CD PLAYER COMMON Symptom Cause No sound. Check out the points below before requesting repairs or servicing. Remedial action/check Ref. 20 • An MD with nothing recorded on it has been • Replace the MD on which tracks have been inserted. (“BLANK DISC” is displayed.) recorded. 45-47 The time display flashes in the • A power failure has occurred or the power display window. cord has been disconnected. • Set the clock and re-program the timer.
English Main Specifications The unit’s specifications and exterior are subject to change without notice due to improvements. CD Player Section System Readout system Error correction system Number of channels Pitch control Total harmonic distortion (1 kHz) Dynamic range (1 kHz) Signal-to-noise ratio Frequency response Wow and flutter Compact disc digital audio system Non-contact optical readout (using semiconductor laser) CIRC 2 ±12% 0.
VICTOR COMPANY OF JAPAN, LIMITED V EN,FR 01/cover (E) J 2 4/1/98, 4:33 PM C 0298IMMIDESAN