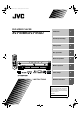
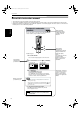
! TV DISC SELECT REPEAT Introduction 2 Preliminary knowledge 6 Getting started 16 Basic operations 24 Advanced operations 30 MP3 disc playback 46 Initial settings 49 Additional information 56 DVD STANDBY/ON TV DVD 3D TV/VIDEO PHONIC CANCEL RETURN TV1 TV2 1 2 TV4 TV5 4 5 TV7 TV8 TV3 3 TV6 6 TV9 7 8 9 TV -/-- TV0 MUTING 10 0 +10 VFP ANGLE SUBTITLE AUDIO PROGRESSIVE SCAN - ZOOM + DIGE
! Warnings, Cautions and Others Mises en garde, précautions et indications diverses CAUTION RISK OF ELECTRIC SHOCK DO NOT OPEN TO REDUCE THE RISK OF ELECTRIC SHOCK. DO NOT REMOVE COVER (OR BACK) NO USER SERVICEABLE PARTS INSIDE. REFER SERVICING TO QUALIFIED SERVICE PERSONNEL. CAUTION To reduce the risk of electrical shocks, fire, etc.: 1. Do not remove screws, covers or cabinet. 2. Do not expose this appliance to rain or moisture.
! English Table of Contents Introduction Page 2 Features...............................................................................2 Supplied accessories..........................................................3 About this instruction manual ..........................................4 Notes on handling ..............................................................5 Preliminary knowledge Page 6 Names of parts and controls .............................
! Introduction Features Introduction This unit is a compatible player for DVD VIDEO, Audio CD and Video CD discs. Picture functions Other functions 7 Progressive Scan system 7 Multi-disc tray and continuous playback Supports the Progressive scan system, as well as the conventional (current) Interlace scan system. * To enjoy the progressive video picture, you must connect the unit to a television or monitor that supports the progressive video input.
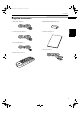
" ! Introduction English • Audio/video cable (x 1) • R6P(SUM-3)/AA(15F) batteries (x 2) • Component video cable (x 1) • Instruction manual (x 1) Introduction Supplied accessories • AV compulink cable (x 1) • AC power cord (x 1) • Remote Control Unit (x 1) E R SE DIS LE C CT E P T A T IC 4 4 V T 3D N O H P 1 V 1 O EL ID E /V C V N T A C V T DV D T 3 3 V N R 8 U V T T E R 5 5 V T T 0 0 6 V 6 T M 9 T IN - 0 +1 U IO D U
! Introduction About this instruction manual • This instruction manual is written in the following manner. • This unit can playback CD-R discs recorded by the MP3 format (we refer to those discs as MP3 discs in this manual). • Regarding operations for MP3 discs, see “MP3 disc playback” on and after page 46. The other sections of this manual basically do not refer to MP3 disc playback.
# ! Introduction English Notes on handling Important cautions Safety precautions Installation of the unit • Select a place which is level, dry and neither too hot nor too cold (between 5oC and 35oC, 41oF and 95oF). • Leave sufficient distance between the unit and the TV. • Do not use the player in a place subject to vibrations. Avoid moisture, water and dust Do not place the unit in moist or dusty places.
! Preliminary knowledge Names of parts and controls Refer to the corresponding pages indicated in () for details.
$ ! Preliminary knowledge 6 0 (OPEN/CLOSE) button (24, 28) Used to open and close the carousel. You can also use this button in the play exchange mode. 7 8 (PAUSE) button (27, 34, 46) Pauses playback. Also, used to display nine continuous still pictures (STROBE function). 8 Remote sensor (21) Receives signals from the remote control unit. English - Disc tray carousel Used to set up to 7 discs. = 7 (STOP) button (27, 46) Stops playback.
! Preliminary knowledge Remote control unit ! Infrared signal-emitting window @ TV STANDBY/ON TV Preliminary knowledge 1 DISC SELECT button DISC SELECT DVD STANDBY/ON TV DVD 2 REPEAT button REPEAT 3 3D PHONIC button TV1 TV2 TV3 1 2 3 TV4 TV5 TV6 4 5 6 TV7 TV8 TV9 4 Numeric buttons 5 ANGLE button 3D TV/VIDEO PHONIC CANCEL RETURN 7 8 9 TV -/-- TV0 MUTING 10 0 +10 PROGRESSIVE SCAN - ZOOM + DIGEST 7 DIGEST button NEXT PREVIO
% ! Preliminary knowledge 6 SUBTITLE button (41) Used to display the subtitle selection display on the TV screen, as well as used to turn the subtitle on or off (for DVD VIDEO). 7 DIGEST button (33) Displays beginning scenes of each title, chapter or track on the TV screen (for DVD VIDEO/Video CD). 8 4/PREVIOUS button (27, 28, 31, 46) Skips back a chapter, title or track. Also used for the page selection of a menu screen (for DVD VIDEO/Video CD).
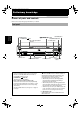
! Preliminary knowledge Rear panel 1 DIGITAL OUT jacks (COAXIAL/OPTICAL) 2 VIDEO OUT - VIDEO jack 3 VIDEO OUT - COMPONENT jacks (Y/PB/PR) 4 Region code label 1 DIGITAL OUT AUDIO OUT VIDEO OUT AC IN AV COMPU LINK VIDEO PCM / STREAM COAXIAL OPTICAL RIGHT LEFT COMPONENT PR Y PB Preliminary knowledge S-VIDEO 7 AV COMPU LINK jacks 6 VIDEO OUT - S-VIDEO jack 8 AC IN connector 5 AUDIO OUT jacks (RIGHT/LEFT) 1 DIGITAL OUT jacks (COAXIAL/OPTICAL) (19)
! Preliminary knowledge English Operational Principles On-screen displays You can set preferences and perform advanced playback functions via various on-screen displays, including the Opening, Preference, Parental Lock and Control displays.
! Preliminary knowledge PREFERENCE (1, 2) displays (see page 49) (PREFERENCE 2) (PREFERENCE 1) You can set preferences via these displays. PREFERENCE1 • To bring up the PREFERENCE 1/PREFERENCE 2 display 1 When a DVD VIDEO disc is set and stopped or no PRESS disc is inserted, press CHOICE.
" ! Preliminary knowledge VCD CONTROL display English AUDIO REPEAT ALL The display shown on the right appears when an MP3 disc is set. You can select the desired Group or track to be played back. Current relative position of the track Current track (St: start, End: end) number REPEAT St. End 0 10 Mb PRESS TRACK ENTER 3 TIME 4 : 58 EXECUTE A-B REPEAT St.
! Preliminary knowledge On-screen guide icons During DVD VIDEO playback, you may see icons displayed over the picture. These have the following meanings. : Displayed at the beginning of a scene recorded from multiple angles. (See page 40.) : Displayed at the beginning of a scene recorded with multiple audio languages. (See page 42.) Preliminary knowledge : Displayed at the beginning of a scene recorded with multiple subtitle languages. (See page 41.
# ! Preliminary knowledge English About discs Playable disc types Playable and non-playable disc types are as follows: Playable discs Video CD Audio CD The DVD VIDEO Logo is a trademark. • CD-R and CD-RW discs recorded with the Audio CD format and CD-R discs recorded with the Audio CD, Video CD and MP3 format can be played back, though some discs may not be played back because of the disc characteristics or recording condition.
! Getting started Connections *In the following description, “TV” may be substituted with “monitor” or “projector.” *Before using the unit, you have to connect the unit to a TV and/or amplifier. Before making any connections • Do not connect the AC power cord until all other connections have been made. • Since different components often have different terminal names, carefully read the instructions supplied with the component you are going to connect.
$ ! Getting started English To connect to a TV with the component video input jacks You can enjoy high picture quality by connecting the unit’s COMPONENT VIDEO OUT jacks (Y, PB, PR) to the COMPONENT VIDEO IN jacks (Y, PB, PR) of your TV with the video cables.
! Getting started NOTES • Connect “Y” to “Y”, “PB” to “PB”, “PR” to “PR” correctly. • When the component video input jacks of the TV is of the BNC type, use an adapter to convert a pin jack to a BNC jack (optional). • When the Progressive scan mode is selected, the VIDEO and S-VIDEO outputs do not feed the correct signals.
% ! Getting started English To connect to audio equipment with a digital input You can enhance the sound quality by connecting either of the unit's DIGITAL OUT jacks to the digital input of an amplifier, MD, etc. by using an optional digital cable (OPTICAL or COAXIAL). The digital audio signal from a disc is directly transferred.
! Getting started To connect the power cord When all the audio/video connections have been made, insert the smaller plug of the supplied AC power cord to the unit’s AC IN connector, then insert the other end to the wall outlet. Make sure that plugs are inserted firmly. The STANDBY indicator lights and setup is completed. Warning • • • • • Disconnect the power cord if you are not going to use the unit for a long time.
! Getting started Precautions for the safe use of batteries English Observe the following precautions for the safe use of batteries. If they are used improperly their life will be shortened, they may burst or their contents may leak. Precaution • Remove the batteries from the remote control if it is not going to be used for a long period of time. • Remove dead batteries and dispose of them properly.
! Getting started To use the remote control unit for TV operation You can operate your TV from the remote control unit. Setting the remote control signal for operating your TV.
" ! Getting started The following buttons can be used for operating the TV: To use the CURSOR (CH–, CH+, VOL–, VOL+), TV/VIDEO - CANCEL and numeric buttons for TV control, set the TV - DVD switch to “TV”. TV English DVD TV Turns the TV on or off. TV/VIDEO CANCEL TV -/-- 1 10 to TV0 0 MUTING Selects the TV channels directly.
! Basic operations In the following description, the buttons on the remote control unit are mainly used, however, you may use the corresponding buttons on the front panel of the unit if available. Turning on/off the unit Press DVD STANDBY/ON on the remote control unit or press STANDBY/ON on the front panel.
# ! Basic operations 2 Press EXCHANGE/ DISC SKIP to select accessible trays if required. English Each press of the button rotates the carousel clockwise by an amount for accessing the next two trays. 6 5 3 Place one or two discs in the tray(s).
! Basic operations Basic playback Note that this section describes basic operations for playback of DVD VIDEO, Audio CD and Video CD discs. For MP3 disc playback, see the independent chapter on and after page 46.
$ ! Basic operations To stop playback completely English Press 7. The unit stops playback. • If you press 0 (OPEN/CLOSE) during playback, the unit stops playback and opens the tray carrousel. To stop playback temporarily Press 8. The unit pauses playback. To resume playback, press 3. . To advance or reverse playback rapidly while monitoring ¶ During playback Method 1 (from the remote control unit only) Each press of 1 or ¡ increases the playback speed.
! Basic operations To locate the beginning of the scene or song ¶ During playback Press 4 or ¢. Press 4 to locate the beginning of the current chapter, title, or track, and press ¢ to locate the beginning of the next chapter, title, or track. NOTE • When you play a Video CD disc with the PBC function or a DVD VIDEO disc, the unit may locate a different place, but it will generally locate the beginning of the chapter, title or track.
% ! Basic operations English Resuming playback The unit can memorize the position on a disc where you interrupt playback, and resume playback from that position later. To memorize the interrupted position ¶ During playback Press 7, or press DVD STANDBY/ON panel. on the remote control unit or STANDBY/ON on the front The unit memorizes the interrupted position. “RESUME” appears in the display window for a few seconds.
" ! Advanced operations • Note that this section describes operations for playback of DVD VIDEO, Audio CD and Video CD discs. For MP3 disc playback, see the independent chapter on and after page 46. • Make sure that the TV - DVD switch is set to “DVD” when using TV DVD the CURSOR 5/∞/2/3, numeric and TV/VIDEO - CANCEL buttons for controlling the unit.
" ! Advanced operations The unit starts playback of the selected item. You can return to the menu by pressing the RETURN button. When “NEXT” or “PREVIOUS” appears on the TV screen, the unit generally works as follows: • Pressing ¢ advances to the next page. • Pressing 4 returns to the previous page. * The method of the operation is different depending on the disc. Depending on the disc type and the unit status, what is specified differs.
" ! Advanced operations • To skip forward chapters/tracks, press ¢ as many times as required. • To skip to the beginning of the current track/ chapter, press 4 once. • To skip back chapters/tracks, press 4 as many times required. 4 Press ENTER. The unit starts playback from the selected chapter. • The “10” and “+10” buttons are not used in this function. NOTES NOTES • You can skip tracks within the current disc only.
"" ! Advanced operations 3 Use the numeric buttons (0 to 9) to enter the time. • When The specified time appears in the message area. 4 Press ENTER. The unit starts playback from the specified time. English NOTES appears on the TV screen in step 2: The time you have selected is not contained on the disc, or the Time search function does not work on the disc.
" ! Advanced operations • While a DVD VIDEO disc is stopped: The opening scene of each title appears on the TV screen. • During DVD VIDEO disc playback: The opening scene of each chapter in the current title appears on the TV screen. • When a Video CD disc is loaded: The opening scene of each track appears on the TV screen.
"# ! Advanced operations English To zoom in/out [ZOOM] • Pressing 8 when the nine still pictures are shown will advance pictures frame by frame. TV1 • To cancel strobe play Press and hold 8 for more than 1 second.
" ! Advanced operations Up to 24 tracks can be programmed. You may select the same track more than once. Changing the playback order PRESS NUMERIC KEY You can play tracks on a Audio or Video CD disc currently loaded in the desired order or in random order using the Program or Random playback function. Note that you cannot use these functions among multiple discs.
"$ ! Advanced operations English To playback in random order [RANDOM] Repeat playback You can play tracks on an Audio CD or Video CD disc in random order by using the Random function. TV DISC SELECT REPEAT DVD STANDBY/ON TV DVD 3D TV/VIDEO PHONIC CANCEL RETURN TV1 You can repeat playback of the current selection or all disc contents on the disc currently loaded (except DVD VIDEO). You can also repeat playback of a desired part.
" ! Advanced operations Method 2 ¢ 4 CLEAR SELECT 3 7 SLOW+ SLO ¡ 1 TIT STROB E 8 W- 2-1 LE ME CH+ 5 VOL - 2-2 NU VOL + Disc type 5 5 The selected mode is also shown on the on-screen display, however, it is shown in the different way from the display window. The following table shows the relation between them.
"% ! Advanced operations English To repeat a desired part [A-B REPEAT] • During playback, pressing ENTER when is pointed at [A-B REPEAT] quits A-B repeat mode and continues playback. • You can also quit A-B repeat mode by pressing 4 or ¢. TV DVD STANDBY/ON TV DVD DISC SELECT NOTES 3D TV/VIDEO PHONIC CANCEL RETURN REPEAT TV1 TV2 • Points A and B must be specified on the same track or chapter.
! Advanced operations Selecting a scene angle of DVD VIDEO You can enjoy a variety of scene angles if the DVD VIDEO disc contains “multi-angle” parts, where multiple cameras were used to shoot the same scene from different angles. • At the beginning of a “multi-angle” part, TV screen. appears on the NOTES • The Angle selection display will automatically disappear if you do not change the angle for several seconds.
! Advanced operations To select a scene angle from the angle list display [ANGLE] TV DISC SELECT REPEAT 1 TV2 TV3 1 2 3 TV4 TV5 TV6 4 5 6 TV7 TV8 TV9 7 8 9 TV -/-- TV0 MUTING 10 0 +10 To select the subtitle language [SUBTITLE] VFP ANGLE SUBTITLE AUDIO PROGRESSIVE SCAN - ZOOM + DIGEST S PREVIOU NEXT ¢ 4 CLEAR 7 SELECT 3 SLOW 3 For DVD VIDEO discs, you can select the subtitle language, as well as the audio language/soun
! Advanced operations From on-screen display TV STANDBY/ON TV DVD DISC SELECT REPEAT 3D TV/VIDEO PHONIC CANCEL RETURN TV1 TV2 TV3 1 2 3 TV4 TV5 TV6 By AUDIO selection, you can choose the audio language of movies or enjoy KARAOKE with or without the vocal.
" ! Advanced operations 2 Use CURSOR 5/∞ or AUDIO to move to (for DVD VIDEO) English Miscellaneous functions [AUDIO]. (for Video CD) To adjust the picture character [VFP] ANGLE 1/3 AUDIO 2/3 SUBTITLTE 1/3 AUDIO REPEAT REPEAT A-B REPEAT St. End TITLE 3 0 10 Mb TIME 1 : 34 : 58 TIME SEARCH ENGLISH CHAP.SEARCH KEY 3 St.
! Advanced operations 2 Select the desired mode by using 3D PHONIC. • TINT Controls the tint of the screen. • SHARPNESS Controls the sharpness of the screen. Each time you press the 3D PHONIC button, the 3D PHONIC mode changes as follows: ACTION • Y DELAY Controls the color gap of the screen. DRAMA 3D PHONIC THEATER • GAMMA Controls the brightness of neutral tints with maintaining the brightness of dark and bright portions.
# ! Advanced operations To check the disc time [TIME SELECT] • While stopped EACH REMAIN (recording time of the current track) You can choose the time display mode for an Audio CD or Video CD disc in the display on the front panel and in the on-screen display.
! MP3 disc playback This unit can playback CD-R discs recorded by the MP3 format (we refer to those discs as MP3 discs in this manual). Though available functions with MP3 discs are limited, operations for the available functions are similar to those with Audio CD discs. Operations Basic operations What is MP3? TV DISC SELECT MP3 is the abbreviation of “MPEG1 Audio Layer 3”. MPEG Audio is a compression specification that compresses the audio portion only.
$ ! MP3 disc playback Specifying the desired Group and Track 4 Press ENTER. English The unit starts playback from the specified Track. During playback, the bottom row of the display shows something like below. When loading an MP3 disc, after the disc contents are read, the MP3 CONTROL display automatically appears on the TV screen. You can specify the desired Group and Track for playback via this display.
! MP3 disc playback Repeat playback You can repeat playback of the current track or group.
% ! Initial settings English NOTES Selecting preferences • To returns the normal screen: Press CHOICE. You can set various preferences for playback via two preference displays. How to set preferences • If you bring up a PREFERENCE display during DVD VIDEO/Video CD playback, the unit memorizes the current playback position, and resumes playback from that position later when dismissing the PREFERENCE display.
# ! Initial settings SUBTITLE Examples of “on-screen guide” icons or characters: You can select the default subtitle language to be displayed if it is contained on a DVD VIDEO disc.
# ! Initial settings PROGRESSIVE MODE PREFERENCE1 PREFERENCE2 MENU LANGUAGE AUDIO LANGUAGE SUBTITLE ENGLISH ON SCREEN LANGUAGE ON SCREEN GUIDE ENGLISH MONITOR TYPE PROGRESSIVE MODE 4:3 LB PRESS ENGLISH OFF ON AUTO KEY • AUTO The unit recognizes the picture type (film or video source) of the current disc according to the disc information. • VIDEO 1 Suitable for playing back a video source disc with static (inactive) pictures.
# ! Initial settings DOWN MIX SCREEN SAVER To playback a DVD VIDEO PREFERENCE1 PREFERENCE2 disc recorded with DIGITAL AUDIO OUTPUT surround multichannel DOWN MIX COMPRESSION AUTO STANDBY audio correctly, the DOWN SCREEN SAVER AV COMPULINK MODE MIX setting must be PRESS KEY properly made according to your audio system.
#" ! Initial settings Limiting playback by children 4 While points [Set Level], use CURSOR 2/3 to select the Parental Lock level. PARENTAL LOCK US Country Code This function restricts playback of DVD VIDEO discs which contain violent (and other) scenes according to the level set by the user.
# ! Initial settings 5 Enter the password using the numeric buttons To change the settings [PARENTAL LOCK] (0 to 9) and press ENTER. moves to [EXIT]. The password entered in the above step becomes the new password. If you do not change the password, enter the same password as in the step 2. Even if you want to change only the country code and/or parental level, do not forget to enter the password after changing the country code and/or parental level.
## ! Initial settings To temporarily release the Parental Lock [PARENTAL LOCK] English When you set the Parental level strictly, some discs may not be played back at all. When you insert such a disc and try to play it, the following Parental Lock on-screen display appears on the TV screen, asking you whether you want the Parental Lock to be temporarily released or not.
# ! Additional information AV COMPU LINK remote control system The JVC AV COMPU LINK system allows you to enjoy video or audio with the simplest operation.
#$ ! Additional information IMPORTANT! English You connect the component video output to your TV: • Set the DVD player’s AV COMPU LINK setting to DVD1. • Make the video/audio connection between the DVD player and your receiver using the supplied audio/video cable, and do not make the S-VIDEO connection.
# ! Additional information Care and handling of discs How to handle discs When handling a disc, do not touch the surface of the disc. Since discs are made of plastic, they are easily damaged. If a disc gets dirty, dusty, scratched or warped, the images and sound will not be picked up correctly, and such a disc may cause the player to malfunction. Label side Do not damage the label side, stick paper to or use any adhesive on its surface.
#% ! Additional information English Troubleshooting What appears to be a malfunction may not always be serious. Please go through the following list before requesting service. Symptom Possible case Remedy Power does not come on. Power plug is not inserted securely. Plug in securely. Too far from the unit. More closer to the unit. The tip of the remote unit is not pointed in the right direction.
! Additional information Specifications General Readable discs: Video format: DVD VIDEO, Audio CD, Video CD NTSC, 525i/525p selectable Other Power requirements: Power consumption: Mass: Dimensions (W x H x D): AC 120 V , 60 Hz 18 W (POWER ON), 2.7 W (STANDBY mode) 5.6 kg (12.
! Additional information English Appendix A:Table of languages and their abbreviations AA AB AF AM AR AS AY AZ BA BE BG BH BI BN BO BR CA CO CS CY DA DZ EL EO ET EU FA FI FJ FO FY GA GD GL GN GU HA HI HR HU HY IA IE Afar Abkhazian Afrikaans Ameharic Arabic Assamese Aymara Azerbaijani Bashkir Byelorussian Bulgarian Bihari Bislama Bengali, Bangla Tibetan Breton Catalan Corsican Czech Welsh Danish Bhutani Greek Esperanto Estonian Basque Persian Finnish Fiji F
! Additional information Appendix B:Country code list for Parental Locks This list is used for the Parental Lock operation. For details, see page 53.
" ! Authorized Service Centers ® QUALITY SERVICE HOW TO LOCATE YOUR JVC SERVICE CENTER TOLL FREE: 1 (800) 537-5722 http://www.jvc.com Dear Customer, In order to receive the most satisfaction from your purchase,please read the instruction booklet before operating the unit.In the event that repairs are necessary, please call 1 (800)537-5722 for your nearest authorized servicer or visit our website at www.JVC.
! LIMITED WARRANTY CONSUMER VIDEO 1-90 JVC COMPANY OF AMERICA warrants this product and all parts thereof, except as set forth below ONLY TO THE ORIGINAL PURCHASER AT RETAIL to be FREE FROM DEFECTIVE MATERIALS AND WORKMANSHIP from the date of original retail purchase for the period as shown below.
# ! VICTOR COMPANY OF JAPAN, LIMITED EN.