Vintage design big button Dual (FSK & DTMF) Caller ID telephone with LCD display Instruction Manual JT-P433 Please read this manual carefully before operating and save it for future reference. Have a question? Please visit http://www.jWIN.
Vintage Design Telephone with Caller ID V10M10_IM_EN_01282008 USER SAFETY GUIDE INSTRUCTIONS ON ENVIRONMENT PROTECTION Do not dispose of this product in the usual household garbage at the end of its life cycle; bring it to a collection point for the recycling of electrical and electronic appliances. This symbol on the product means the instructions for use or the packaging will inform about the methods of disposal. The materials are recyclable as mentioned in its marking.
Vintage Design Telephone with Caller ID V10M10_IM_EN_01282008 USER SAFETY GUIDE Compliance (USA and Canada) This product complies with the standards in Part 68 of the FCC Rules in the USA and CS-03 in Canada. 1. This product must be connected to the public switched telephone network through a modular telephone outlet or jack. 2.
Vintage Design Telephone with Caller ID V10M10_IM_EN_01282008 -3- www.jWIN.
Vintage Design Telephone with Caller ID V10M10_IM_EN_01282008 TABLE OF CONTENTS Getting Started General Features ……………………………………………………………………... In the Package ………………………………………………………………………... Location of Controls ………………………………………………………………..… Getting the Telephone Ready for Use ……………………………………………... Installing the Batteries ……………………………………………………………….. 6 6 7 8 8 Operational Instructions Basic Setup ……………………………………………………………………………. Receiving Caller ID Information ……………………………………………………..
Vintage Design Telephone with Caller ID V10M10_IM_EN_01282008 GETTING STARTED Thank you for purchasing the JT-P433 Vintage design big button Dual (FSK & DTMF) Caller ID telephone with LCD display. Please read and follow the instructions in this manual carefully to ensure that your product operates correctly.
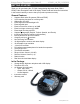
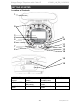
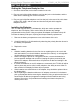
Vintage Design Telephone with Caller ID V10M10_IM_EN_01282008 GETTING STARTED Location of Controls 1 2 3 4 5 6 9 10 7 8 11 12 13 14 15 16 1. RECEIVER 2. NUMBER keypad 3. LCD SCREEN 4. SET / BACK button 5. DEL button 6. AUTO / VIP button 7. STORE / M1 / M2 buttons 8. SNOOZE button 9. VOLUME button 10. SPEAKER PHONE button 11. UP/ DOWN button 12. REDIAL / P button -6- 13. FLASH button 14. HOLD button 15. speaker 16. DC 9V JACK www.jWIN.
Vintage Design Telephone with Caller ID V10M10_IM_EN_01282008 GETTING STARTED Getting the Telephone Ready for Use 1. Choose a desired flat, level surface location for the unit. 2. Plug one end of the coiled telephone cord into the jack on the handset, and the other into the matching jack on the unit’s base. 3. Plug one end of the flat telephone cord into the jack in the rear of the unit’s base (marked TEL-LINE), and the other end into the wall jack which supplies telephone service.
Vintage Design Telephone with Caller ID V10M10_IM_EN_01282008 OPERATIONAL INSTRUCTIONS Basic Setup Note: Please be sure the telephone lines are connected well and batteries or AC adapter are installed before starting setting. Press the SET/BACK button to enter the setting menu, use ▲UP or ▼DOWN buttons to select from the menu including Set Language, Set Local Area Code, Set Time/Date and LCD Contrast. Press the FLASH button to exit the setting manual. A.
Vintage Design Telephone with Caller ID V10M10_IM_EN_01282008 OPERATIONAL INSTRUCTIONS Basic Setup-continued G. SET ALARM CLOCK When the LCD displays “ALARM”, press the SET/BACK button to enter The LCD will display “OFF” and “-1-“ (means the 1st group of alarm clock). Press ▲UP or ▼DOWN to select the alarm group. There are a total of three (3) groups to be selected. Press the SET/BACK button to enter the setting Press ▲UP or ▼DOWN to select “ONE TIME”, “P.
Vintage Design Telephone with Caller ID V10M10_IM_EN_01282008 OPERATIONAL INSTRUCTIONS Basic Setup-continued L. SET DIALING MODE When the LCD displays “DIAL MODE”, press the SET/BACK button to enter. Press ▲UP or ▼DOWN to select the desired dialing mode. ‘TONE’ for tone dialing and ‘PULSE’ for pulse dialing Press the SET/BACK button to confirm Note: Under the pulse dial state, press the Star button to change to tone dial. M.
Vintage Design Telephone with Caller ID V10M10_IM_EN_01282008 OPERATIONAL INSTRUCTIONS Basic Setup-continued R. RINGER VOLUME CONTROL Under off- hook state, press VOLUME to enter the setting The LCD will display “RING VOLUME” and “-2-”(the volume level). Press VOLUME to select the ringer volume level.“1”is low level, “2”is high level and “OFF” is ringer off. Note: If you choose ringer off, you can still dial out, but cannot hear ringer sound of any incoming calls.
Vintage Design Telephone with Caller ID V10M10_IM_EN_01282008 OPERATIONAL INSTRUCTIONS Recieving Caller ID Information Note: You must make sure your Telephone Company offer caller ID service so that the caller ID function can be activated. A. Incoming Call Display When there is an incoming call, the LCD will display the number, area code, name, time and date of the call. B.
Vintage Design Telephone with Caller ID V10M10_IM_EN_01282008 OPERATIONAL INSTRUCTIONS Phonebook Review - Under on-hook or off-hook state, press the BOOK button to enter the phonebook review When the LCD displays “SEARCH”, press ▲UP or ▼DOWN to review the phonebook number or Enter the letter of the name by using keypad, the wanted telephone number will display on LCD, press ▲UP or ▼DOWN to review one by one Press [FLASH] to exit the phonebook review Phonebook Input - Press [BOOK] twice continuously, th
Vintage Design Telephone with Caller ID V10M10_IM_EN_01282008 OPERATIONAL INSTRUCTIONS Dialing IP Number - When the IP was set as ‘On’, pick the handset and if press the first digit is long distant code, then it will run by IP format automatically or Under off-hook state, when reviewing the incoming and outgoing call, if the first digit of displaying number is long distant code, press the SET/BACK button, then it will run by IP format after hook the phone once.
Vintage Design Telephone with Caller ID V10M10_IM_EN_01282008 OPERATIONAL INSTRUCTIONS Dialing from Two-Touch Memories - Under off-hook state, press the AUTO/VIP button, the LCD will display “INPUT ADDR” Press the desired two-touch location from 0-9 and the LCD will display the number Press the SET/BACK button and the number will be dialed out automatically.
Vintage Design Telephone with Caller ID V10M10_IM_EN_01282008 OPERATIONAL INSTRUCTIONS New Incoming Call Indicator Under on-hook or off-hook state, when there is new incoming call, the new call LED will be lighted for 10 seconds and the new call icon will display on LCD at the same time. The new call icon will disappear after the new call has been reviewed. Last Number Redial The last outgoing number can be redialed automatically just by pressing the REDIAL button under on-hook state.
Vintage Design Telephone with Caller ID V10M10_IM_EN_01282008 TROUBLESHOOTING & SPECIFICATIONS Troubleshooting • No Display on LCD Screen o Brightness on display may be turned down. Increase brightness level. o No batteries or batteries are improperly installed. If no batteries, install three (3) AA batteries as directed or Install optional AC Adapter Make sure batteries observe to polarities (+/-) as indicated inside the battery compartment.
Vintage Design Telephone with Caller ID - 18 - V10M10_IM_EN_01282008 www.jWIN.
TEL: 516-626-7188 FAX: 516-626-7105 website: www.jWIN.com © 2008 jWIN Electronics Corp. All rights reserved. No portion of this printed material or product enclosed herewith including design, shape and graphics, may be reproduced or transmitted in any form without the expressed written consent of jWIN Electronics Corp. by any means, electronic or mechanical, including photocopying, recording, or by use of an information storage and retrieval system.