
Owner's Manual


5. EXAMPLES FOR ATTACHMENT
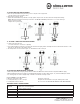
C. For concrete and perforated brick: grout injection anchorage
C. - WITHOUT a perforated sleeve for solid bricks and concrete.
C. - WITH a perforated sleeve for perforated brick.
C. Advantage: Attachment is free of expanding pressure, which means the bracket can be exchanged as often as required and be
C. attached close to the edge (minimum distance 100 mm).
C. The detailed instructions for mounting are on the product information leaflet.
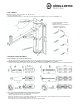
- Position the wall plate vertically,
- mark the drill holes
- drill the holes for the rawl plugs 6 x
- - ø 8 mm for bolt anchors
- - ø10 mm for frame anchors
4. WALL MOUNT
NOTE: the bracket can be mounted in two different ways:
a. In a pre-assembled state or
b. The wall plate first 6 and then connect the rest of the bracket to the wall plate (see section 3. ASSEMBLY - b.)
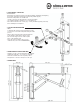
A. Concrete wall: e.g.: bolt anchor M8 x 75 mm
A. - drill a hole, blow debris from the hole, drive in the anchor, position a washer and screw in the bolt with 20 Nm.
B. Perforated brick: e.g.: plastic frame anchor 10 x 100 mm with wood screw DIN571 ø7 x 105 mm
B. - drill a hole, blow debris from the hole, drive in the rawl plug, position the wall plate, connect with a screw and an intermediate washer.