
Owner's Manual


6. USER NOTES / FUNCTION
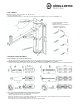
7. TILT OF CANTILEVER ARM
- NOTE:
- To adjust the tilt, first remove the loudspeaker or ask a
- second person to hold the loudspeaker during the entire
- process.
- Remove the bolt and bolt parts Y from the drill hole
- for the adjusting shaft and the support section.
- Reconnect the support section at the required
- place on the adjusting shaft.
- There are eleven possible positions for the
- cantilever arm (see section 9. DIMENSIONS).
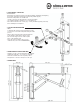
8. DIRECTION OF CANTILEVER ARM
- Slightly loosen the connection Z between the adjusting
- shaft and the wall plate - do not remove completely.
- Swivel the cantilever arm to the required position.
- Re-tighten the connections and press on the caps.
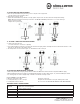
9. DIMENSIONS
SAFETY NOTES
- Ensure there are sufficient people to help when installing, dismantling and adjusting
- the speaker (preferably 2 technically and physically suitable people).
- Ensure the loudspeakers are suitable and
- that the connections are the right size (ø 35 mm) and quality.
- Use suitable installation equipment, e.g. a safe ladder, etc.
- Check the bracket functions correctly (e.g. correctly installed supporting section 11)
- before installing the loudspeaker.