
Owner's Manual


- In the event of maintenance pay attention to possible risks (wedging, possibility of being knocked into, ladder?)
- To care for the product use a damp cloth and a non-abrasive cleaning agent
FAULT-FINDING (F) and REPAIR (R)
F: The wall mount/bracket is loose R: Check to ensure the wall is suitable (load bearing)
R: Check the screws 3 and tighten/replace
R: (use a qualified technician)
F: The swivel bracket/adapter plate is loose R: Check screws 4.a, 5.c and tighten;
R: Check the loudspeaker case
F: The loudspeaker inadvertently leans forward R: Screw connections (6.a) screws not properly
R: tightened, i.e. tighten screws
CHECK, MAINTENANCE, CLEANING
TECHNICAL DATA / SPECIFICATIONS
Material
Wall plate, swivel bracket: Steel, powder coating, black
Suspension profile: Aluminum, powder coating, black
Screws: Steel, galvanized
Caps, Cushioning: Plastic (PE, PA)
Load Loudspeakers: max. 25 kg
Dimensions W x D x H: 120 x 104 x 220 mm, Box: 110 x 120 x 220 mm
Weight net: 1.35 kg gross: 1.45 kg
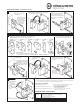
MOUNT SPEAKERS - DIRECT without adapter plate
4
5
6
4.a
Screw the speakers to the
swivel bracket.
(Screws not included
with the delivery, due
to the fact that the
required screws differ
according to the
respective loud-
speaker)
4.b Hang swivel bracket (with mounted loudspeaker)
4.b into the wall mount/bracket
4.c
Secure the swivel bracket that
has been hung into the wall
mount. Screw the parts together
with a carriage bolt, U disk and
safety nut.
5.a Adapter plates are needed for the different connection dimensions.
5.a KÖNIG & MEYER offers a wide range of adapter plates:
6.a
Variable adjustment
from 0° to 30°.
Loosen the upper
screws and adjust
the angle
according to the
scale. Tighten the
screws.
5.b Screw the appropriate adapter plate using
5.b both safety nuts on the swivel bracket.
SETUP INSTRUCTIONS - Install wall mount (4-6)
MOUNT LOUDSPEAKER - INDIRECT, with optional adapter plate (Article No.: 24352, 24354, 24356, 24357, 24358, 24359)
SETTINGS
5.c Screw the loudspeaker to
5.c the adapter plate
(Screws M6x14 only delivered
with Adapter Plate 6; Not with
Adapter Plates 1-5 due to the
fact that the loudspeakers
require different screws)
5.d Hang the swivel bracket (with mounted
5.d loudspeaker) into the
5.d wall mount.
5.e Secure the swivel support
5.e armwith a lock screw, U disk
5.e and safety nut. Place the cap
5.e on the bolt.
For this use
the previously
loosed screw
(See Section 1.a).
ACCESSORIES;
2x Safety nuts M6 (for Adapter Plates 1-6) >5.b
2x Screws M6x14 + U Disks (only for Adapter Plate 6 - fits GENELEC Ser.8000) >5.c
6.b
Variable adjustment around the vertical axis.