
Installation Manual
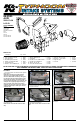

INSTALLATION INSTRUCTIONS
Continued
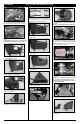
10. Install the inserted nut onto the heat shield us-
ing the provided hardware as shown.
11. Remove the two screws securing the mass air
sensor to the air box and then remove the mass air
sensor from the air box.
12. Install the mass air sensor into the heat shield
as shown and secure with the provided hardware.
13.Cut the provided edge trim into the four
separate lengths as shown. One length will be 19”
long, one length will be 17” long, one length will be
8” long and the shortest length will be 7”.
14. Install the 7” section of edge trim onto the heat
shield as shown.
15. Install the 8” section of edge trim onto the heat
shield as shown.
16. Install the 17” section of edge trim onto the heat
shield as shown.
17. Install the 19” section of edge trim onto the
fresh air scoop as shown.
18. Remove the headlamp mounting bolt shown.
19. Install the silicone hose (08490) onto the mass
air sensor as shown and secure with the provided
hose clamp.
NOTE: Do not completely tighten at this time.
20. Set the heat shield assembly into position on
the inner fender while installing the silicone hose
onto the turbo inlet. Secure the heat shield with the
provided hardware and secure the silicone hose
with the provided hose clamps.
21. Install the K&N
®
air lter onto mass air sensor
and secure with the provided hose clamp.
22. Reconnect the mass air sensor electrical
connection.
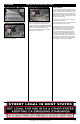
NOTE: Due to manufacturing tolerances, it may
be necessary to unclip the mass air sensor
electrical harness from the plastic covering to
provide adequate slack.
23. Using the provided hardware, secure the fresh
air scoop to the heat shield as shown.
8. Pull up the air box and remove it from the
vehicle.
NOTE: K&N Engineering, Inc., recommends that
customers do not discard factory air intake.
7. Loosen the two hose clamps which secure the
stock intake tube to the turbo inlet and factory air
box, then remove the intake tube from the vehicle.
9. Install the heat shield mounting bracket (083139)
onto the heat shield as shown.
24. Separate the fresh air bellows from the fresh air
scoop as shown.