CMP-WNPCI10 Wireless LAN PCI 54 Mbps Manual ENGLISH
Package Contents The following contents should be found in your box: One 54 Wireless Adapter One Resource CD including: • Wireless Client Utility (WCU) and Drivers • User Guide • Network cable Note: If any of the listed contents are damaged or missing, please contact the retailer from whom you purchased the Wireless Adapter for assistance. Chapter 1: Introduction 1.
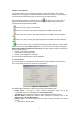
1.3 LED Status 1.3.1 54M Wireless PCI Adapter LED Indications LED Indications Status Status Green Intermittently Status Green Status Green Light up Flashing Working Status The adapter is in an electricity saving status or the adapter is already connected but is not transmitting or receiving data. The adapter is on wake up status. The adapter is transmitting and receiving data.
Chapter 2: Installation Guide 2.1 Hardware Installation 2.1.1 54M Wireless PCI Adapter Hardware Installation To install the adapter, follow these steps listed below: 1. Turn off your desktop PC and disconnect the power. 2. Open your PC case and locate an available PCI slot on the motherboard. Remove the metal slot cover on the back of the PC. Check with your computer manufacturer for instructions if needed. 3. Slide the PCI Adapter into the PCI slot.
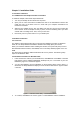
Figure 2-2 Wireless Client Utility Installation Program 4. The Setup Wizard will ask you to choose a Setup type in figure 2-3. It is recommended that you select Install Client Utilities and Driver. Select Install Driver Only to install driver only, select Make Driver Installation Diskette(s) to make the diskette(s) as the installation driver. Select Install Client Utilities and Driver and click Next to continue the Installation.
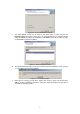
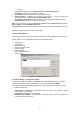
Figure 2-5 Choose Destination Location 7. The Setup Wizard will ask you to create a new folder name or select one from the Existing Folders list shown in figure 2-6. It is recommended that you keep the default value. Click Next to continue the Installation. Click Back to return to the previous page, or click Cancel to end the Installation. Figure 2-6 Select a Program Folder 8. The Setup Wizard will notify you of how to proceed with the installation, shown in figure 2-7.
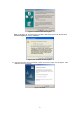
Figure 2-8 Widows 2000 Warning Box Note: In Windows XP, the warning box is similar to that shown figure 2-8a. Please select Continue Anyway to continue installation. Figure 2-8a Windows XP Warning Box 10. After the files have been successfully copied, the screen in figure 2-9 will appear. Click Finish to reboot the system.
Chapter 3: Configuration The Wireless Adapter can be configured by Wireless Client Utility (WCU). This chapter describes how to configure your Wireless Adapter for wireless connectivity on your Wireless Local Area Network (WLAN) and use the data security encryption features. After Installing the Adapter, the Adapter’s tray icon will appear in your system tray. It appears at the bottom of the screen, and shows the signal strength using color and the received signal strength indication (RSSI).
• Ad Hoc Configure the network type on the Advanced tab of Profile Management. IP Address - Displays the computer’s IP address. Current Channel - Shows the currently connected channel. Data Encryption - Displays the encryption type the driver is using. Configure the encryption type on the Security tab of Profile Management. Server Based Authentication - Shows whether server based authentication is used. Signal Strength - Shows the strength of the signal.
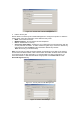
Figure 3-3 General Tab of Profile Management 2. Edit the Security tab Edit the fields in the Security tab of Profile Management to configure the profile. To define the security mode, select the radio button of the desired security mode. WPA - Wi-Fi Protected Access WPA Passphrase - Wi-Fi Protected Access Passphrase 802.1x - Enables 802.1x security. Shared Key (Static WEP) - Enables the use of shared keys that are defined on both the access point and the station.
3. Edit the Advanced tab Transmit Power Level - Selects the transmit power level for 802.11b/g in mW. Actual transmit power may be limited by regulatory domain or hardware limitations. Power Save Mode • Maximum - Selects maximum mode to let the access point buffer incoming messages for the wireless adapter. The adapter will detect the access point if any messages are waiting periodically.
3. Click Activate. 3.2.4 Import a Profile 1. 2. 3. 4. From the Profile Management tab, click Import…. The Import Profile will then appear. Browse to the directory where the profile is located. Highlight the profile name. Click Open, the imported profile will then appear in the Profiles List. 3.2.5 Export a Profile 1. 2. 3. 4. From the Profile Management tab, highlight the profile to export. Click Export…, the Export Profile window will then appear. Browse the directory to export the profile to.
DECLARATION OF CONFIRMITY We declare under our responsibility that the product; Brand name: KÖNIG Model: CMP-WNPCI10 Description: Wireless PCI adapter Is in conformity with the following standards; EN 300 328 V.1.4.1 (2003) EN 301 489-1 V.1.4.1 (2002) / EN 301 489-17 V.1.2.1 (2002) EN 60950-1: 2001 Following the provisions of the 1999/5/EC R&TTE Directive. Conform this regulation it’s allowed to use this product in all European Community & EFTA countries.
www.konigcomputer.