BEDIENUNGSANWEISUNG mit Montageanweisungen INSTRUCTIONS FOR USE and installation EN DE Lesen Sie unbedingt die Gebrauchsanleitung und den Montageplan vor Aufstellung, Installation sowie Inbetriebnahme. Please read the users and installation instructions carefully before installation of the appliance and before starting to use it. Service und Kundendienst Telefon: 0209 – 401 631 Email: kundendienst@kueppersbusch.de FKG9500.
CONTENTS Safety information Safety instructions Operation Daily use Hints and tips 2 3 5 7 9 Care and cleaning Troubleshooting Installation Technical data 10 11 13 19 Subject to change without notice. SAFETY INFORMATION Before the installation and use of the appliance, carefully read the supplied instructions. The manufacturer is not responsible for any injuries or damages that are the result of incorrect installation or usage.
Farm houses; staff kitchen areas in shops, offices and other working environments – By clients in hotels, motels, bed and breakfast and other residential type environments Keep ventilation openings, in the appliance enclosure or in the built-in structure, clear of obstruction. Do not use mechanical devices or other means to accelerate the defrosting process, other than those recommended by the manufacturer. Do not damage the refrigerant circuit.
• The appliance contains a bag of desiccant. This is not a toy. This is not food. Please dispose of it immediately. • Electrical connection • WARNING! Risk of fire and electric shock. • The appliance must be earthed. • Make sure that the parameters on the rating plate are compatible with the electrical ratings of the mains power supply. • Always use a correctly installed shockproof socket. • Do not use multi-plug adapters and extension cables.
• Remove the door to prevent children and pets to be closed inside of the appliance. • The refrigerant circuit and the insulation materials of this appliance are ozonefriendly. • The insulation foam contains flammable gas. Contact your municipal authority for information on how to discard the appliance correctly. • Do not cause damage to the part of the cooling unit that is near the heat exchanger. OPERATION Freezer Control panel 1 1. 2. 3. 4. 5. 6. 7. 8. 9.
This function stops automatically after 52 hours. It is possible to deactivate the function at any time by pressing FastFreeze switch. The FastFreeze light will switch off. Fridge Control panel 1 1. 2. 3. 4. 5. 6. 7. 8. 9. Pilot light ON/OFF switch Temperature regulator (+) Temperature display Temperature regulator (-) IntensiveCooling light IntensiveCooling switch Minidac light Minidac switch Switching on 1. Insert the plug into the wall socket. 2. Press the ON/OFF switch.
The difference between temperature on display and set temperature appears when: • selecting new setting • the door left open for a long time • after placing warm food in the compartment. The Minidac light comes on and the function is activated. The function can start automatically if necessary, refer to "Minidac". Minidac function You can activate the function by pressing the Minidac switch. DAILY USE WARNING! Refer to Safety chapters.
Do not move the glass shelf above the vegetable drawer to ensure correct air circulation. Freezing fresh food Minidac The refrigerator compartment is equipped with Minidac device that allows rapid cooling of foods and equalize temperature in the compartment. The device activates itself when needed, for example after door opening or when the ambient temperature is high. It allows you to switch on the device manually when needed, refer to "Minidac function”.
not nee‐ ded Introducing small quantities of fresh food daily 2 kg maxi‐ mum Storage of frozen food When first starting-up or after a period out of use, before putting the products in the compartment let the appliance run at least 2 hours on the higher settings.
• Cooked foods, cold dishes: cover and place on any shelf. • Fruit and vegetables: clean thoroughly and place in a special drawer. Bananas, potatoes, onions and garlic must not be kept in the refrigerator if not packed. • Butter and cheese: place in a special airtight container or wrap in an aluminium foil or a polythene bag to exclude as much air as possible. • Bottles: close with a cap and place on the door bottle shelf, or (if available) on the bottle rack.
every time the motor compressor stops, during normal use. The defrost water drains out through a trough into a special container at the back of the appliance, over the motor compressor, where it evaporates. It is important to periodically clean the defrost water drain hole in the middle of the refrigerator compartment channel to prevent the water overflowing and dripping onto the food inside. when it is in operation, neither on the internal walls, nor on the foods.
Problem Possible cause Solution The appliance is noisy. The appliance is not sup‐ ported properly. Check if the appliance stands stable. Audible or visual alarm is on. The cabinet has been re‐ cently switched on or the temperature is still too high. Refer to "High temperature alarm". The temperature in the ap‐ pliance is too high. Refer to "High temperature alarm". The temperature in the ap‐ pliance is too high.
Problem Possible cause Solution The door is not closed cor‐ rectly. Refer to "Closing the door". The food products' tem‐ perature is too high. Let the food products temper‐ ature decrease to room tem‐ perature before storage. Many food products are stored at the same time. Store less food products at the same time. The door has been opened often. Open the door only if necessa‐ ry. There is no cold air circu‐ lation in the appliance.
Positioning Install the appliance in a dry, well ventilated indoors where the ambient temperature corresponds to the climate class indicated on the rating plate of the appliance. Cli‐ mate class Ambient temperature SN +10°C to + 32°C N +16°C to + 32°C ST +16°C to + 38°C T +16°C to + 43°C Some functional problems might occur for some types of models when operating outside of that range. The correct operation can only be guaranteed within the specified temperature range.
A B 15 mm 17.5 mm 820 mm 1015 mm 15 mm 64 mm a. Rear edge b. Front edge c. Right hand side panel The dimension of 260* mm is allowed for fitting a 100 mm plinth below the panel. For different plinth sizes, increase the dimension of 260* mm accordingly. 2. Apply spacers (D) to the hinges before installing the appliance into the cabinet . See picture D 280 mm 539 mm 2 C 30 mm 260* mm D 541 mm 1 3. Rest the panels against the appliance. 45 mm 4.
6. Fix the squares (contained in the bag) to the lower part of the door (references already provided). 7. If necessary, door opening angle max 90° can be obtained by introducing the pivots (L) supplied separately. See picture. 214 193 193 214 193 193 25 25 4 5 1013 1013 min. 3 N 4 4 L 60 60 25 90 L 25 6 7 min. 444 max. 447 min. 444 max. 447 o 115 o N Fitting the door panels 1. Open a door a remove the bracket cover.
1 3 2 1 2 5. Close the door and check that the small door is positioned at the required height, operating the adjustment screws if necessary. 10. Then refit the bracket cover. Fitting the plinth Alignment height of 820 mm • If using a 140 to 170 mm plinth, make a cut out as shown. 820-870 mm 170-220 mm 900 mm 140-190 mm 30-100 mm 6. Use the same screws for vertical alignment of the small doors. 7. If necessary, carry our horizontal alignment by shifting the small doors. 8.
140-190 mm 3 1 1 2 2 E Installing the appliance Alignment height of 870 mm • If using a 190 to 220 mm plinth, make a cut out as shown. 1. Fit the appliance into the recess. 2. Rotate the bracket of 180° in order to obtain the right position ( 2). The position (1) is on the delivery.
50 mm WARNING! The top of the appliance must be kept clear to allow better air circulation. If a wall unit is fitted above the appliance, there must be a gap of 50 mm between this unit and the wall and it must be at least 50 mm below the ceiling.
INHALTSVERZEICHNIS Sicherheitshinweise Sicherheitsanweisungen Betrieb Täglicher Gebrauch Tipps und Hinweise 20 22 24 26 28 Reinigung und Pflege Fehlersuche Montage Technische Daten 29 30 33 39 Änderungen vorbehalten. SICHERHEITSHINWEISE Lesen Sie vor der Montage und dem Gebrauch des Geräts zuerst die Gebrauchsanleitung. Bei Verletzungen oder Schäden infolge nicht ordnungsgemäßer Montage oder Verwendung des Geräts übernimmt der Hersteller keine Haftung.
• Halten Sie sämtliches Verpackungsmaterial von Kindern fern und entsorgen Sie es auf angemessene Weise. Allgemeine Sicherheit • • • • • • • • • Dieses Gerät ist für die Verwendung im Haushalt und ähnliche Zwecke vorgesehen, wie z. B.
SICHERHEITSANWEISUNGEN Montage WARNUNG! Die Montage des Geräts darf nur von einer qualifizierten Fachkraft durchgeführt werden. • Entfernen Sie die Verpackungsmaterialien und die Transportschrauben. • Montieren Sie ein beschädigtes Gerät nicht und benutzen Sie es nicht. • Halten Sie sich an die mitgelieferte Montageanleitung. • Seien Sie beim Umsetzen des Gerätes vorsichtig, da es sehr schwer ist. Tragen Sie stets Sicherheitshandschuhe und festes Schuhwerk.
• • • • • • • • • Isobutan (R600a), ein Erdgas mit einem hohen Grad an Umweltverträglichkeit. Dieses Gas ist brennbar. Wird der Kältekreislauf beschädigt, stellen Sie bitte sicher, dass es keine Flammen und Zündquellen im Raum gibt. Belüften Sie den Raum. Stellen Sie keine heißen Gegenstände auf die Kunststoffteile des Geräts. Legen Sie Erfrischungsgetränke nicht in das Gefrierfach. Dadurch entsteht Druck auf den Getränkebehälter. Bewahren Sie keine entzündbaren Gase und Flüssigkeiten im Gerät auf.
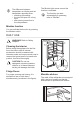
BETRIEB Bedienfeld des Gefriergeräts 1 1. 2. 3. 4. 5. 6. 7. 8. 9. 2 3 4 5 6 7 8 9 Kontrolllampe Taste EIN/AUS Temperaturregler (+) Temperaturanzeige Temperaturregler (-) Alarmleuchte Löschtaste für den Alarmton Kontrolllampe FastFreeze Taste FastFreeze Einschalten des Geräts 1. Stecken Sie den Stecker in die Netzsteckdose. 2. Drücken Sie die EIN-/AUS-Taste. Die Betriebs-Kontrolllampe leuchtet auf. Ausschalten des Geräts Drücken Sie zum Ausschalten des Fachs EIN/AUS.
Bedienfeld des Kühlschranks 1 1. 2. 3. 4. 5. 6. 7. 8. 9. Kontrolllampe Taste EIN/AUS Temperaturregler (+) Temperaturanzeige Temperaturregler (-) Kontrolllampe IntensiveCooling Taste IntensiveCooling Kontrolllampe Minidac Taste Minidac Einschalten des Geräts 1. Stecken Sie den Stecker in die Netzsteckdose. 2. Drücken Sie die EIN-/AUS-Taste. Die Betriebs-Kontrolllampe leuchtet auf. Ausschalten des Geräts Drücken Sie zum Ausschalten des Fachs EIN/AUS.
Die Kontrolllampe Minidac leuchtet, wenn diese Funktion eingeschaltet ist. Die Funktion wird im Bedarfsfall automatisch eingeschaltet, siehe „Minidac“. TÄGLICHER GEBRAUCH WARNUNG! Siehe Kapitel Sicherheitshinweise. Reinigen des Innenraums Bevor Sie das Gerät in Betrieb nehmen, beseitigen Sie den typischen Neugeruch am besten durch Reinigen der Innenteile mit lauwarmem Wasser und einer neutralen Seife. Sorgfältig nachtrocknen.
Die Funktion Minidac schaltet sich automatisch ab, wenn die Tür geöffnet wird und schaltet sich wieder ein, sobald die Tür geschlossen wird. Die maximale Menge an Lebensmitteln, die innerhalb von 24 Stunden eingefroren werden kann, ist auf dem im Inneren des Geräts befindlichen Typenschild angegeben. Der Gefriervorgang dauert 24 Stunden: legen Sie während dieses Zeitraums keine weiteren einzufrierenden Lebensmittel in das Gerät.
WARNUNG! Kam es zum Beispiel durch einen Stromausfall, der länger dauerte als der in der Tabelle mit den technischen Daten angegebene Wert (siehe „Lagerzeit bei Störung“), zu einem ungewollten Abtauen, dann müssen die aufgetauten Lebensmittel sehr rasch verbraucht oder sofort gekocht und nach dem Abkühlen erneut eingefroren werden.
• Fleisch (alle Sorten): Wickeln Sie Fleisch in geeignetes Material und legen Sie dieses auf die Glasablage über der Gemüseschublade. Lagern Sie Fleisch höchstens 1 - 2 Tage. • Gekochte Lebensmittel, kalte Gerichte: Decken Sie die Speisen ab und ordnen Sie sie auf einer beliebigen Ablage ein. • Obst und Gemüse: Gründlich reinigen und in der speziellen Schublade aufbewahren. Bananen, Kartoffeln, Zwiebeln und Knoblauch sollten im Kühlschrank nicht unverpackt aufbewahrt werden.
Regelmäßige Reinigung Das gesamte Gerät muss regelmäßig gereinigt werden: Kühlraums, damit das Tauwasser nicht überläuft und auf die eingelagerten Lebensmittel tropft. • Reinigen Sie die Innenseiten und die Zubehörteile mit lauwarmem Wasser und etwas Neutralseife. • Prüfen und säubern Sie die Türdichtungen in regelmäßigen Abständen, um zu gewährleisten, dass diese sauber und frei von Fremdkörpern sind. • Spülen und trocknen Sie sie sorgfältig ab.
Was tun, wenn... Störung Mögliche Ursache Abhilfe Das Gerät funktioniert nicht. Das Gerät ist ausgeschal‐ tet. Schalten Sie das Gerät ein Der Netzstecker wurde nicht richtig in die Steck‐ dose gesteckt. Stecken Sie den Netzstecker korrekt in die Steckdose. Es liegt keine Spannung an der Steckdose an. Testen Sie, ob ein anderes Gerät an dieser Steckdose funktioniert. Wenden Sie sich an eine Elektrofachkraft. Die Alarmleuchte blinkt. Die Temperatur im Ge‐ frierraum ist zu hoch.
Störung Mögliche Ursache Abhilfe Zu starke Reif- und Eisbil‐ dung. Die Tür ist nicht richtig ge‐ schlossen oder die Dich‐ tung hat sich verformt/ist verschmutzt. Siehe „Schließen der Tür“. Wasser fließt an der Rück‐ wand des Kühlschranks hi‐ nunter. Während des automati‐ schen Abtauprozesses schmilzt Reif auf der Rückwand. Dies ist normal. Wasser fließt in den Kühl‐ schrank. Die eingelagerten Lebens‐ mittel verhindern, dass das Wasser zum Wasser‐ sammler fließt.
Es wird dringend empfohlen nur Originalersatzteile zu verwenden. Verwenden Sie nur LEDLampen (E14 Fassung). Die maximale Leistung ist auf der Lampe angegeben. VORSICHT! Ziehen Sie den Netzstecker aus der Steckdose. 1. Ziehen Sie den Netzstecker aus der Netzsteckdose. 2. Nehmen Sie die Lampenabdeckung ab (siehe hierzu die Abbildung). 3. Ersetzen Sie die defekte Lampe durch eine Lampe mit der gleichen Leistung, die speziell für Haushaltsgeräte vorgesehen ist.
vorhandene Küchenschränke anzupassen. Anbringen der Seitenteile 1. Befestigen Sie die Halterungen an den Seitenteilen, wie in der Abbildung dargestellt. A B 15 mm 17.5 mm 820 mm 1015 mm 820-870 mm 15 mm 1. Vor der Montage des Geräts zwischen Küchenschränken muss die Höhe der Füße und Hinterräder eingestellt werden. Die Räder sind werkseitig auf eine Höhe von 820 mm eingestellt. 2.
a. Hinterkante b. Vorderkante c. Rechtes Seitenteil Die Abmessung von 260* mm bietet Platz für eine 100 mm hohe Sockelblende. Für Sockelblenden anderer Größen erhöhen Sie die Abmessung von 260* mm entsprechend. 2. Bringen Sie die Abstandshalter (D) an den Scharnieren an, bevor Sie das Gerät in den Küchenschrank einbauen. Siehe Abbildung D Bei der genauen Einpassung müssen Sie sich vergewissern, dass der Abstand zwischen Gerät und Küchenschrank 45 mm beträgt. 5.
2. Bohren Sie, wie in der Abbildung gezeigt, in die kleinen Türen. 214 193 193 214 193 193 25 25 4 5 1013 1 1013 min. 3 4 60 4 2 60 25 25 6 7 min. 444 max. 447 min. 444 max. 447 mm • 4. Frontteil oben rechts • 5. Frontteil oben links • 6. Frontteil unten rechts • 7. Frontteil unten links 3. Befestigen Sie die Halterung mit den mitgelieferten Schrauben (Beipack) an der Tür. 4.
Halterungen und die Schrauben der kleinen Halterung festziehen. 9. Befestigen Sie die kürzere und längere Halterung unter der Tür an der Verkleidung mit den zwei mitgelieferten Kunststoffsicherungsscheiben (Beipack). gewünschte Tiefe und bringen Sie ihn zwischen Sockelblende und Lüftungsgitter an. Drücken Sie ihn unterhalb dieses Lüftungsgitters fest in die korrekte Position. • Wenn Sie eine 100 mm hohe Sockelblende verwenden, bringen Sie den gesamten mitgelieferten Höhenausgleichsstreifen an.
gewünschte Tiefe und bringen Sie ihn zwischen Sockelblende und Lüftungsgitter an. • Wenn Sie eine 150 mm hohe Sockelblende verwenden, bringen Sie den gesamten mitgelieferten Höhenausgleichsstreifen an. • Wenn das Gerät am Ende einer Küchenzeile installiert wird, fügen Sie Fuß E ein, um die Sockelblende zu fixieren. 3. Befestigen Sie es mit der korrekten Halterung an der Wand. 50 mm 50 mm 1 2 E Montage des Geräts 1. Setzen Sie das Gerät in die Einbaunische. 2.
TECHNISCHE DATEN Technische Daten Abmessungen der Einbaunische Höhe mm 1900 Breite mm 860 Tiefe mm 560 Lagerzeit bei Störung Stunden 12 Spannung Volt 230 - 240 Frequenz Hz 50 Die technischen Daten befinden sich auf dem Typenschild auf der Außen- oder Innenseite des Geräts sowie auf der Energieplakette. UMWELTTIPPS Recyceln Sie Materialien mit dem Symbol Geräte mit diesem Symbol nicht mit dem Hausmüll.
K08-180067/02 222374323-B-032018 Küppersbusch Hausgeräte GmbH Postfach 10 01 32, D-45801 Gelsenkirchen, Küppersbuschstraße 16, D-45883 Gelsenkirchen Telefon: (0209) 401-0, Telefax: (0209) 401-303 www.kueppersbusch.de Teka Austria GmbH Eitnergasse 13, A-1230 Wien Telefon: (01) 86680-15, Telefax: (01) 86680-50 www.kueppersbusch.