INSTRUCTIONS FOR USE and installation instructions I E Istruzioni di uso e di montaggio Instrucciones de Uso e Instrucciones de Montaje 152991 86/0 0/0398 IG 643.
ENGLISH Important safety information It is most important that this instruction book should be retained with the appliance for future reference. Should the appliance be sold or transferred to another owner, or should you move house and leave the appliance, always ensure that the book is left with the appliance in order that the new owner can get to know the functioning of the appliance and the relevant safety information. This information has been provided in the interest of safety.
For the user ENGLISH Contents For the installer Important safety information 2 Guide to use the instruction book 3 Description of the appliance 4 The control panel 5 Before use Setting the water softener Rinse aid Use of detergent 6 6 8 9 Using your appliance Loading your appliance Adjusting the height of the upper basket 10 10 11 Hints and tips 12 Washing programmes 13 Operating sequence 14 Maintenance and cleaning Internal cleaning Cleaning the central filter Cleaning the large filter
ENGLISH Description of the appliance Water hardness adjustment Upper basket Levelling spacers Upper basket stop Upper spray arm Large filter Door balancers Salt container Lower spray arm Detergent dispenser Central filter Lower basket Rinse aid dispenser Cutlery basket Rating plate Control panel IN25 4 PDA03GB
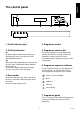
1 2 ENGLISH The control panel 3 4 5 6 7 1. On/Off indicator light 4. Programme marker 2. On/Off pushbutton 5. Programme selector dial On By depressing this button the machine starts operating and, at the same time the On/Off indicator light illuminates. To select a programme, turn the programme selector dial clockwise, making sure that the programme number you wish to select corresponds with the programme marker on the control panel.
Before using your dishwasher for the first time: ☞ ensure that the electrical and water connections comply with the installation instructions ☞ remove all packaging from inside the appliance ☞ set the water softener ☞ fill the salt container ☞ fill the rinse aid dispenser. Setting the water softener The dishwasher is equipped with a water softener designed to remove minerals and salts from the water supply, which would have a detrimental or adverse effect on the operation of the appliance.
ENGLISH Filling with salt If your water is "level 0" it is already soft and therefore there is no need to use salt. Salt must be used from level 1 upward. Only use salt specifically designed for use in dishwashers. All other types of salt not specifically designed for use in dishwasher, specially table salt, will damage the water softener. Only fill with salt just before starting one of the complete washing programmes (not the Rinse and Hold programme).
Rinse aid is automatically added during the last rinse, ensuring through rinsing, spot and streak free drying. The dispenser, which is positioned inside the door, holds about 110 ml of rinse aid, which is sufficient for 16 - 40 dishwashing programmes, depending upon the dosage setting. Filling with Rinse Aid: 1. Open the container by turning the lid (A) anticlockwise. A 2. Add the rinse aid until the container is completely full (approx. 110 ml). The indicator (B) will be completely dark. BR01 3.
ENGLISH Use of detergent Only use detergents specifically designed for use in dishwashers. To fill the dishwasher with detergent proceed as follows: 1. Open the dispenser lid by pulling the catch (D). D 2. Add the detergent according to the recommendations in the programme chart. As all detergents are not the same, you should also consult the instructions on the packet specially for tablets.
ENGLISH Using your appliance Loading your appliance Before placing dishes in the machine, remove any scraps of food, to avoid clogging the filters and consequently reducing the performance. Do not load very small items which can fall through the baskets. Open the door and slide out the baskets to load the dishes. The lower basket The lower basket is designed to take saucepans, lids, plates (up to 27 cm in diameter), salad bowls, cutlery etc.
ENGLISH The upper basket The upper basket is designed for plates (dessert plates, saucers, dinner plates of up to 24 cm in diameter), salad bowls, cups and glasses; Glasses with long stems can be placed upside down in the raised cup racks. Larger plates (dinner plates up to 24 cm in diameter) must be loaded in the front part of the upper basket. Light items (plastic bowls etc.) should be loaded in the upper basket and arranged so they do not move.
ENGLISH Hints and tips To save energy Items not suitable for dishwashers: Place dishes in the machine immediately after every meal and wait until the dishwasher is full before washing.
Programme Normal soil. Crockery, cutlery pots and pans Normal 65° no prewash Light soil. Crockery and cutlery ** Quick 65°C Light soil. Crockery and party crockery * Normal 65° with prewash Rinse and hold * Degree of soil and type of load Any. Partial load (to be completed later in the day).
ENGLISH Operating sequence 1. Check the filters 9. Ensure they are clean and properly positioned (see cleaning instructions). 2. Check that there is rinse aid and salt 3. Load the dishes Start the programme Depress the On/Off button. The On/Off indicator light will come on and the machine will start. If you wish to interrupt the wash programme at any time press the button again. 10. At the end of the washing programme Remove any scraps of food.
ENGLISH Maintenance and cleaning Internal cleaning Ensure that the seals around the door, the detergent and rinse aid dispensers are cleaned regularly with a damp cloth. We recommend every 3 months to run a 65°C wash programme without dishes using detergent. Cleaning the central filter (After each wash) Scraps of food may accumulate in the drain filter (A) and should be removed by rinsing the filter under running water. ☞ To remove the drain filter: simply pull it out by the handle.
ENGLISH External cleaning Clean the external surfaces of the machine and control panel with a damp soft cloth. If necessary use only neutral detergents. Never use abrasive products, scouring pads or solvent (acetone, trichloroethylene etc....). Prolonged periods of non-operation If you are not using the machine for any period of time you are advised to: 1. Unplug the appliance and then turn off the water; 2. Fill the rinse aid dispenser; 3.
Certain problems are due to lack of simple maintenance or oversights, which can be solved easily without calling out an engineer. Before contacting your local Service Force Centre, please carry out the checks listed below. Symptom Solution The machine will not start ■ ■ ■ ■ The dishwasher does not fill with water ■ ■ ■ ■ The filters are blocked The dishwasher will not drain The door has not been properly closed. The plug is not properly inserted in the power socket. Check the plug fuse.
ENGLISH If after all these checks, the problem persists, contact your local Service Force Centre, quoting the model and serial number. This information can be found on the rating plate located on the right hand side of the dishwasher door (see picture). Service and spare parts Prod.No. ........ Ser. No. ......... Mod. ........ RA01 This product should be serviced by an authorised Service engineer, and only genuine spare parts should be used.
ENGLISH Installation instruction Any electrical work required to install this appliance should be carried out by a qualified electrician or competent person. Any plumbing work required to install this appliance should be carried out by a qualified plumber or competent person. Technical specifications DIMENSIONS Width Height Max depth Max depth with open door 59.6 cm 81.8 - 87.8 cm 57 cm 111.
ENGLISH Remove all packaging before positioning the machine. If possible, position the machine next to a water tap and a drain. Water supply connections This dishwasher may be fed with either hot (max. 60°) or cold water. Nevertheless we advise you a cold water supply. A hot water supply is not always efficient with very soiled crockery as it shortens the washing programmes a lot. The water pressure must be within the limits given in the technical specifications.
ENGLISH Water outlet hose connection The end of the drain hose can be connected in the following ways: 2 Ø Ø 18 21 1 min 4 cm 1. To the sink outlet siphon, securing it if necessary with a clip. 2. To a stand pipe provided with vent-hole, minimum internal diameter 4 cm. min 30 cm max 100 cm The waste connection must be at a height of between 30 cm (minimum) and 100 cm (maximum) from the bottom of the dishwasher.
This dishwasher is designed to be fitted under a kitchen counter or worksurface. It is essential that the recess dimensions indicated in the diagram are followed. No further openings for venting of the dishwasher are required, but only to let the water fill and drain hose and power supply cable pass through. The recess height may be anywhere between 820 and 880 mm from the floor since the dishwasher incorporates adjustable feet (max 60 mm).
ENGLISH The furniture door The door on this appliance is designed for the overlay of a panel having the following dimensions: Width Height Thickness Weight 596 cm 604 mm max 20 mm max 2 - 7.5 kg max The panel height should be no more than indicated, otherwise complete opening of the door will no longer be possible as the panel hits against the dishwasher plinth.
ENGLISH Fitting the vapour protection Screw the vapour protecting strip onto the front part of the worktop using four 3.5 x 16 screws. 600 mm Fitting the sealing strips to the sides of the appliance 600 mm To ensure closer contact with adjacent kitchen units, fit the plastic sealings strips down both sides of the front of the machine before inserting it into the recess.
ENGLISH Noise protection Adhesive noise protection ensures perfect acoustic insulation in all mounting conditions. This should be fitted when the dishwasher has been mounted in the recess and height-adjusted. Apply the protection as shown in the drawing, making sure that the non-adhesive section reaches right down to the floor. II61 Kitchen plinth adjustment To allow correct opening of the door it is sometimes necessary to cut the kitchen plinth. refer to the cutting table.
Küppersbusch Vertriebsgesellschaft mbH Postfach 10 01 32, D-45801 Gelsenkirche, Küppersbuschstraße 16, D-45883 Gelsenkirchen Telefon (02 09) 4 01-0, Telefax (02 09) 4 01-3 03