
User manual


23
Any electrical work required to install this
appliance should be carried out by a qualified
electrician or competent person.
Any plumbing work required to install this
appliance should be carried out by a qualified
plumber or competent person.
Remove all packaging before positioning the machine.
If possible, position the machine next to a water tap and a drain.
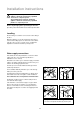
Levelling
Good levelling is essential for correct closure and sealing of
the door.
When the appliance is correctly levelled, the door will not
catch on the levelling spacers on either side of the cabinet.
If the door does not close correctly, loosen or tighten the
adjustable feet until the machine is perfectly level.
Water supply connections
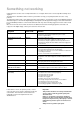
This dishwasher must be plumbed into a cold or hot water
supply (max. 60°). (See "Technical specifications" -
Instructions for use - Part 2).
Nevertheless we advise you a cold water supply, a hot water
supply is not always efficient with very soiled crockery as it
shortens the washing programmes time.
The water pressure must be within the limits given in the
technical specifications.
Your local Water Authority will advise you on the average
mains pressure in your area.
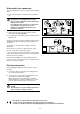
The dishwasher features fill and drain hoses which can be
turned either to the left or the right to suit the installation.
The locknut must be correctly fitted to avoid water leaks.
Avoid bends or kinks in the hose which could prevent or
slow down the water supply.
If the machine is connected to new pipes or pipes which
have not been used for a long time, you should run the
water for a few minutes before connecting the inlet hose.
This will prevent deposits of sand or rust clogging the inlet
hose filter.
Installation instructions
CA17
CA16
A
CA02
A
CA03
Only for water fill hose with supplied filter!
Be sure to incorporate the filter (A) onto the joint