
User manual


11
Operation
Insert the plug into the wall socket. Turn the
thermostat knob (E), clockwise, beyond the «O»
(STOP) position.The pilot light (D) will light up,
indicating that the appliance is powered. The
warning light (C) will light up, indicating that the
temperature inside the appliance is to high.
To stop operation, simply turn the thermostat knob to
position «O».
Temperature regulation
The temperature is automatically regulated and can
be increased to achieve a higher temperature
(warmer) by rotating the thermostat knob toward
lower settings or reduced (colder) rotating the knob
towards higher settings.
However, the exact setting should be chosen
keeping in mind that the temperature inside the
refrigerator depends on:
• room temperature;
• how often the door is opened;
• the quantity of food stored;
• location of appliance.
A medium setting is generally the most suitable.
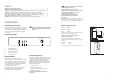
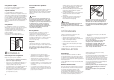
Control Panel
A. Normal/Super push button
B. Super control light
C. Warning light
D. Pilot light
E. Thermostat knob
Quick-freezing
For quick-freezing, push the button (A). The super
control light (D) will then light up.
Warning light (C)
The temperature alarm light turns on automatically
whenever the temperature within the freezer rises
above a certain value which might endanger
satisfactory long-term conservation.
It is perfectly normal for the temperature alarm light
to remain lit up for a short time after the freezer is
initially turned on. It will remain lit up until the
optimum temperature for the conservation of frozen
food is attained.
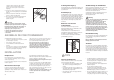
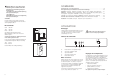
Freezing fresh food
The 4-star compartment is suitable for long term
storage of commercially frozen food and for freezing
fresh food.
To freeze fresh foods allow it to run on the fast
freeze setting for at least 24 hours before loading
food.
Place the food to be frozen in the compartments as
shown in figure.
D670
9 Kg
7 Kg
1
2
3
4
5
6
ABCD E
14
PR01
540
50
B
T
H
50 mm
min.
200 cm
2
200 cm
2
min.
D567
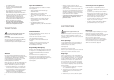
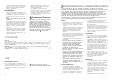
Dimensions of housing
Height 880 mm
Depth 550 mm
Width 560 mm
For safety reasons, minimum ventilation must be as
shown in Fig.
Attention: keep ventilation openings clear of
obstruction.
It is necessary that the niche is provided with a
conduct of ventilation having the following
dimensions:
Depth 50 mm
Width 540 mm
For installation see the instructions enclosed.
ATTENTION!
It must be possible to disconnect the appliance from
the mains power supply; the plug must therefore be
easily accessible after installation.
Electrical connection
Before plugging in, ensure that the voltage and
frequency shown on the serial number plate
correspond to your domestic power supply. Voltage
can vary by ±6% of the rated voltage.
For operation with different voltages, a suitably sized
auto-transformer must be used.
The appliance must be earthed.
The power supply cable plug is provided with a
contact for this purpose.
If the domestic power supply socket is not earthed,
connect the appliance to a separate earth in
compliance with current regulations, consulting a
specialist technician.
The Manufacturer declines all responsibility if
the above safety precautions are not observed.
This appliance complies with the following
E.E.C. Directives:
- 87/308 EEC of 2/6/87 relative to radio interference
suppression.
- 73/23 EEC of 19.2.73 (Low Voltage Directive) and
subsequent modifications;
- 89/336 EEC of 3.5.89 (Electromagnetic
Compatibility Directive) and subsequent
modifications.
INSTALLATION
Location
The appliance should be installed well away from
sources of heat such as radiators, boilers, direct
sunlight etc.