
User manual


– 6
These operating instructions describe the maximum
equipment. Depending on the model, there are differ-
ences in the scopes of delivery (see packaging).
The scope of delivery of your appliance is illustrated on
the packaging. Check the contents of the appliance for
completeness when unpacking.
In the event of missing accessories or any transport
damage, please contact your dealer.
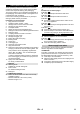
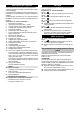
Illustrations on fold-out page!
1 High pressure connection
2 Appliance switch „0/OFF“ / „I/ON“
3 Storage hook for mains connection cable
4 Storage for high pressure hose
5 Transport handle
6 Water connection with integrated sieve
7 Detergent suction hose with detergent filter and lid
8 Detergent Tank
9 Coupling element for water connection
10 Storage for spray lance
11 Storage for trigger gun
12 Mains cable with mains plug
13 Bearing wheel
14 Trigger gun
15 Lock trigger gun
16 Clamp for high pressure hose
17 High pressure hose
18 Spray lance with pressure regulation (Vario Power)
Carrying out the most common cleaning tasks. The
work pressure can be stagelessly regulated be-
tween "Min" and "Max". You can add detergent
when "Mix" is selected.
In order to adjust the working pressure, release the
lever of the trigger gun and turn the spray lance to
the desired position.
19 Spray lance with Dirtblaster
For strong contaminations
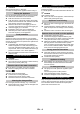
Mount loose parts delivered with appliance prior to start-
up.
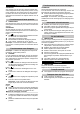
Illustrations on fold-out page!
Illustration
Insert the transport wheels and lock them.
Illustration
Insert the transport handle and screw in.
Illustration
Screw the coupling element to the water connec-
tion on the appliance.
Illustration
Pull out the clamp for the high pressure hose from
the trigger gun.
Illustration
Connect high pressure hose to trigger gun.
Push the clamp in until it locks. Check the secure
connection by pulling on the high-pressure hose.
Park the appliance on an even surface.
Illustration
Connect the high pressure hose to the high pres-
sure connection of the appliance.
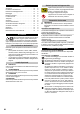
Insert the mains plug into the socket.
For connection values, see type plate/technical data.
Observe regulations of water supplier.
ATTENTION
Impurities in the water can damage the high-pressure
pump and the accessories. For protection, the use of
the KÄRCHER water filter (optional accessory, order
no. 4.730-059) is recommended.
Attach the water supply hose to the coupling on the
water connection.
Connect the water supply hose to the water supply.
Completely open the water tap.
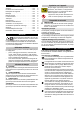
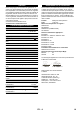
Description of the Appliance
* Optional
20 Washing brush
Suitable for use with detergents.
21 Foam nozzle
For effective detergent foam.
22 Detergent
** Additionally required
23 Fabric-reinforced water hose with commercially
available coupling.
– Minimum diameter, 1/2 inches (13 mm).
– Minimum length 7.5 m.
Assembly
Start up
Water supply from mains
11EN