GHN5381 MOTORIZED TREADMILL OWNERS’ MANUAL ! Read all instruction carefully before use this product. Retain this owner manual for the future reference.
Safety Instructions Warning: Consult with your physician or health professional before starting your workout, especially necessary if your age is up to 35 or once had healthy problem. We take no responsible for any troubles or hurts if you don’t following our specification. Treadmill should be carefully assembled and covered with the motor shield before connected to the power. Notes: 1、Ensure the safety lock’s clamp were attached to the clothing or belts before using the treadmill.
Parts of treadmill inside the carton: Main frame 69# Oil bottle Tools&screws 2L&R 4# 32# 66#,25#,24# Item No. Description Remarks Qty.
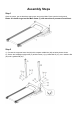
Assembly Steps Step 1 Open the carton, get out the above spare parts, and put the Main Frame onto the level ground. Notes: It is better to get out the Main frame (1) with more than 2 persons to avoid hurt. Step 2 1). Connect the computer lower line (64) with computer middle line (63) as below picture shows. 2). Secure the Left&right upright tube (2) to Main frame (1) by 6 bolts M8*15 (10), 4 arc washers D8 (26) and 2 gaskets D8 (22).
Step 3 1). Connect the computer middle line (63) with computer up line (62). 2). Secure the computer frame (4) to the Left&right upright tube (2) with 2 bolts M8*32 (9), 2 Gasket D8 (22); and then tight the computer frame (4) with 2 bolts M8*15 (10) and 2 arc washers D8 (26). 3). Put the 2 handlebar cap (32) onto the computer frame(4). Step 4 Push the spring (25) into the pin (24), and then push the pin (24) into the hole of left upright tube (2L). Secure the pin with knob (66).
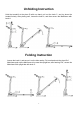
Unfolding Instruction Hold the treadmill at the place B with one hand, pull out the knob C, and lay down the treadmill slowly. After placing well, loosen the knob A, and then secure the Mainframe with knob A. Folding Instruction Loosen the knob A, and secure it on the hole nearby. Put one hand onto the place B of Mainframe,push up the Mainframe to be near the upright bar, after hearing “KA”, secure the Mainframe with upright bar with knob C.
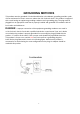
GROUNDING METHODS This product must be grounded. If it should malfunction or breakdown, grounding provides a path of least resistance for electric current to reduce the risk of electric shock. This product is equipped with a cord having an equipment-grounding conductor and a grounding plug. The plug must be plugged into an appropriate outlet that is properly installed and grounded in accordance with all local codes and ordinances.
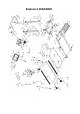
Explosive DIAGRAM 7
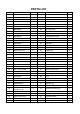
PARTS LIST Item no. DESCRIPTION QTY Item no.
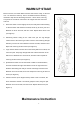
WARM UP STAGE Before exercise, it is better Warm muscles stretch more easily, so the first of 5 ~ 10 minutes to warm up. Then in accordance with the following methods to stop and do stretching exercises - do five times, each leg every time 10 seconds or more time to do it again after the end of the exercise. 1. Down the stretch: knees slightly curved, the body bent forward slowly, so that the back and shoulders relaxed, hands try to touch your toes. Maintain 10 to 15 seconds, and then relax.
WARNING: Always unplug the treadmill before cleaning or maintenance. General cleaning will greatly prolong the treadmill. Keep treadmill clean by dusting regularly. Be sure to clean the exposed part of the deck on either side of the walking belt and also the side rails. Keep the running shoes clean to avoid foreign material underneath the walking belt. WARNING: Always unplug the treadmill before removing motor cover. Make sure to removing the motor cover and clean the motor one time per year.
We suggest that you should cut off the power for 10Mints after keep running 1.5hours to maintain the treadmill. The belt would slip if too loose during using;if the belt is too tight, it would affect the performance of motor and increase the abrasion of roller and belt. The belt can be lift away from the deck for around 50 — 75mm if the degree of tightness is just well. Center the running belt 一、Place treadmill on a level surface. Run Treadmill at approximately 6-8KM/H, checking the running condition.
1. Console face: 2. Start Normal startup after 5s counting backwards. 3. Number of programs P1~P12 automatic programs 4. Safety lock function Removing the safety lock, “E7” will be immediately displayed, the treadmill will stop rapidly and alarm as “Bi-Bi-Bi”. Installing the safety lock, the electronic meter will be reset after 2s of data display. 5. Key function 5.1.
set up relevant countdown value. After the completion of the setting, press START can start the treadmill. 5.4. Speed keys: “SPEED+” and “SPEED -” are acceleration and deceleration keys: They may be used to adjust parameter setting when setting up parameters of the treadmill. When the treadmill is running, they are used to adjust the speed for 0.1mile/time; for long-time pressing for more than 2s, automatic continuous acceleration and deceleration will be realized. The two keys are on the handle. 6.
Built-in program data: Set time / 10 = running time for each section Time Program 1 2 3 4 5 6 7 8 9 10 P1 SPEED 3 3 6 5 5 4 4 4 4 3 P2 SPEED 3 3 4 4 5 5 5 6 6 4 P3 SPEED 2 4 6 6 5 6 6 2 3 2 P4 SPEED 3 3 5 6 5 6 5 4 3 3 P5 SPEED 3 6 6 6 5 5 4 5 5 4 P6 SPEED 2 6 5 4 6 5 5 3 3 2 P7 SPEED 2 6 6 5 5 6 5 3 2 2 P8 SPEED 2 4 4 4 5 6 6 5 6 2 P9 SPEED 2 4 5 5 6 5 6 3 3 2 P10 SPEED 2 5 6 5 6
11. Others 11.1 After the operation completion of a countdown parameter, END will be displayed. The system will alarm for 0.5s at the interval of 2s until the steady stop of the treadmill. Then, the system will return back to the manual mode. 11.2. Circular setting is supported for parameter setting. For example, the time setting range is 5:00—99:00; to press “+” when the time displayed is 99:00, 5:00 will be displayed, and so on. “+” and “-” can be used for increase and decrease. 11.3.
E1 Abnormal communication between the controller and the electronic console after powering on. Stop the controller to enter failure state. It cannot be started up. The electronic meter displays the error code and the buzzer sounds for 3 times. Possible reasons: The communication between the controller and the electronic meter is blocked; check each section of connection of the communication wires from the electronic meter to the controller and ensure that all core wires are well connected.