KiWi™ 2900 User’s Guide Photographic VR Panoramic Tripod Head Designed expressly for the Fuji MX-2900 Digital Camera
Copyright Information Copyright © 2000 Kaidan, Inc. All Rights Reserved. First Edition, September 2000. KiWi is a trademark of Kaidan, Inc. Other products mentioned herein may be trademarks of their respective companies. Patents Pending. Information in this manual is subject to change without notice and does not represent a commitment on the part of Kaidan.
1 Setting Up Your KiWi 2900™ Warranty Registration Please take a brief moment and fill out the warranty registration card included with your package. Please print clearly in capital letters and remember to affix postage. You can also register after filling out the card by faxing it to 215-322-4186 or register on-line at: http//ww.kaidan.com/register.html. UNPACKING THE BOX The KiWi 2900 is shipped in a single box and consists of the components detailed below. Please make sure that all parts are included.
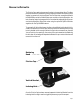
REMOVING THE FRICTION CAP The Friction Cap needs to be removed in order to change detent discs. The discs provide the means for establishing and changing the number and spacing of the angular increments of the tripod head. The two discs that come standard with the KiWi 2900 provide for 14 and 18 shots per revolution. Use the 18 position detent disc when capturing images with the normal wide-angle setting of the camera. Use the 14 position detent disc when using the optional Fujifilm 0.
REMOVING & REPLACING THE DETENT DISC Once the Indexing Hub is removed, the detent disc can be removed from its recess in the bottom of the Vertical Bracket. The disc may slip out once the Indexing Hub is removed. If it sticks inside the recess, simply insert the tip of a ballpoint pen or a pin small enough to fit into the detent disc ejection hole on the top of the bracket and push the detent disc out of the detent disc recess.
ADJUSTING THE DETENT FORCE The spring plunger that provides the detent action can also be adjusted to vary the force. Use a flat blade screw driver to move the plunger in and out as desired. A convenient way to adjust the plunger is to screw the plunger all the way in until it gently bottoms out. Then unscrew the plunger about one complete turn.
2 Shooting Panoramas HOW MANY SHOTS? The KiWi 2900 is designed to be used with: • The normal wide-angle setting of the camera lens • The optional Fujifilm 0.8X wide angle lens (screw on) • Other third party lenses usable with the Fuji MX-2900 camera The normal wide-angle setting of the camera will require the 18 position detent disc. The Fujifilm 0.8X wide angle lens requires the use of the 14 position detent disc.
MOUNTING THE CAMERA? (CONTINUED) The KiWi 2900 is designed to be used with either the standard wide-angle camera setting or with the add-on Fujifilm 0.8X wide angle lens. The two threaded mounting holes below the slot on the Camera Bracket will position the camera at its proper nodal point setting for either configuration. The diagram below shows the proper mounting holes for the camera .
TAKING THE PHOTOS The KiWi 2900 has a female 1/4-20 thread on the bottom of the Indexing Hub for mounting to most standard tripods. When ready to shoot, make sure that the KiWi 2900 is securely attached to the tripod. Use a tripod that is sturdy, ideally one that has a center support system of braces to help keep the camera and KiWi 2900 from excessive flexing. It may be possible that your tripod uses a larger 3/8 inch thread.
3 Finding the Nodal Point When using 3rd Party Lenses HOW DO I LOCATE MY CAMERA’S NODAL POINT? Follow these steps and you will be able to easily locate the nodal point for any camera and lens combination. Simply put, the nodal point is the point inside your camera where the light rays converge and flip over. When shooting an immersive panorama, it is necessary to rotate about this point to eliminate the image mismatch caused by parallax error.
STEP 2: THE SLIGHTLY HARDER PART - FORE-AFT ADJUSTMENT Put the Captive Camera Knob in the long slot of the Vertical Bracket. This will allow you to slide the camera (along with the Camera Adjustment Shoe) as required. Note: This step is most easily accomplished outside. Find a vertical edge or line, such as a doorway or edge of a building.