EG ...
EN DEAR CUSTOMERS, thank you for purchasing this Kaiser product. We are convinced that you have made a right choice. This product which satisfies the high quality demands and corresponds to world comprehensive standards realizes your cookeries, and his modern appearance which has been developed by the best European designers will decorate your kitchen splendidly. We ask you to read the operating instructions before usage thoroughly.
DE RU LIEBE KUNDIN, LIEBER KUNDE, УВАЖАЕМЫЙ ПОКУПАТЕЛЬ, wir danken Ihnen für den Erwerb unserer Technik. благодарим Вас за приобретение нашей техники. Wir sind überzeug, dass Sie eine richtige Wahl getroffen haben. Dieses Produkt, das die hohen Forderungen zur Qualität befriedigt und weltumfassenden Standards entspricht, verwirklicht Ihre Kochkünste, und sein modernes Aussehen, das von besten europäischen Designer entwickelt worden ist, wird Ihre Küche prächtig schmücken.
EN CONTENTS INSTALLATION INSTRUCTIONS 6 Electrical connection 6 Gas connection 8 Conversion to a different gas type 10 Installation of the oven 14 SAFETY CONDITIONS 18 BRIEF DESCRIPTION 22 Control panel EQUIPMENT AND USAGE 22 24 Preparation 24 Oven temperature control 26 Electric grill 28 Digital clock timer with sensor Touch control of the ovens CHEF 30 Spit 4 42 PRACTICAL ADVISES 44 CARE AND ATTENDANCE 50 RESPECT FOR THE ENVIRONMENT 56
DE RU ОГЛАВЛЕНИЕ INHALTSVERZEICHNIS FÜR DEN INSTALLATEUR 7 ИНСТРУКЦИЯ ПО МОНТАЖУ 7 Stromanschluss 7 Подключение к электросети 7 Gasanschluss 9 Подключение к газу 9 Umstellen auf einen anderen Gastyp 11 Переключение на другой тип газа 11 Einbau des Backofens 15 Установка духового шкафа 15 SICHERHEITSBEDINGUNGEN 19 УСЛОВИЯ БЕЗОПАСНОСТИ 19 KURZBESCHREIBUNG 23 КРАТКОЕ ОПИСАНИЕ 23 23 Панель управления 23 Bedienblende AUSSTATUNG UND BENUTZUNG 25 ОБОРУДОВАНИЕ И ИСПОЛЬЗОВАНИЕ 25
EN INSTALLATION INSTRUCTIONS ELECTRICAL CONNECTION Before connecting the oven to the mains power supply, make sure that: 1 • the supply voltage corresponds to the specifications on the data plate 1 on the front of the oven, • the mains supply has an efficient ground connection complying with all applicable laws and regulations. Correct grounding is a legal requirement.
DE RU FÜR DEN INSTALLATEUR ИНСТРУКЦИЯ ПО МОНТАЖУ STROMANSCHLUSS ПОДКЛЮЧЕНИЕ К ЭЛЕКТРОСЕТИ Vor der Durchführung des Stromanschlusses muss Перед подключением духовки к sichergestellt werden, dass: необходимо убедиться, что: эл.
EN GAS CONNECTION The oven is designed to operate with both natural gas (methane) and liquid gas (LPG), and can be easily converted from one type to another following the instructions given in the relative section of this booklet (Conversion to a different type of gas). Внимание! Connection to the gas supply and conversion to a different type of gas must be carried out by qualified technicians and in conformance with the requirements.
DE RU GASANSCHLUSS ПОДКЛЮЧЕНИЕ К ГАЗУ Der Backofen kann mit Erdgas (Methan) oder Flüssiggas betrieben und ganz einfach von einem Gastyp auf den anderen umgestellt werden (siehe Abschnitt „Umstellen auf einen anderen Gastyp“). Духовка может работать на природном (метан) или сжиженном газе и очень просто переключаться с одного типа газа на другой (см. раздел „Переключение на другой тип газа“).
EN CONVERSION TO A DIFFERENT TYPE OF GAS Before converting the appliance for operation with a different gas type, check which type of gas it is currently set to operate with (adhesive label 1 on appliance). For the correct nozzle diameter, refer to the table “Nozzle Table”. Conversion to a different gas type must be carried out by qualified technicians and in conformance with the requirements.
DE RU ПЕРЕКЛЮЧЕНИЕ НА ДРУГОЙ ТИП ГАЗА UMSTELLEN AUF EINEN ANDEREN GASTYP Vor dem Umstellen auf einen anderen Gastyp den Перед переключением на другой тип газа, Gastyp feststellen, auf den das Gerät eingestellt ist определить на какой тип газа настроен прибор (см. на заводской табличке 1). (siehe Typenschild des Gerätes 1). Für den Düsendurchmesser siehe »Tabelle der Düsen«. Umstellung von einem Gastyp auf einen anderen muss von einem Fachmann gemäß den geltenden Vorschriften ausgeführt werden.
EN Adjustment of the minimum setting following conversion to a different gas type Conversion from natural gas to LPG Ovens with stainless steel front: Turn the temperature control knob to the minimum position, Then remove the knob. Insert a screwdriver through the aperture to engage the bypass screw 1, Turn the screw fully to the right.
DE RU Einstellen der minimalen Gaszufuhr bei der Установка минимальной подачи газа при Umstellung auf einen anderen Gastyp переключении на другой тип газа Umstellen vom Erdgas auf Flüssiggas Переключение с природного газа на сжиженный Geräte mit Edelstahl-Bedienblende: Приборы с панелью нержавеющей стали: управления из • Den Drehregler des Thermostats Minimum stellen und dann abnehmen, auf • Установить ручку терморегулятора на минимум и после этого ее снять, • Den Schraubendreher durch die Öff
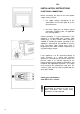
EN INSTALLATION OF THE OVEN The regulations covering the installation, maintenance and operation of gas appliances for domestic use are applicable regulations. Positioning The products of combustion from cooking appliances must always be discharged into suitable extractor hoods, which must be connected to a chimney, flue or vented directly to outside the building.
DE EINBAU DES BACKOFENS RU УСТАНОВКА ДУХОВОГО ШКАФА Für die Installation, Wartung und Benutzung von Для установки, ухода и пользования газовым Gasgeräten des privaten Gebrauchs handeln Sie прибором следуйте требованиям entsprechend den geltenden Normen und соответствующих норм. Vorschriften.
EN Flush fitting The oven can be installed under a work top or in a cooking column. Figure shows the installation dimensions. The installation space measurements are given in mm. Make sure that surrounding materials are heat resistant. Align the oven centrally with respect to the side walls of the units surrounding it and fix it in place with the screws and bushings provided. See the accompanying instructions for combining the oven with multi-functional gas or gas-electric cookers.
DE RU Einbau des Backofens Установка духового шкафа Der Backofen kann unter einer Arbeitsplatte oder in einen Schrank eingebaut werden. Die Einbaumaßen müssen den auf der Abbildung dargestellten Massen entsprechen. Духовой шкаф предназначен для встройки либо под рабочую поверхность стола, либо в шкаф. Размеры, которыми необходимо руководствоваться при встройке, указаны на рисунке. Die Einbaumaßen sind in mm angegeben. Размеры для встраивания даны в мм. Das Möbelmaterial muss hitzebeständig sein.
EN SAFETY CONDITIONS 18 • Please, keep watch over children as long as the gas oven is in operation. Children are unaware of operating rules. Hot gas hot oven cavity, oven door can cause a skinburn. • If faults occur, further operation is not allowed until the appliance has been repaired by an authorized serviceman. • Don’t turn on the valve of the gas inlet or gas cylinder before you make sure that the gas burners are switched off.
DE RU УСЛОВИЯ БЕЗОПАСНОСТИ SICHERHEITSBEDINGUNGEN • Пожалуйста, во время пользования духовкой следите за детьми, так как дети не знают принципов обслуживания духовки. Горячие духовой шкаф, гриль, стекло дверцы могут быть причиной ожога у ребенка. • В случае повреждения духовки, дальнейшая эксплуатация разрешена только после полного устранения повреждений квалифицированным специалистом. Den Gasabsperrhahn an der Gasanschlussstelle bzw.
EN In case of gas leak, it is not allowed: to strike a match, smoke, switch on and off an electric receiver (a door bell, a light switch) as well as use other electrical or mechanical appliances which can cause electric or chugging spark. In this case, immediately shut off gas supply (turn off the valve of the gas cylinder or the switch which cuts off the connection to the gas supply), air the room and contact an authorized person. • Don’t attach appliance.
DE RU Im Falle eines Gasleckverdachtes ist folgendes В случае подозрения утечки газа нельзя: untersagt: Streichhölzer anzünden, Zigaretten rauchen, Elektrogeräte ein- und ausschalten (Klingel- und Lichtschalter) sowie sonstige elektrische und mechanische Geräte benutzen, die Elektro- und Schlagfunkentstehung verursachen können. In so einem Fall muss der Gasabsperrhahn der Gasanschlussleitung bzw.
EN BRIEF DESCRIPTION CONTROL PANEL GAS OVEN WITH ELECTRIC GRILL 1. Grill temperature control, spit and oven light knob 2. Gas oven temperature control, grill on 3. Digital time switch clock 4. Grill indicator light 5.
DE RU KURZBESCHREIBUNG КРАТКОЕ ОПИСАНИЕ BEDIENBLENDE ПАНЕЛЬ УПРАВЛЕНИЯ GASBACKOFEN MIT ELEKTROGRILL ГАЗОВЫЙ ДУХОВОЙ ШКАФ С ЭЛЕКТРИЧЕСКИМ ГРИЛЕМ 1. Drehregler des Grills, des Bratspießes und der Innenbeleuchtung 2. Drehregler des Gasbackofen – Thermostats, Einschalten von Grill 3. Elektronische Zeitschaltuhr 4. Grill - Kontrolllampe 5. Backofenfunktionsanzeige 1. Регулятор температуры электрического гриля, вертела и внутреннего освещения 2. Ручка терморегулятора газовой духовки, включения гриля 3.
EN EQUIPMENT AND USAGE PREPARATION Clean the oven thoroughly with soapy water and rinse well. To remove the lateral frames 1* from smooth-walled ovens, proceed as shown in the figure. Operate the oven for about 30 minutes at maximum temperature to burn off all traces of grease which might otherwise create unpleasant smells when cooking. Self-cleaning catalytic panels* 1 Our smooth walled ovens can be fitted with selfcleaning panels 2 to cover the inside walls.
DE RU AUSSTATUNG UND BENUTZUNG ОБОРУДОВАНИЕ И ИСПОЛЬЗОВАНИЕ VORBEREITUNG ПОДГОТОВКА Vor dem ersten Gebrauch muss der Backofen gründlich mit Seifenwasser gesäubert und anschließend mit klarem Wasser abgewaschen werden. Die mitgelieferten Einhängegitter 1* auf die Seitenwände einbauen und die Gitter und Bleche aufstellen. Перед первым пользованием тщательно очистить духовку мыльным раствором и хорошо промыть достаточным количеством воды.
EN OVEN TEMPERATURE CONTROL The temperature control knob 1 serves to set the desired oven temperature and is equipped with a safety valve. The minimum position corresponds to an oven temperature of 130°C. The maximum position corresponds to an oven temperature of 250°C. 1 To light the burner: • Push in the temperature control knob 1 and turn it anticlockwise to the desired temperature, • Hold the knob pressed in for 5-10 seconds.
DE RU УСТАНОВКА ТЕМПЕРАТУРЫ TEMPERATUREINSTELLUNG Der Drehregler des Thermostats 1 dient zum Ручка терморегулятора 1 служит для установки Einstellen der gewünschten Backofentemperatur температуры духовки и оснащена защитным вентилем. und ist mit einem Sicherheitsventil ausgestattet. Die Position »Minimum« entspricht Backofentemperatur von 130°C. «минимум» einer Положение температуре 130°С. соответствует Die Position »Maximum« entspricht Backofentemperatur von 250°C.
EN ELECTRIC GRILL 3 To operate the electric grill: • Turn the knob 1 to the symbol . The heat intensity of the grill can be set from 50°C to MAX using the relative control knob 2. 2 1 The maximum position corresponds to an oven temperature of 250°C. When the grill is in operation, the grill indicator light and the oven interior light 3 will be illuminated. To operate the spit roaster motor (optional): • Turn the knob 2 to the symbol • Then turn the knob to desired power setting from 50°C to MAX.
DE RU ELEKTROGRILL ЭЛЕКТРИЧЕСКИЙ ГРИЛЬ Zum Einschalten des Elektrogrills muss: Для включения электрического гриля: • Der Drehregler 1 auf gestellt werden. • Уставить ручку 1 на символ .. Die Erhitzungsleistung kann mit dem Drehregler 2 Интенсивность нагрева регулируется ручкой 2 von 50°С bis MAX eingestellt werden. от 50°С до МАХ. Die Position »Maximum« entspricht Backofentemperatur von 250°C. «максимум» einer Положение температуре 250°С.
EN DIGITAL CLOCK TIMER WITH SENSOR* Touch control OF THE OVENS CHEF Symbol 1 will start flashing when the unit is switched on for the first time. 1 The symbols 12.00 appear on the display. Setting the clock To set the current day time: 2 • 3 By pressing choice keys 2 or 3 (– or you can set the time. +) After a few seconds the controller sets the time currently displayed and the symbol 1 goes out. 1 The set time can be also set afterwards.
DE RU ELEKTRONISCHE ZEITSCHALUHR MIT SENSOR - BEDIENUNG* Touch control VON BACKÖFEN CHEF СЕНСОРНОЕ ЭЛЕКТРОННОЕ ПРОГРАММИРУЮЩЕЕ УСТРОЙСТВО* Touch control ДУХОВОК CHEF Wird die Uhr zum ersten Mal eingeschaltet, blinkt При первом включении часов мигает символ 1. das Symbol 1. Auf dem Display erscheint 12.00. На дисплее появится 12.00.
EN Electronical countdown timer The countdown timer works independently of all other timer functions, and can be used even when the oven is switched off. To switch on the countdown timer • The symbols 0.00 appear on the display. 1 • 3 2 Press the middle key 1 repeatedly till the symbol 2 will start flashing. 4 Press the choice keys 3 or 4 (– or +) to set the duration and wait a few seconds.
DE RU Электронный минутник Elektronischer Kurzzeitwecker Der Gebrauch vom elektronischen Kurzzeitwecker Электронный минутник работает независимо от ist von anderen Funktionen unabhängig und kann других функций. Им можно пользоваться даже auch bei ausgeschaltetem Backofen verwendet если духовой шкаф выключен. werden. Чтобы включить минутник: Zum Einschalten des Kurzzeitweckers: • Die mittlere Taste 1 mehrmals solange drücken bis das Symbol 2 anfängt zu blinken.
EN Setting the cooking time The process in the oven should switch off after a wanted duration automatically (only for function electric grill). Before setting the duration you have to set the oven operating function grill and the temperature (see chapter “Electric grill”). 2 • 1 The symbols 0.00 appear on the display. • 3 2 Press the middle key 1 repeatedly till the symbol 2 will start flashing. 4 By using the choose keys 3 or 4 (– or +) you set the wanted duration of the preparation.
DE Einstellen der Betriebsdauer RU Установка продолжительности приготовления Der Vorgang im Backofen soll nach einer Духовка должна автоматически отключиться по gewünschten Dauer automatisch abgeschaltet истечении желаемого промежутка времени werden (nur für Funktion Elektrogrill). (только для функции электрический гриль). Bevor die Dauer der Gerichtszubereitung eingegeben wird, müssen Sie die Backofenfunktion Grill und die Temperatur der Zubereitung einstellen (siehe Kapitel „Elektrogrill“).
EN Setting the end of cooking time The oven must switch off after the set end time (only for function electric grill). Before setting the end of cooking time you have to set the oven operating function grill and the temperature (see chapter “Electric grill”). • 2 The symbols 0.00 appear on the display. • 1 Press the middle key 1 repeatedly till the symbol 2 will start flashing. By using the choose keys 3 or 4 (– or +) you set the wanted end of the preparation.
DE RU Einstellen der Endzeit Установка времени окончания приготовления Der Backofen muss in eingegebener Endzeit ausgeschaltet werden (nur für Funktion Elektrogrill). Духовка должна автоматически отключиться в заранее заданное время (только для функции электрический гриль). Bevor die Endzeit eingegeben wird, müssen Sie und die die Backofenfunktion Grill Temperatur der Zubereitung einstellen (siehe Kapitel „Elektrogrill“).
EN Setting cooking duration and end times You can combine the cooking duration and end of cooking time functions to set the start and end times for cooking. In this way you can program your electronic oven to cook while you are out (only for function electric grill). A great help in the kitchen! Set first the duration 1 and then the end of cooking time 2. 1 Example: You want to start cooking a dish 30 minutes before you get home so that it will be ready for you arrival at 12:55.
DE RU Einstellen der Betriebsdauer und Endzeit Установка продолжительности и времени окончания приготовления Sie können die beiden Funktionen "Betriebsdauer" und „Endzeit“ kombinieren, wobei Sie eine gewünschte Zeit eingeben, um den Backofen einund auszuschalten. So können Sie Ihren Backofen für die Zeit programmieren, wenn Sie nicht zu Hause sind (nur für Funktion Elektrogrill). Das ist eine große Hilfe in Ihrer Küche.
EN Now set the wanted end time (see chapter «Setting the end time»). The end time (1) appears on the display, that accords to the current day time plus duration (in our example 12:45, that means plus 30 minutes). 1 • 3 Set the wanted end time with the choice key 2 ( + ). A few seconds later this time will be registrated 3 (in our example – 12:55, that means we shifted the end time 10 minutes). 2 4 The oven is in expectance state now. The current day time is displayed 4 (in our example 12:15).
DE RU Programmieren Sie jetzt die gewünschte Endzeit Теперь запрограммируйте желаемое время (siehe Kapitel »Einstellen der Endzeit«). окончания процесса приготовления (см. раздел «Установка времени окончания приготовления»). Auf dem Display erscheint die Endzeit (1), die der aktuellen Tageszeit plus Betriebsdauer entspricht (in unserem Beispiel 12:45, das heißt plus 30 Minuten). • Mit der Wahltaste 2 ( Endzeit einstellen.
EN SPIT Some ovens are completely equipped with stick engine and rotary spit for spit roast. The spit* allows to roast food in the oven rotary. It serves primarily for the roasting of shashliks, fowl, small sausages and similar dishes.
DE RU DREHESPIESS ВЕРТЕЛ Einige Backöfen sind komplett mit Stabmotor und Drehspieß für Spießbraten ausgestattet. Der Spieß* erlaubt es, Speisen im Backofen rotierend zu rösten. Er dient hauptsächlich zum Rösten von Schaschliks, Geflügel, Würstchen u.ä. Speisen. Некоторые духовки оборудованы вертелом, приводимым во вращение эл. мотором, Благодаря вертелу* возможна вращательная обжарка блюд в духовке. Служит главным образом для обжарки домашней птицы, шашлыков, колбасок и других блюд.
EN PRACTICAL ADVISES Baking • It is advised to bake pastry and cakes on the baking trays, which are provided as oven equipment. • You also can bake on customary baking trays, which are to be placed on the grate. In this case baking trays out of black plate are recommended. These trays have a better heat conductivity, the baking time is abbreviated and energy can be saved. • Some pastry is to be placed into a preheated oven.
DE RU PRAKTISCHE EMPFEHLUNGEN ПРАКТИЧЕСКИЕ СОВЕТЫ Backen Выпечка кондитерских изделий • Es wird empfohlen, die Gebäcke und Kuchen in den Backblechen zu backen, die als Herdausrüstung mitgeliefert sind. • Рекомендуется выпечка теста на противнях, составляющих заводское оборудование духовки. • Es kann auch in handelsüblichen Kuchenformen und Backblechen gebacken werden, die dann auf dem Rost aufzustellen sind. In diesem Fall werden Kuchenformen aus schwarzem Blech empfohlen.
EN Cooking in the oven With this cooking method, you can operate the oven in the normal way and follow the instructions in recipe books. The food to be cooked should preferably be placed on the middle shelf of the oven.
DE RU Zubereitung im Backofen Приготовление в духовом шкафу Bei dieser Zubereitungsart kann man den Backofen wie üblich benutzen und die Rezepte aus den Kochbüchern verwenden. Die zu zubereitenden Gerichte sollten vorzugsweise auf der mittleren Ebene platziert werden. Для такого способа приготовления духовку можно использовать как обычно и применять рецепты из поваренной книги. Приготовливаемая пища должна быть расположена преимущественно на среднем уровне.
EN Note! The shown parameters concern roasting on the grid. If you use closed jars the temperature is to be set to 200°C. After the run off of the predetermined halftime the meat should be reversed. 5 4 3 2 1 It is more advantageous to roast bigger meat shares. Baste the meat with gravy while roasting. It is advised to place a plate with water on the lowest level under the grid with the dish and refill water while preparing. (Don’t sparkle the meat).
DE RU Bemerkung! Die dargestellten Parameter betreffen das Braten auf dem Rost. Bei der Verwendung von geschlossenen Gefäßen ist die Temperatur auf 200°C einzustellen. Примечание! Приведенные параметры касаются жарения на решетке. В случае применения закрытых емкостей (кастрюль), температуру следует установить на уровне 200°С.
EN CARE AND ATTENDANCE REPLACING THE OVEN LIGHT The oven light 1 must have these precise features: 1 a) it must be able to resist high temperatures (up to 300°C) b) power supply: see V/Hz indicated on data plate. c) power 25W. d) E 14 connection.
DE RU PFLEGE UND WARTUNG ОБСЛУЖИВАНИЕ И УХОД AUSWECHSLUNG DER BACKOFENBELEUCHTUNG ЗАМЕНА ЛАМПЫ ОСВЕЩЕНИЯ ДУХОВКИ Die Backofenbeleuchtung Merkmale aufweisen: 1 muss духовки folgende Освещение следующие параметры: 1 должно иметь a) Термостойкость (до 300° С) a) hochtemperaturbeständig (bis zu 300° С) b) Stromversorgung: siehe Anschlusswerte V/Hz b) Электропитание: параметры подключения V/Hz указаны в заводской табличке. auf dem Typenschild. c) Потребляемая мощность 25 W.
EN Oven The inner walls of the oven are covered with easy to be cleaned high quality enamel. The very smooth surface counteracts against the appearance of the remaining soiling on the walls of the oven very fast and can be also simply cleaned. The anti-acid-containing quality of this enamel permits a long-term qualitatively high exploitation of Your oven The oven is to be cleaned after every use.
DE RU Backofen Духовой шкаф Die inneren Wände des Backofens sind mit hochwertiger einfach zu säubernden Emaille bedeckt. Die sehr glatte Oberfläche wirkt dem Erscheinen der restlichen Verschmutzungen auf den Wänden des Backofens sehr schnell entgegen und kann auch einfach gereinigt werden. Die antisäurehaltige Eigenschaft dieser Emaille erlaubt eine langfristige qualitativ hohe Nutzung Ihres Backofens. Der Backofen ist nach jedem Gebrauch zu reinigen.
EN Telescope (if available) The system Telescope 1 (one, two or three levels depending on your model), which your oven is equiped with, enables you to pull out all griddles together or seperated from each other and even while preparing a meal. 1 The given construction Kaiser differs from similar ones through the comfortable and practical access to every griddle and allows you to take out and check pastry without cooling down the whole oven or food on the other griddles.
DE RU Teleskop (falls vorhanden) Телескоп (если имеется) Das System Teleskop 1 (1fach-, 2fach- oder 3fach-Teleskop-Auszug, je nach Modell), mit dem Ihr Herd ausgestattet ist, ermöglicht Ihnen, alle Bleche sowohl zusammen als auch getrennt voneinander und sogar während der Zubereitung eines Gerichtes herauszuschieben.
EN Alternate inspection Besides the current maintenance the user is duty bound to the following actions: • Alternate check and maintenance of oven elements and assemblies, • Let the oven be checked by the customer service after expiration of the warranty once in two years. • Abolishment of noticed errors, Note! All installing and maintenance actions mentioned on the top as well as reparations are to be accomplished by a authorized installer.
DE Periodische Besichtigung RU Периодический осмотр Außer den laufenden Wartungsarbeiten ist der Кроме операций, связанных с текущим уходом за плитой, следует: Benutzer zu folgenden Tätigkeiten verpflichtet: • Periodische Überprüfung und Wartung von Herdelementen und Baugruppen, • Производить периодические проверки исправности органов управления и рабочих узлов плиты, • Nach Ablauf der Garantieperiode jede zwei Jahre den Herd vom Kundendienst durchsehen lassen.
EN RESPECT FOR THE ENVIRONMENT The documentation provided with this oven has been printed on chlorine free bleached paper or recycled paper to show respect for the environment. The packaging has also been designed to avoid environmental impact. Packaging material is ecological and can be re-used or recycled. By recycling the packaging, you will help save raw materials as well as reducing the bulk of domestic and industrial waste.
DE UMWELTVERTRÄGLICHKEIT RU ОХРАНА ОКРУЖАЮЩЕЙ СРЕДЫ Als Beitrag zum Umweltschutz wurde die В качестве вклада в охрану окружающей среды, Dokumentation dieses Geräts auf chlorfrei вся документация к этому устройству была напечатана на отбеленной, не содержащей gebleichtes oder Recycling-Papier gedruckt. хлора или на пригодной ко вторичной переработке бумаге.
УСЛОВИЯ ГАРАНТИИ 1. Гарантия на исправное действие прибора действительна на период 12 месяцев со дня покупки прибора (подтверждена оттиском печати пункта розничной продажи и подписью продавца). 2. Фирма - изготовитель обеспечивает безвозмездный ремонт в случае обнаружения в гарантийный период заводских дефектов (несоответствующая конструкция, монтаж, дефектные материалы и исполнение). 3.
ГАРАНТИЙНЫЙ ТАЛОН (Nr. соответствует номеру аппарата, смотри на задней обложке настоящей инструкции) Данные гарантийные обязательства не ограничивают определенные законом права потребителей Поздравляем Вас с приобретением бытовой техники отличного качества! Пожалуйста ознакомьтесь с настоящим гарантийным свидетельством и проследите, чтобы оно было правильно заполнено и имело штамп магазина. При отсутствии штампа и даты продажи гарантийный срок исчисляется с момента изготовления изделия.
Представительство Kaiser в России по сервисному обслуживанию и работе с потребителями: Tел/ факс: (499) 488-75-10, 488-76-10 www.kaiser.ru E-Mail: service@kaiser.ru Почтовый адрес: 127238, Москва, а/я 46. Адреса и телефоны авторизированных сервисных центров, обеспечивающих гарантийное и послегарантийное обслуживание техники Kaiser: 1.
36. 37. 38. 39. 40. 41. 42. 43. 44. 45. 46. 47. 48. 49. 50. 51. 52. 53. 54. 55. 56. 57. 58. 59. 60. 61. 62. 63. 64. 65. 66. 67. 68. 69. 70. 71. 72. 73. 74. 75. 76. 77. 78. 79. 80. 81. 82. ООО «ФМ-Электроникс», тел.: (3842) 33-04-32, ул. пр-кт Кузнецкий, 33Д, ООО «Сибирская Сервисная Компания», тел.: 8(3842) 36-52-41, ул. Н.Островского, 12А, Киров: ООО «Вятка Сервис», тел.: (8332) 27-34-66, ул. Производственная, 24 ООО «ВГК-севис», тел.: (8332) 70-34-85, ул. Базовая, 8 ООО «Квадрат Сервис», тел.
83. Тольятти: ООО «Наша Эра», тел.: (8482) 70-65-12, 70-44-06, 70-44-07, пр-т Разина, д. 36а, оф. 329 84. Томск: ООО «Академия Сервис», тел.: (3822) 49-15-80, 49-28-08, пр. Академический 2, блок А ООО «ГлавбытСервис», тел.: (3822) 26-64-62, 44-03-07, ул. Некрасова, д. 12 ООО «Сибирский Сервис», тел.: (3822) 42-29-80, 41-44-24, ул. Елизаровых, д. 17 СЦ Технолюкс-сервис, тел.: (3822) 72-75-78, пр. Мира, 76 ООО «Соли-Сервис», тел.: 8 (3822) 25-10-17, 25-22-78, ул. Иркутский тракт, 102 85.
Представительство Kaiser в Украине: Тел.: 8 (044) 331-50-77, 8 (044) 331-50-78, 8 (044) 496-55-44 Факс: 8 (044) 391-03-00 www.kaiser.com.ua E-Mail: service@kaiser.com.ua Адреса и телефоны авторизированных сервисных центров, обеспечивающих гарантийное и послегарантийное обслуживание встраиваиваемой техники Kaiser в Украине: 1. 2. 3. 4. 5. 6. 7. 8. 9. 10. 11. 12. 13. 14. 15. 16. 17. 18. 19. 20. 21. 22. 23. 24. 25. 26. 27. 28. 29. 30. 31. 32. 33. 34. 35. 36. 37. 38. 39. 40. 41. 42. 43. 44. 45. 46. 47. 48.
54. Черкассы: «СЦ «Фокстрот», тел.: (0472) 72-35-58, ул. Калинина, 115 55. Черновцы: «Фокстрот-Сервис», тел.: (0372) 58-43-01, ул. Главная, 265 56. Шостка: КП ТД «Березка-Сервис», тел. (05449) 4-07-07, ул. Рабочая, 5 The manufacturer declines all responsibility for possible mistakes and typing errors and reserves the right to make in design and construction of our own products those changes which do not touch negative influence upon the qualities and properties without a preliminary notification.
OLAN-Haushaltsgeräte, Berlin Germany www.kaiser-olan.