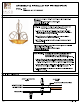
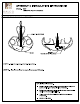
ASSEMBLY & INSTALLATION INSTRUCTIONS i MODEL: 4297 TRANSCRIBE 6LT 37" PENDANT GALLO CEILING BRACE OPTIONS " METHOD A" SCREW. TE HICKEY BOX HEX NUT & LOCK WASH Brace is directly on top of the outlet box and not accessible). Using a 1/8" drill bit, per-drill (4) holes into the wood brace through the (4) hole pattern in the outlet box. (Outlet box is shown as a cutaway for Clarity). Secure the hickey to the brace with (4) #8 x screws.
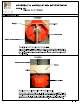
ASSEMBLY & INSTALLATION INSTRUCTIONS MODEL: 4297 TRANSCRIBE 6LT 37" PENDANT es KNOCKDOWN INSTRUCTION ASSEMBLY WIRE! STEP 1: Carefully pull the wire in the center of the fixture am then insert to the main fixture as show /——CENTER STEM i FIXTURE STEM STEP 2: Pull the wire in the center stem and carefully screw it to the main fixture stem to secure the fixture arm as shown.
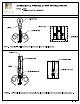
ALCOA MODEL: 4297 TRANSCRIBE SLT 37" PENDANT ASSEMBLY & INSTALLATION INSTRUCTIONS FRAME/COMPONENTS ASSEMBLY STEP 3: STEP 4: STEP 5: STEP 6: STEP: STEP 8: STEPS: STEP 10: Assemble nipple and collar loop to cast hickey. Determine fixture height. Make adjustment if beaded ION BOX (NOT INCLUDED) Oo Attach chain to fixture loop and collar loop using ops-able chain BLACK SMOOTH HICKEY WIRE ROUND WIRE Pass the collar loop ring and canopy, over the chain.
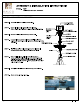
ASSEMBLY & INSTALLATION INSTRUCTIONS i MODEL: 4297 LACE on TRANSCRIBE 6LT 37” PENDANT FRAME/COMPONENTS ASSEMBLY STEP 11: Slide the glass bowl to the main fixture frame. STEP 12: Install the bulb, do not use bulb that exceed watts. FOR LIGHTING MAINTENANCE: duster, soft lint-free or damp cloth is recommended. reaction on the hand painted finishes. components. HANDLE WITH CARE.
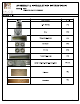
4 MODEL: 4297 TRANSCRIBE BLT 37" PENDANT ASSEMBLY & INSTALLATION INSTRUCTIONS PARTS LIST IMAGE PARTS NAME QTY. X-14 Parts Bag 1PC Screw PCs Threaded Nipple (Short) 1PC Star Washer PCs Hex Nut PCs Threaded Nipple (Long) 1PC Canopy / Chain 4Ft.