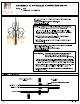
ASSEMBLY & INSTALLATION INSTRUCTIONS MODEL: 4298 wail TRANSCRIBE 3LT DINETTE KNOCK DOWN ASSEMBLY INSTRUCTIONS RAIN FIXTURE FRAME STEP 1: Carefully insert the center tam to the main fixture as shown. RAIN FIXTURE FRAME STEP 2: Attach the middle finial to the main fixture and secure with center finial as shown. Page? Warn Alcoa.
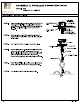
ee MODEL: 4298 TRANSCRIBE 3LT DINETTE ASSEMBLY & INSTALLATION INSTRUCTIONS MOUNTING INSTRUCTIONS STEP 3: STEP 4: STEP 5: STEP 6: STEP 7: STEP 8: Attach mounting plate to outlet box with the (2) 8/32" 3/4" screws. Fasten Nipple info mounting plate so that they extend away from the ceiling when the mounting plate is installed. Lock in place using the hex nut and washer provided. Determine fixture height. Make adjustment if needed. Attach chain to the fixture loop and collar loop using ops -able chain.
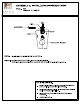
ASSEMBLY & INSTALLATION INSTRUCTIONS MODEL: 4298 REE TRANSCRIBE 3LT DINETTE COMPONENT INSTRUCTIONS GIMBALS: GLASS 100W BULB (NOT INCLUDED) STEP 9: Install bulbs. Do not install bulbs which exceed 100W. STEP 10: Use glass screws to secure glass. Line up the hole with gimbals hole. Thread in one glass screw halfway and repeat for the other screws. Then finally tighten all screws.
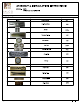
# ALCOA ASSEMBLY & INSTALLATION INSTRUCTIONS MODEL: 4298 TRANSCRIBE 3LT DINETTE PARTS LIST IMAGE PARTS NAME ary X-9 Parts Bag 1PC Screw PCs Threaded Nipple 1PC Star Washer 1PC Hex Nut PCs Open-able Chain PCs Chain (ft) 1PC Canopy 1PC Center stem 1PC Middle Finial 1PC Center Finial 1PC Glass Screw PCs Pages ‘www alcoholism