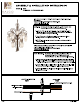
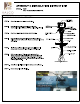
ASSEMBLY & INSTALLATION INSTRUCTIONS MODEL: 4299 TRANSCRIBE 16LT CHANDELIER ALCOA CEILING BRACE OPTIONS "METHOD A" sc TE HICKEY LET BOX HEX NUT & LOCK WASH! Brace is directly on top of the outlet box and not accessible). Using a 1/8" drill bit, per-drill (4) holes into the wood brace through the (4) hole pattern in the outlet box. (Outlet box is shown as a cutaway for Clarity). Secure the hickey to the brace with (4) #8 x screws.
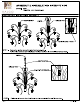
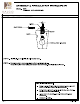
MODEL: 4299 16LT CHANDELIER TRANSCRIBE CALCINED ASSEMBLY & INSTALLATION INSTRUCTIONS FRAME/COMPONENTS ASSEMBLY STEP 4: STEPS: STEP 6: STEP: STEP 8: STEPS: STEP 10: STEP 11: Assemble nipple and collar loop to cast hickey. Determine fixture height. Make adjustment if needed. Attach chain to fixture loop and collar loop using open-able chain. Pass the collar loop ring and canopy, over the chain.
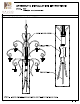
ASSEMBLY & INSTALLATION INSTRUCTIONS MODEL: 4299 TRANSCRIBE 16LT CHANDELIER GALLO FRAME/COMPONENTS ASSEMBLY GIMBALS GLASS — KET 100W BULB (NOT INCLUDED) STEP 12: Install bulbs. Do not install bulbs which exceed 100W. STEP 13: Use glass screws to secure glass. Line up the hole with gimbals hole. Thread in one glass screw halfway and repeat for the other screws. Then finally tighten all screws.
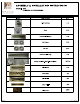
MODEL: 4299 TRANSCRIBE 16LT CHANDELIER ASSEMBLY & INSTALLATION INSTRUCTIONS PARTS LIST IMAGE PARTS NAME ary. X-14 Parts Bag 1PC Screw PCs Threaded Nipple (Short) 1PC Star Washer PCs Hex Nut PCs Threaded Nipple (Long) 1PC Canopy / Chain 8Ft.
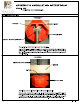
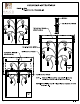
UNPACKING INSTRUCTIONS MODEL: 4299 TRANSCRIBE 16LT CHANDELIER ALCOA TOP METAL FARM ( REMOVABLE) MAIN FIXTURE (BODY)— I MARE— TOP METAL FRAME MAIN METAL Fi (REMOVABLE 4-1-1 MAIN METAL FRAME STEP 1: Remove all screw (PCs) and carefully lift the top metal frame together with the fixture as shown. 1 NOTE : When lifting heavier / large fixture, need two or more peoples to lift. Pages www Kaloo.