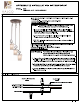
ASSEMBLY & INSTALLATION INSTRUCTIONS MODEL: 4302 TRANSCRIBE 3 LT FOYER PENDANT KALE MOUNTING ASSEMBLY —— PARTS BAG SCREW ( FOR CEILING MOUNTING) NOT INCLUDED STEP 1: Fasten screw into customized parts bag so that it will hang from the ceiling. FRAME/COMPONENTS ASSEMBLY CANOPY LOOP WIR PENDANT FIXTURES 'PENDANT FIXTURE! STEP 2: Carefully attach the two stems as show. Make sure there is no wire pinch between the two stem. Insert the wire to the loop and attach all the pendant fixture to the canopy as shown.
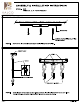
ASSEMBLY & INSTALLATION INSTRUCTIONS i MODEL: 4302 TRANSCRIBE 3LT FOYER PENDANT ALCOA ELECTRICAL MOUNTING INSTRUCTION BLACK WIRES (HoT) GROUND WIRE! WHITE WIRES (NEUTRAL) SAFETY CABLE STEP 3: Refer to wiring diagram. Connect the black supply CANOPY: wire to the black fixture wire with wire connector, connect the white supply wire to the white fixture wire with wire connector. Connect ground wire from fixture with supply ground wire. STEP 4: Install safety cable to ceiling beam.
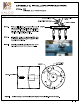
ASSEMBLY & INSTALLATION INSTRUCTIONS MODEL: 4302 TRANSCRIBE 3 LT FOYER PENDANT REL COMPONENTS ASSEMBLY GIMBALS GLASS SCREW Te SOCKET 100W BULB GLASS (NOT INCLUDED) STEP 6: Install bulbs. Do not install bulbs which exceed 100W. STEP: Use glass screws to secure glass. Lineup hole in glass with gimbals hole. Thread in one glass screw halfway and repeat for other two screws. Then fully tighten all screws.
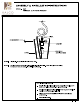
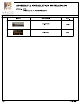
ASSEMBLY & INSTALLATION INSTRUCTIONS MODEL: 4302 TRANSCRIBE 3 LT FOYER PENDANT PARTS LIST IMAGE PARTS NAME Qry. Lock-Up Screw PCs Glass Screw PCs Pages ‘www .