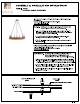
ASSEMBLY & INSTALLATION INSTRUCTIONS a MODEL: LANDLESS 9 LIGHT CHANDELIER KNOCKDOWN ASSEMBLY STEP 1: Hook the all the operable chain to the main fixture loop as shown. FOR LIGHTING MAINTENANCE: duster, soft lint-free or damp cloth is recommended. reaction on the hand painted finishes. components. HANDLE WITH CARE.
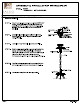
ASSEMBLY & INSTALLATION INSTRUCTIONS 4 MODEL: LANDLESS 9 LIGHT CHANDELIER ELECTRICAL / MOUNTING INSTALLATION PENDANT OPTION : STEP 2: Attach mounting plate to outlet box with the (2) 8/32"x 3/4” screws. Fasten Nipple info mounting plate so that they extend away from the ceiling when the mounting plate is installed. Lock in place using the hex nut and washer JT Numerated) provided. BLAG & SMI oO ROUND WIRE WIRE JOINTING PLATE STEP 3: Determine fixture height. Make adjustment if needed.
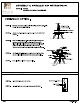
ASSEMBLY & INSTALLATION INSTRUCTIONS MODEL: LANDLESS 9 LIGHT CHANDELIER ALCOA ELECTRICAL / MOUNTING INSTALLATION 2 SEMI-FLUSH OPTION : STEP 1: Remove the cover plate, collar loop/ring and the open-able chain / link to semi-floes option. OPEN ABLE CHAIN COLLAR LOOP / RING STEP 2: Attach mounting plate to outlet box with the (2) 8/32"x 3/4" screws. STEP 3: Refer to wiring diagram.
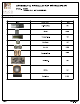
ASSEMBLY & INSTALLATION INSTRUCTIONS MODEL: LANDLESS 9 LIGHT CHANDELIER ALCOA PARTS LIST IMAGE PARTS NAME ary X-9 Parts Bag re Screw PCS Ee. | Threaded Nipple PE.