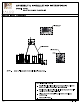
ASSEMBLY & INSTALLATION INSTRUCTIONS MODEL: 507771 ALSTON 15 LIGHT CHANDELIER rhino KNOCK DOWN ASSEMBLY LOOP STEP: Attach all fixture stems on the main fixture loop as shown. FOR LIGHTING MAINTENANCE: Regular cleaning of fixture with proper and gentle care using a soft duster, soft lint-free or damp cloth is recommended. Refrain from using harsh cleaning liquids that may cause chemical reaction on the hand painted finishes. Always refer to the Assembly Instruction before removing any ‘components.
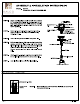
i CALK O MODEL: 507771 ALSTON 15 LIGHT CHANDELIER ASSEMBLY & INSTALLATION INSTRUCTIONS ELECTRICAL / MOUNTING INSTALLATION STEP 2: STEP 3: STEP 4: STEP &: STEP 6: STEP 7: Attach mounting plate to outlet box with the {2) 8/32" 3/4" screws. Fasten Nipple into mounting plate so that they extend away from the ceiling when the mounting plate is installed. Lock in place using the hex nut and washer provided. Determine fixture height. Make adjustment if needed.
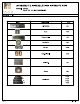
MODEL: 507771 ALSTON 15 LIGHT CHANDELIER KENDALL ASSEMBLY & INSTALLATION INSTRUCTIONS PARTS LIST IMAGE PARTS NAME QTy X-9 Parts Bag 1PC Screw 2PCcs Threaded Nipple 1PC Star Wagner 1PC Hex Nut PCS g Q Open-able Chain PCS Chain (4ft) 1PC Canopy 1PC PCS 3L S Candle Cover apes o o spews Page 4