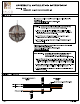
ASSEMBLY & INSTALLATION INSTRUCTIONS MODEL: 7041 CORONADO & LIGHT ROUND CHANDELIER ee KNOCKDOWN ASSEMBLY STEP 1: Attach fixture loop io the decorative cover top screen & center stem to the main fixture as shown 9 -TOP COVER SCREEN BOTTOM COVER SCREE! BOTTOM COVER SCREEN STEP 2: Attach the bottom cover screen to the top cover screen as shown and secure with screw provided. Page 2 ‘www.
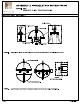
ASSEMBLY & INSTALLATION INSTRUCTIONS 4 MODEL: 7041 CORONADO 6 LIGHT ROUND CHANDELIER ALCOA ELECTRICAL /MOUNTING INSTALLATION STEP 3: Fasten nipple into mounting plate so that they extend away from the ceiling when the mounting plate is installed. risen Lock in place using the hex nut & washer provided. Raids wires BA Sr O [MOUNTING PLATE " x 3/4" SCREW. STEP 4: Attach mounting plate to outlet box with the (2) 8-32 x WHITE & RIBBER NUTRIENT %' screws.
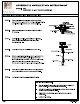
ASSEMBLY & INSTALLATION INSTRUCTIONS MODEL: 7041 CORONADO 6 LIGHT ROUND CHANDELIER CALLED COMPONENT ASSEMBLY STEP 10: Insert the candle cover to the socket. STEP 11: Install the bulbs, do not use bulbs that exceeds 60 watts. ADDITIONAL INSTRUCTIONS: BULB REPLACEMENT STEP 1: Unscrew the finial. STEP 2: Remove the wood beseecher then unscrew the bolt. STEP 3 Carefully open and remove the access door. Replace bulb then close back access door.
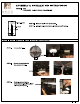
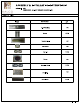
Kale ASSEMBLY & INSTALLATION INSTRUCTIONS MODEL: 7041 CORONADO 6 LIGHT ROUND CHANDELIER PARTS LIST IMAGE PARTS NAME ary X-9 Parts Bag 1PC Screw PCS Threaded Nipple 1PC Star Washer 1PC Hex Nut PCS Canopy 1PC Open-able Chain PCS Chain (4ft) 1PC — Candy Cover ores Page 5 ‘www .alcohol.