Handshower, Hose & Handshower Accessories INSTALLATION INSTRUCTIONS P21650, P21660, P24452, P24453, P24454, P24456, P24743, P24745, P24746, P24761, P24843 1188577-2-F ©2014 KALLISTA 1 of 5 Questions? Problems? For additional assistance, please contact KALLISTA’s Customer Service Department at 1-888-4-KALLISTA (1-888-452-5547) or kallista.
Handshower, Hose & Handshower Accessories INSTALLATION INSTRUCTIONS THANK YOU FOR CHOOSING KALLISTA We appreciate your commitment to KALLISTA quality products. Please take a moment to review this manual before you install your KALLISTA product. If you encounter any installation or performance problems, please do not hesitate to contact us at the phone number listed at the bottom of the page. BEFORE YOU BEGIN WARNING: Risk of scalding. High water temperature can cause severe burns.
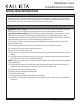
Handshower, Hose & Handshower Accessories INSTALLATION INSTRUCTIONS TOOLS AND MATERIALS Pencil Tape Measure Drill Level Assorted Screwdrivers Hex Wrench Thread Sealant Adjustable Wrench Pipe Wrench . 1. INSTALL THE SUPPLY ELBOW (P24452) Shower Ell Adapter O-Ring Supply Elbow Apply thread sealant tape. Install a temporary nipple into the shower ell. Run water through the system to flush out dirt and debris. Remove the temporary nipple from the shower ell.
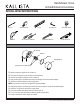
Handshower, Hose & Handshower Accessories INSTALLATION INSTRUCTIONS 2. INSTALL THE FIXED WALL BRACKET (P24453) Drill holes using a 5/16" bit. Anchor 13/16" (21 mm) Fixed Wall Bracket Screw Press and hold legs together. Determine the location for the fixed wall bracket. Mark the hole locations for the wall anchors. Drill the holes and install the wall anchors. Attach the fixed wall bracket to the wall with the screws. 3.
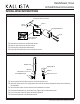
Handshower, Hose & Handshower Accessories INSTALLATION INSTRUCTIONS 4. INSTALL THE OPTIONAL SLIDEBAR (P24456) Cap Setscrew O-Ring Coupling Tube Drill a 5/16" hole for the anchor. Escutcheon Handshower Bracket Anchor Sleeve Hub Screw Coupling O-Ring Setscrew Cap 1188577-2-E 5 of 5 Determine the location for the slidebar. Mark the hole locations for the wall anchors. Drill the holes and install the wall anchors. Attach the escutcheons, sleeves, and hubs with the screws.
Wall Bracket with Integrated Supply Elbow INSTALLATION INSTRUCTIONS P21651 1230883-2-B 1 of 3 KALLISTA ©2015 P21652 Questions? Problems? For additional assistance, please contact KALLISTA’s Customer Service Department at 1-888-4-KALLISTA (1-888-452-5547) or kallista.com.
Wall Bracket with Integrated Supply Elbow INSTALLATION INSTRUCTIONS THANK YOU FOR CHOOSING KALLISTA We appreciate your commitment to KALLISTA quality products. Please take a moment to review this manual before you install your KALLISTA product. If you encounter any installation or performance problems, please do not hesitate to contact us at the phone number listed at the bottom of the page. BEFORE YOU BEGIN NOTE: Plumbing codes may require a vacuum breaker be installed in-line to handshowers.
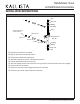
Wall Bracket with Integrated Supply Elbow INSTALLATION INSTRUCTIONS 1. INSTALL THE PIPE NIPPLE 11/16" (17 mm) Beyond Finished Wall 1/2" NPT Nipple Apply sealant tape. 3/8" (10 mm) Max 1-5/8" (41 mm) Max Apply sealant tape to one end of a 1/2” NPT nipple. Install the nipple to extend 11/16″ (17 mm) beyond the finished wall. Ensure the gap between the nipple and finished wall is no more than 3/8” (10 mm). 2. INSTALL THE WALL BRACKET Wall Bracket Apply sealant tape.
Raindome Showerhead INSTALLATION INSTRUCTIONS 1193226-2-G © 2015 KALLISTA P21510 P21511 P21512 P21513 P21514 P21515 P21540 P21671 P21676 Questions? Problems? For additional assistance, please contact KALLISTA’s Customer Service Department at 1-888-4-KALLISTA (1-888-452-5547) or kallista.
Raindome Showerhead INSTALLATION INSTRUCTIONS THANK YOU FOR CHOOSING KALLISTA We appreciate your commitment to KALLISTA quality products. Please take a moment to review this manual before you install your KALLISTA product. If you encounter any installation or performance problems, please do not hesitate to contact us at the phone number listed at the bottom of the page. IMPORTANT IMFORMATION WARNING: Risk of scalding. High water temperature can cause severe burns.
Raindome Showerhead INSTALLATION INSTRUCTIONS INSTALL THE SHOWERHEAD Shower Ell (Wall) Shower Ell (Ceiling) Escutcheon Escutcheon Shower Arm (Not Provided) Setscrew Shower Arm (Not Provided) Setscrew Apply thread sealant tape. Showerhead CAUTION: Risk of product damage. To avoid plugging the showerhead spray outlets, use thread sealant tape on the shower arm threads. Do not use thread sealant compound. NOTE: The shower arm is not provided.
Shower Arms INSTALLATION INSTRUCTIONS 1193441-2-A 1 of 3 P21520 P21521 P21522 P21523 Questions? Problems? For additional assistance, please contact KALLISTA’s Customer Service Department at 1-888-4-KALLISTA (1-888-452-5547) or FAX 1-888-272-3094.
Shower Arms INSTALLATION INSTRUCTIONS THANK YOU FOR CHOOSING KALLISTA We appreciate your commitment to KALLISTA quality products. Please take a moment to review this manual before you install your KALLISTA product. If you encounter any installation or performance problems, please do not hesitate to contact us at the phone number listed at the bottom of the page. IMPORTANT IMFORMATION Observe all local plumbing and building codes. Shut off the main water supply.
Shower Arms INSTALLATION INSTRUCTIONS INSTALL THE SHOWER ARM Escutcheon (Not Provided) Shower Ell (Wall) Shower Ell (Ceiling) Escutcheon (Not Provided) Shower Arm Shower Arm Apply thread sealant tape. Showerhead (Not Provided) CAUTION: Risk of product damage. To avoid plugging the showerhead spray outlets, use thread sealant tape on the shower arm threads. Do not use thread sealant compound (pipe dope). NOTE: The showerhead and escutcheon are not provided.
Pressure Balance Trim INSTALLATION INSTRUCTIONS P24015, P24016, P24115, P24116, P24215, P24216, P24415, P24416 1050182-2-C 1 of 5 Questions? Problems? For additional assistance, please contact KALLISTA’s Customer Service Department at 1-888-4KALLISTA (1-888-452-5547) or FAX 1-888-272-3094.
Pressure Balance Trim INSTALLATION INSTRUCTIONS IMPORTANT INSTRUCTIONS READ AND SAVE FOR THE CONSUMER WARNING: Risk of scalding or other severe injury. ●● Before completing installation, the installer must set the maximum water temperature setting of this valve to minimize the risks associated with scalding hazards according to ASTM F 444. ●● Do not install a shut-off device on either outlet of this valve.
Pressure Balance Trim INSTALLATION INSTRUCTIONS THANK YOU FOR CHOOSING KALLISTA We appreciate your commitment to KALLISTA quality products. Please take a moment to review this manual before you install your KALLISTA product. If you encounter any installation or performance problems, please do not hesitate to contact us at the phone number listed at the bottom of the page. BEFORE YOU BEGIN Observe all local plumbing and building codes. Shut off the main water supply.
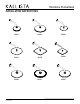
Pressure Balance Trim INSTALLATION INSTRUCTIONS 1. WATER TEMPERATURE ADJUSTMENT High Flow Valve Standard Valve Tab Setscrew Collar Tab Valve Label Valve Stem Setscrew Valve Stem O-Ring Collar CAUTION: Risk of personal injury. The water temperature should never be set above 120° F (49° C). NOTE: Do not remove the O-ring and collar at this time. Removing the O-ring and collar will change the factory setting for the maximum water temperature. Discard the plaster guard.
Pressure Balance Trim INSTALLATION INSTRUCTIONS 3. INSTALL THE FACEPLATE AND HANDLE Valve Stem Discard plaster guard with dome. Valve Seal Faceplate Diverter Actuator Screw Collar Diverter Seal Setscrew Handle Tiled Wall Installations Only, apply silicone sealant. Fit diverter seal over diverter actuator (if applicable) and valve seal over valve stem, as shown. Align the notches in the valve seal with the threaded holes in the valve. Install the faceplate onto the valve.