
Installation Sheet


INSTALLATION INSTRUCTIONS
Freestanding Bath
Questions? Problems? For additional assistance, please contact KALLISTA’s Customer
Service Department at 1-888-4KALLISTA (1-888-452-5547) or kallista.com.
1297399-2-C
3 of 5
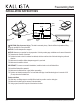
1. PREPARE THE SITE
Drain
Pipe
Bath
Drain
Finished
Floor
Finished
Floor
Align.
2-3/4"
(70 mm)
Level
Trace.
CAUTION: Risk of personal injury. This bath is extremely heavy. Obtain sufcient help and use lifting
straps to carefully lift or move the bath.
NOTICE: Provide adequate oor support.
NOTICE: Measure your product for site preparation. Visit the product page at kallista.com for more information.
Determine the location of the bath.
Position the bath so that it is oriented as desired, with the overow side of the bath facing the preferred
direction.
Make sure the suboor offers adequate support for your bath.
Make sure the suboor is level.
IMPORTANT! To ensure a successful installation, install the bath on a level nished oor.
Install the nished oor material.
Make sure the nished oor is level before proceeding.
Position and install a standard PVC or brass bath drain pipe. Install the drain pipe so it extends 2-3/4"
(70 mm) above the nished oor.
Position the Bath
With help, use lifting straps to carefully lift the bath into position over the drain pipe.
Make sure the drain pipe is centered in the bath drain.
Using a pencil, trace the footprint of the bath on the oor.