WALL-MOUNTED SPLIT AIR CONDITIONER INSTRUCTION MANUAL Ref: 031016_GB KA AC 2 220-240V~3480W Thank you for choosing one of our air conditioners. Please read this INSTRUCTION MANUAL carefully before using the appliance and keep it for further reference. Contact our local qualified service center, who will install your appliance. This appliance must be installed by a competent qualified technician.
CONTENTS Contents …….……………………………………………………………………………………. 1. Safety Awareness……………………………………………………………………………………….. 2 Part description…………………………………………………………………………………………. 4 Operation procedure Remote control's preparative before operation……………………………………………. 6 Operation explanation of air conditioner ……………………………………………………… 7 Service and Maintenance of the air conditioner …………………………………………..………… 12 Troubleshooting ………………………………………………………………………. 14 Performance parameters ……………………………………………………………………………….
Read this safety awareness section carefully before use. The items indicated here are very important safety precautions, which must be followed. Must connect grounding line Strictly forbidden Must unplug plug Must be done WARNING Do not pull at the power cord. Hold plug to unplug when removing power, or part of the line in the power cord may break and cause fire. Do not let cool air blow directly at you for long time. Possible health problems may occur.
WARNING Clean the air conditioner with a soft and dry cloth. Do not use chemical solvent, insecticide, inflammable -spraying material or which could damage the air conditioner. The appliance shall be installed in accordance with national wiring regulations. The appliance must not be installed in the laundry. The appliance must be installed 2.3m above the floor. The appliance must be positioned so that the plug is accessible.
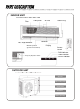
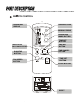
INDOOR UNIT Filter Front panel Left / Right deflector Manual operation (open the Front Panel) Emergency Operation Switch Air inlet Power Plug Deflector Display Remote Control RUN indicator TIME indicator SLEEP indicator OUTDOOR UNIT Air Inlet Connecting Pipe Drain Hose Air outlet Drain Opening
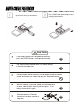
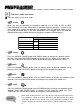
REMOTE CONTROL OPERATION DISPLAY SWING BUTTON MANUAL SWING AUTO M ANUAL O P E R AT IO N MODE TEMPERATURE ADJUSTMENT BUTTON RUN/STOP BUTTON O FF ON FAN SPEED BUTTON FA N S P E E D TIME OFF BUTTON TIME ON BUTTON TIME CANCEL BUTTON T IM E CANCEL OPERATION MODE BUTTON SET SLEEP TIME SET BUTTON SLEEP BUTTON RESET
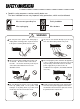
Open back cover, put in batteries. Press RESET with pointed object after changing the batteries. CAUTION If the remote control can't be operated normally, press the RESET button, it will operate normally. The signal can be reached within six meters directly in front of the indoor unit. Handle remote control carefully. Do not drop or throw the remote control and make sure it does not get wet. Avoid malfunction.
Operation procedure-Control under the Remote control Run/Stop Press I/O button to start the appliance, and press again to switch it off. Temperature adjustment Press TEMPERATURE ADJUSTMENT button, pressing “ ” button once decreases by 1°C, and increase by 1°C by pressing “ ” button once. The temperature will be displayed on the remote control. Fan speed adjustment Press the FAN SPEED button, change the fan speed of indoor unit in the order of (low) (medium) (high) (auto).
2 Press the SWING button, the deflector starts to rotate automatically, and will stop if you press the button again. Change right/left air flow direction Manually swing the Left/Right deflector to change right/left air flow direction. Complete the adjustment before operation, if adjusted during operation, the auto swinging deflector may pinch your fingers.(Fig. 1) (Fig.1) ADVICE In DRY or COOL mode, we advise you to put deflector in the (auto) position, and make the air blow downward in (1).
Operation mode adjustment Cool only type has not HEAT mode 1 AUTO mode When you start the appliance, the operation mode will turn to COOL or DRY or HEAT mode according to the room temperature. If operation stops for two hours, it restarts in the same mode set as before the operation was stopped. Once the operation mode is set, it will not be influenced even if the room temperature has changed. Press the MANUAL SWING button and the SWING button to change the up/down airflow direction.
Timer operation Timer operation ON 1. Press the button when the air conditioner is not operating to set the time at which you want it to start operating. "l" of flickers on the remote controle display. Press the button when the air conditioner is operating to set the time at which you want it to stop operating. of flickers on the remote control display. 2. Press or to enter the time setting. Press or once, the timer will increase by 1 hour, the time will be displayed on the remote control. 3.
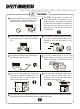
Air Conditioner no use for a long time Start fan only for 3-4 hours to completely dry the inside of the indoor unit Set COOL mode or HEAT mode, and select the highest setting temperature, then fan turns. O PE FA N R AT Want to use the Air Condi tioner Clean filters and replace them to original position. Clean indoor unit with soft clothe. Do not use gasoline, benzene, thinner, grinding powder, detergent, insecticide etc. to clean units as they can hurt the units.
Deodorization filter, Air cleaner, Filters must be cleaned regularly. Open the front panel only after air conditioner has stopped completely. Filters should be cleaned once two every weeks. Clean deodorization filters and air cleaner Open the cover and take out filters. Take out filters first, then take out the deodorization filter and the air cleaner. Clean the filters with a vacuum cleaner or by shaking them gently.
If problems cannot be solved after doing below items, please stop the air conditioner, contact our air conditioner specially engaged service center nearest to you to get help. Is there a fault? Fault analysis The air conditioner does not operate at all. Does power fail? Is plug out? Does power fuse or switch off? Is voltage higher than 253V or lower than 207V? Is time set suitable? The remote control is not available and does not display.
Is there a fault? Indoor unit fan stops for about 10 minutes during heating. Issues cracking sounds You can hear the sound of running water Indoor unit issues “pooosh” sound and click sound. There is an odd odour in the air that air conditioner blow out. Outdoor unit leaks water. Fault analysis It is defrosting of the outdoor unit coil. It should complete this process in about 10 minutes at most. (It freezes when outdoor temperature is low and humidity is high.
KA AC 2 M odel in d o o r F u n c tio n Power 2 2 0 -2 4 0 V ~ , 5 0 H z R a t e d c o o lin g / h e a t in g c a p a c it y ( W ) 6 5 0 0 ( c o o l) /7 4 0 0 ( h e a t) R a te d in p u t ( W ) 2 6 5 0 ( c o o l) /2 6 5 0 ( h e a t) R a te d in p u t c u r r e n t ( A ) 1 3 ( c o o l) /1 3 ( h e a t) 3 A ir flo w v o lu m e ( m /h ) 1100 D e h u m id ify in g c a p a c ity ( L /h ) 2 .
Installation sketch Confirm installation place with the marker of indoor unit installation board. a>b =o v 1e0 1 50 m5mm m m4m a >b = o v2e4 2 mm a b>o v = e 1 5155m5 m m 1 2 3 4 Notice: do not put the drain hose high. G aa bb oo vv ee 77 m mm m 7 H F C B D Configuring pipe can be installed to back, right, underside, or left-back side.
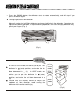
Before installation, inspect the following accessories: In d o o r u n it a c c e s s o r ie s In s ta lla tio n a c c e s s o r ie s Q u a n tity Q u a n tity 1 M o u n tin g p la te 1 A C o n n e c tin g p ip e 1 2 T a p p in g s c r e w S T 4 x 2 5 5 B B o n d in g ta p e 2 3 E x p a n s io n r u b b e r p lu g 4 C C la m p 3 4 E x p a n s io n b o lt 2 D C e m e n t n a il 5 5 B a tte r y 2 E D r a in h o s e 1 6 R e m o te c o n tr o lle r 1 F O p e n in g c a p
Secure the mounting plate The mounting plate should be attached to the structural part of the wall (post etc.). Fasten string at the central hole Plumb The holes at solid arrow position must be secured to avoid the shake of mounting plate. NOTICE When the expansion bolts are used, two holes ( 11×20 or 11×26 ) that the distance between them is 450mm should be adopted. Drill on the wall Confirm the position of holes, and drill holes of ф65mm on the wall.
Installation drain hose Liquid pipe NOTE The drain hose must be arranged beneath the copper pipe. Gas pipe Drain hose The drain hose must not be hunched or bent. Do not wrap the drain hose by pulling it. Adiabatic underlay When the drain hose must be through the house, it should be wrapped by the special heat insulated materials. Felt The copper pipe and the drain hose must be wrapped by felt strip. Heat insulated pad should be used in the place that the pipe contact the wall.
SEAL OF WALL HOLE AND FASTEN OF PIPE get rid of unwanted part Use putty to seal the wall hole. Use clamp (pipe fastener) to secure the pipe at specified position. airproof with putty clip the connecting pipe with clamp screw indoor unit OUTDOOR UNIT Wiring The cable wire can be led from the back hole of the piping hole or ejecting hole. Please utilize outdoor pipe support when the cable wire is led from the backside.
Note: 1. The power wire and signal wire between the indoor/outdoor units must be connected one by one as per corresponding number on the wiring terminal board. 2. The terminal positions of R1 and R2 must be connected with signal wire. They can't connect with the power in any case; otherwise, there will be failure. 3. If the signal wire has to be bought separately, choose electric wire above 0.75mm.
PIPE DIAMETER OF PIPE . TORQUE (N m) Liquid pipe Gas pipe Discharge the air procedure Connect charging hose(low pressure) of manifold gauge to the service port of gas shut-off valve. Open the valve of the low pressure and close high pressure valve of manifold gauge. Purge the air from the system using the vacuum pump until its pressure(low pressure side) is below 12Pa. Close the low pressure valve and remove the charging hose from service port .