KAMADO JOE CLASSIC III OWNER’S MANUAL KJ15040921, KJ15040721 9804200025 210809-GH
Table of Contents Warnings 3 Parts List & Tools Required 7 Grill Set-Up Instructions 8 Assembly Instructions 9 Safety Information 14 Cleaning & Care 15 Hinge Adjustments 16 Quick Start Guide 18 Quick Temperature Guide 19 Grill does not come with charcoal.
WARNING • This manual contains important information necessary for the proper assembly and safe use of the appliance. • Read and follow all warnings and instructions before assembling and using the appliance. • Keep this manual for future reference. Failure to follow these instructions could result in fire, explosion or burn hazard which could cause property damage, personal injury or death.
WAR N I N G S WARNINGS AND IMPORTANT SAFEGUARDS READ ALL INSTRUCTIONS • WARNING! This barbecue will become very hot. Do not move it during operation. • WARNING! Do not use indoors! • WARNING! Do not use alcohol, gasoline or other similar liquids to light or relight the barbecue. • WARNING! Keep children and pets away from grill at all times. Do NOT allow children to use grill. Close supervision is necessary when children or pets are in the area where grill is being used.
WARNINGS AND IMPORTANT SAFEGUARDS • Never use grill for anything other than its intended use. This grill is NOT for commercial use. • Accessory attachments not supplied by Kamado Joe are NOT recommended and may cause injury. • Use of alcohol, prescription or non-prescription drugs may impair user’s ability to assemble or safely operate grill. • Keep a fire extinguisher accessible at all times while operating grill.
WARNINGS AND IMPORTANT SAFEGUARDS • Be careful when removing food from grill. All surfaces are HOT and may cause burns. Use protective gloves/mitts or long, sturdy cooking tools for protection from hot surfaces or splatter from cooking liquids. • Do not touch HOT surfaces. • Grill is HOT during use. To avoid burns, keep face and body away from vents and when opening lid. Steam and hot air are expelled during use.
1. 2. 3. 4. 5. 6. 1 2 3 7. 8. 9. 10. 4 5 6 11. 12. 13. 14. 15. 16. 17. 18. 19. 20. 21. 7 8 9 10 11 22 12 22.
Grill Set-Up UNBOXING YOUR GRILL 1 Cut the plastic bands and remove the top and side panels of the shipping container. 2 Set the grill cart box aside. 3 Open the dome of the grill and remove the components from the inside of the grill. Handle the internal ceramic parts with care. KAMADO JOE GRILL WITH CART 1 Once the internal components of the grill have been removed, lift the grill out of the container and set it aside. Due to the weight of this grill, we highly recommend two people perform this task.
5mm 1 18 M6X16 X8 18 M6 X8 18 M6 X8 18 19 18 6mm 2 M8X20 X4 M8 X4 M8 X4 20
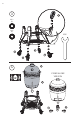
3 21 M12 X4 M12 X4 #16 21 21 21 21 4 2 STAND ALONE VERSION 17 23 23 23
5 11 12 6 9 8 10
6 5 6 6 7 7 1 3 3 4 STAND ALONE VERSION
8 1 13 14 15 9 16
Latch Adjustments The latch on your Classic III is already preset for an ultra-tight seal. Use these instructions if any adjustments should be needed. CLASSIC III LATCH To tighten and loosen the latch setting, use a small Allen wrench. Adjust the set screw to lower the latch plate and add the spacer. Once the spacer is added, reinstall the latch plate by tightening the set screw.
Cleaning & Care Your Kamado Joe grill is made of quality materials, so general care and maintenance is minimal. The best way to protect your Kamado Joe from the elements is with a grill cover. Light cracked porcelain called crazing is part of the natural characteristic. SELF-CLEANING 1 Add charcoal and light it. 2 Install the Divide & Conquer® flexible cooking rack in the top position and both heat deflectors on the accessory rack.
Classic Air Lift Hinge Adjustments The Air Lift Hinge on your Kamado Joe Classic is already pre-adjusted for ideal balance and stability. Follow these instructions for any additional adjustment to suit your personal preferences. Caution: Air Lift Hinge under high tension. CLASSIC 1 Open the dome of your Kamado Joe Classic grill. 2 With the dome open, place the 7mm wrench on the flats on the screw (see Inset 1).
Inset 1 Nut under connector Flats on screw Adjustment nut on spring retainer Inset 2 Hex end for 7mm socket wrench TOOLS REQUIRED: 7MM (9/32 INCH) OPEN END WRENCH OR 7MM (9/32 INCH) SOCKET WRENCH, DEPENDING ON THE MODEL AND 9/16 INCH OPEN END WRENCH (OR 14MM OPEN END WRENCH MAY WORK)
Quick Start Guide STARTING IT UP 1 Add charcoal to firebox and light using one or two fire starters. 2 Leave dome open for 10 minutes with the bottom vent fully open. 3 Close the dome. 4 Begin closing the top vent and bottom vent when the dome temperature is within 50°F (10°C) of your target. MAINTAINING TEMPERATURE To lower the temperature, decrease the airflow through the grill by closing the vents. Conversely, raise the temperature by opening the vents.
QUICK TEMPERATURE GUIDE Approximate temperatures for cooking techniques. GRILLING 400–600˚F (205–315°C) SEARING 500–750˚F (260–400°C) BAKING 300–750˚F (150–400°C) ROASTING 300–450˚F (150–230°C) SMOKING 225–275˚F (105–135°C) CAUTION BURP When cooking above 350°F (175°C), carefully open the grill (or burp the grill) each time you lift the grill dome to prevent flashback. LIQUIDS Do not spill liquids inside or on the grill while it is hot.
Dimensions IMPORTANT DIMENSION NOTES Please use this as a general guide for installing your ceramic grill in a built-in outdoor kitchen or grill table. We highly recommend that the actual grill being installed be measured. Table should be fixed on the ground or wall. Non-flammable building materials are suggested for construction. Drawing is not to scale. Classic II Classic III Big Joe II Stand Alone Stand Alone Stand Alone KJ23NRHC KJ15040721 BJ24NRHC 30.3 30.3 35.6 26.9 26.9 31.8 22.3 22.3 27.6 31.2 34.
IM Label Here KAMADOJOE.COM KAMADOJOE.COM/CONTACT KAMADOJOE.COM/WARRANTY KAMADOJOE.