Kanguru Micro MP3 PRO USB2.0 User’s Manual MP3/WMA Player + Digital Voice Recorder + USB Flash Drive Copyright 2004, All Rights Reserved. This manual applies to 1.1 or later versions of the Kanguru Micro MP3 PRO.
Please be aware of the following points before using the Kanguru Micro MP3 PRO. Copyright© 2004, Kanguru Solutions. All rights reserved. DOS®, Windows 95®, Windows 98®, Windows NT®, Windows 2000®, Windows ME®, and Windows XP® are registered trademarks of Microsoft Inc. Apple® and Macintosh® are registered trademarks of Apple Computer Inc. IBM and OS/2 are registered trademarks of the International Business Machines Corporation.
TABLE OF CONTENTS WELCOME ........................ 4 TECHNICAL SPECIFICATIONS .... 5 PACKAGE CONTENTS .... 6 QUICK START................... 7 OPERATIONAL NOTES.... 8 PLAYER CONTROLS ....... 9 FRONT VIEW .................... 9 SIDE VIEW ........................ 9 LCD.................................. 10 TURNING THE POWER ON/OFF 11 PLAYING MP3 MUSIC .... 12 VOLUME CONTROL....... 13 MENU MODE................... 13 VOICE RECORDING FUNCTION 14 SETTINGS: EQ (EQUALIZER) ... 15 SETTINGS: REPEAT ......
Welcome The Kanguru Micro MP3 PRO is a high quality, portable USB flash drive AND MP3/WMA Player rolled into one! Store and play all your favorite digital music as well as Word, PowerPoint or any other file you need while on the go.
Technical Specifications - Supports USB specification version 2.0 - Transferring rate up to 12Mbit per second at “Full Speed”. - Supports Windows 2000, ME, XP, Mac OS 9.2 or above and Linux 2.4.0 or above without device driver. - Supports Windows 98/98SE with device driver. - Key lock / write protect switch. - Hot Plug & Play. - Durable solid-state storage – data retention for at least 10 years.
Package Contents Installation CD Stereo Phone Maintenance Certificate USB Cable Manual AAA Battery 6
Quick Start Please note, the following instructions are intended to give you a brief overview, allowing you to use the player right away. For detailed instructions please refer to the rest of this manual. 1. Remove the back cover and insert the included AAA battery. 2. Install the drivers if required (Win98/98SE) 3. Connect the drive to an available USB port on your PC and the unit will appear as a “Removable Disk” under “My Computer”. 4. Double click on the “Removable Disk” icon to view its contents.
Operational Notes 1. Please remove the battery if you do not plan to use the MP3 player for extended periods of time. 2. The MP3 player should be kept in areas free from extreme temperature changes, moisture, and dust. 3. The MP3 player cannot be turned on if the HOLD switch is in the ON position. 4. Please change the battery when and “Low Battery” is displayed. the indicator appears 5.
Player Controls Front View Play/pause/power A-B Repeat LCD FF/Mode/Rew USB port Side View Volume+ VolumeHold button Earphone 9
LCD Play repeat mode Battery indicator Hold icon A-B Repeat Playback time Current operation Song Name Type of the song Repeat modes: Repeat, Repeat All, Random, Preview and Normal. Equalizer modes: Jazz, Classic, Rock, Pop and Normal.
Turning the power on/off To turn on the MP3 player, press and hold the PLAY button for 2 seconds. “Power On” will be displayed on the LCD screen. To turn off the MP3 player, press and hold the PLAY button for 2 seconds. “Power Off” will be displayed on the LCD screen.
Playing MP3 music 1. Turning on the power by pressing Play/Stop button momentarily, you could see the following interface: The 001-022 means there are 22 songs loaded on this particular MP3 player, and it’s currently on song 1. 2. When you press Play/Stop button again, the current track will be played as shown above. The top left corner is the playback time indicator. 3. If you want to select previous/next song, turn the rolling wheel up and down to get the track.
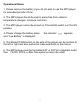
Volume Control The volume steps (see illustration) will increase or decrease when the VOL+/VOL- button is pressed correspondingly. There are 32 volume steps and the volume level ranges from 0 to 31. Menu Mode 1. To enter the Menu mode, press down on the Mode button (in the middle of the rolling wheel).
2. To select an option, use the FF/RW wheel to scroll to the desired option. Then press down on the Mode button to enter that selection. Each screen has a Return option as the last item, which can be used to return to the previous screen. Voice Recording Function There are two ways you can enter the Voice Recording function. 1. Press down on the Mode button to enter the Menu Mode, and scroll to the Record function. Press down on the mode button to begin recording. (See illustration). 2.
Settings: EQ (Equalizer) There are 5 Equalizer modes to select from: Jazz, Classic, Rock, Pop, and Normal. 1. Enter the Mode Menu and select the Settings option. 2. Select the EQ (Equalizer) option. 3. Scroll to the desired EQ setting (Jazz, Classic, Rock, Pop, or Normal) and press down on the Mode button to select that setting. 4. After selecting the EQ setting you will be returned to the Settings menu where you can return to the Main Menu. 5 The EQ setting will appear in the LCD, as show below.
2. Select the REPEAT option. 3. Scroll to the desired REPEAT setting (Normal, Preview, Repeat Track, Repeat All, or Shuffle) and press down on the Mode button to select that setting.
Settings: LCD contrast You can adjust the contrast of the LCD screen to work best in your surrounding environment. 1. Enter the Mode Menu and enter the Settings option. 2. Select the LCD Contrast option. 3. Scroll to the desired REPEAT setting. You can now adjust the contrast level by using the FF/RW scroll wheel as show below. The LCD contrast can be adjusted from 0 to 32. Adjust the level according to the surrounding environment.
If you select one of the 4 time periods, then you player will automatically shut down after it’s been idle for the selected amount of time. Settings: Rec Sample You adjust the sampling rate of your voice recordings to improve the playback quality. Please note that recording at higher sample rates increases the file size of the recording. To change the sample rate, please do the following: 1. Enter the Mode Menu and select the Settings option. 2. Select the Rec Sample option. 3.
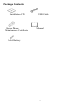
detailed in the software section of this manual. Repeat A-B Mode The MP3 player has a built in feature that allows you to repeat a certain part of an audio track. This can be a useful tool for things such as language learning or memorization. Please follow these steps to repeat a portion of a file: 1. Play the desired track. When you reach the section you want to repeat; press the A-B button to mark the beginning of the section. (shown below). 2.
Loading & Managing Audio Files Connecting to your PC To load audio files or data onto your MP3 player you must connect the drive to a PC. If you are on Windows 98/98SE you will need to load drivers before connecting the drive. To install the Win98 drivers you must run the MP3 management software (setup.exe) from the Drivers CD included with your drive. All other supported operating systems already have the drivers loaded on the system. To transfer files to your MP3 player, please follow these steps: 1.
MP3 Management Software The Kanguru Micro MP3 PRO drive includes a MP3 Management utility to help you transfer audio files to the player. To install this program, simply double click on the setup.exe file located in the Drivers folder for this product. A shortcut name “MP3 Player” will be added to your desktop. Please note that you must have the MP3 player connected to your PC to run the MP3 Management utility.
Disclaimer All the information in this document is subject to change without prior notice. The manufacturer does not make any representations or any warranties (implied or otherwise) regarding the accuracy and completeness of this document and shall in no event be liable for any loss of profit or any other commercial damage, including but not limited to special, incidental, consequential, or other damages.