Handheld LPC Utility Software for Windows MODEL S388-70 Operation Manual Read this manual carefully and understand the warnings described in this manual before operating the product. Keep this manual handy for future reference. 02001 2006.
NOTICE: 1. The copyright of this software belongs to Kanomax Instrument (Shenyang) Ltd. 2. Any unauthorized duplication of the product, in whole or in part, without written consent from Kanomax Inc. is strictly prohibited. 3. Purchase of one set of software per computer is required. 4. Contents of the Operation Manual are subject to change without notice.
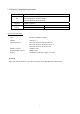
Table of Contents 1. Connecting the Handheld LPC with a Computer...................................................... 1 1.1 Handheld LPC Setting ............................................................................................................................. 1 1.2 Connecting with a Computer................................................................................................................... 2 1.3 Software Operating Requirements......................................................
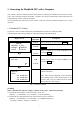
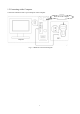
1. Connecting the Handheld LPC with a Computer This Software Operation Manual describes the method of connecting the Handheld Laser Particle Counter (LPC) with a personal computer (hereinafter “computer”) by using a communication cable (model 3887-08) and performing a remote control measurement. The measurement data collected by remote control is stored in a format of Microsoft Office Excel (*.CSV) document. 1.
1.2 Connecting with a Computer Connect the instrument with a 9 pin COM port of the Computer. Back side of the computer Computer Fig.
1.
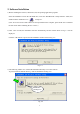
2. Software Installation 1) Before installing the software, shut down (exit) all operating application programs. Insert the installation CD into the CD-ROM drive, select the “Handheld LPC Utility Software” folder, and double click the installation icon “Setup.exe”. (Note: If an old version of this software is already installed in the computer, please make sure to uninstall the old version before installing the new version.
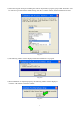
4) Select the Program Group for installing the software. By default, a program group called “Kanomax” will be created. To proceed with the default setting, click the “Continue” button, and the installation will start. Fig. 2-3 5) The following window will be displayed while the installation is in progress. Fig. 2-4 6) When installation is completed properly, the following window will be displayed. Click the “OK” button to close the window. Fig.
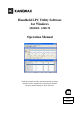
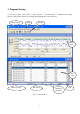
3. Program Startup To start the program, select: [Start] → [All Programs] → [KANOMAX] → [Handheld LPC Utility Software]. The program will start on clicking the [Handheld LPC Utility Software]. Software Name Menu Tool Bar Particle Graph Data Table Measuring Status Data Status Fig.
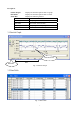
Description: Particle Graph: Displays the measured particle data in a graph. Data Table: Displays the measured particle data in a table. Status Bar: Displays the following statuses. Item Status Measuring Status Sampling / Wait Data Status New Data / Previous Data Measuring Parameter Sampling Time / Sampling Interval Port COM1, COM2…… COM8 3.1 Particle Graph Data Mark Line Status Bar Data Fig. 3-2 Particle Graph 3.2 Data Table Fig.
Description: 1) The “Data Mark Line” on the graph specifies a given point in time. 2) On clicking the “Data Mark Line” on the graph, corresponding data will be displayed at the “Status Bar”, and the cursor in the “Data Table” will move to the corresponding data in the table. 3) On clicking the “Data Table”, the “Data Mark Line” will move to the corresponding position on the graph, and the corresponding data will be displayed at the “Status Bar”.
4. File The file menu provides various operations such as; creating a new data file, opening a file, opening a history file, and closing the software. Fig.
4.1 Creating a New Data File To open a new window, perform any of the following procedures: 1) Click: [File] → 2) Click: 3) Press the F2 key A new window as shown below will open. Fig.
4.2 Opening a File To open a stored measurement data file (*.CSV), and to display the measurement data (graph and data table), perform any of the following procedures: 1) Click: [File] → 2) Click: 3) Press the F3 key The following dialog box will open. Fig. 4-3 File Opening Dialog Box Command Button: : To open a data file. : To exit without opening a data file.
4.3 Saving a Data File To save the measurement parameters and measurement data, perform any of the following procedures: 1) Click: [File] → 2) Click: 3) Press the F4 key The following dialog box will open. Fig. 4-4 File Saving Dialog Box Command Button: : To save the data file. : To exit without saving the data file.
4.4 Opening a History File As shown in Fig. 4-5, the most recently saved data files, up to 8 files in maximum, will be displayed on the file menu (path and file name of the data files). The listed data files can be opened by clicking on the desired data file in the list. Fig. 4-5 Opening a History File 4.
5. Communication Setting To enable communication between the Handheld LPC and the computer, the RS232C COM port must be set. Fig. 5-1 Setting Menu 5.1 Setting RS232C COM Port To set the RS232C COM port, perform any of the following procedures: 1) Click: [Setting] → 2) Click: 3) Press the F5 key The following RS232C Setting dialog box will open Fig. 5-2 RS232C Setting Dialog Box Caution: Select the COM port number which corresponds to the RS-232C port number of your computer.
1) Parameter Settings Item Port Baud Rate Parity Bit Data Bit Stop Bit Setting COM1, COM2 …… COM8 9600bps No 8 1 2) Command Button : To save the parameter settings. : To exit without saving the parameter settings.
6. Set, Start and Stop Sampling Fig. 6-1 Sampling Menu 6.1 Set and Start Sampling To enter the sampling settings, perform any of the following procedures: 1) Click: [Sampling] → 2) Click: 3) Press the F6 key The following Sampling Parameter Setting dialog box will be displayed. Fig.
1) Parameters Settings Item Sampling Time Interval Time The Number of Sample 3887 Model Particle Type Setting 10 to 3600 seconds 1 to 1440 minutes 1 to 3000 Type-A or Type-B Type-A: 0.3µm, 0.5µm, 5.0µm Type-B: 0.3µm, 0.5µm, 1.0µm Remarks Select or input Select or input Select or input Select Particle size can be selected from three (3) sizes. At least one must be selected. At maximum, three (3) sizes can be selected. 2) Command Button : To save the settings and start sampling.
6.2 Screen while Sampling The following window will be displayed while sampling. Fig.
6.3 Stop Sampling To stop sampling, perform any of the following procedures: 1) Click: [Sampling] → 2) Click: 3) Press the F7 key The following dialog box will be displayed asking whether you want to stop sampling. Fig. 6-4 Sampling Stop Confirmation Dialog Box Command Button: : To stop sampling. : Do not stop sampling, and continue with the sampling as set.
7. View Settings From the View menu, view settings of the graph can be made, and graph, data table, status bar, and toolbar can be switched between display/hide. Fig.
7.1 Graph Display Settings To enter the graph display settings, perform any of the following procedures: 1) Click: [View] → 2) Click: 3) Press the F8 key The following Particle Graph Setting dialog box will be displayed. Fig.
7.2 Display/Hide Graph 1) To display a graph, perform any of the following procedures: (1) Click: [View] → (2) Click: (3) Press the F9 key Fig.
2) To hide the graph, perform any of the following procedures. (1) Click: [View] → (2) Click: (3) Press the F9 key Fig.
7.3 Display/Hide Data Table 1) To display a Data Table, perform any of the following procedures: (1) Click: [View] → (2) Click: (3) Press the F10 key Fig.
2) To hide the Data Table, perform any of the following procedures: (1) Click: [View] → (2) Click: (3) Press the F10 key Fig.
7.4 Display/Hide Status Bar The Status Bar displays the measuring status, measuring parameter, and baud rate. 1) To Display the Status Bar, perform any of the flowing procedures: (1) Click: [View] → (2) Press the F 11 key Status Bar Fig.
2) To hide the Status Bar, perform any of the following procedures: (1) Click: [View] → (2) Press the F11 key Fig.
7.5 Display/Hide Toolbar Create New Data File Open Data File Save Data Set RS232C Display /Hide Data Table Display/Hide Graph Edit Graph Stop Sampling Sampling 1) To display the toolbar, perform any of the following procedures: (1) Click: [View] → (2) Press the F 12 key Tools Bar Fig.
2) To hide the toolbar, perform any of the followings: (1) Click: [View] → (2) Press the F12 key Fig.
8. Option Display language can be selected from the Option menu. Fig. 8-1 Display Language Menu 1) To Display in English Click: [Option] → and the window will be displayed in English. Fig.
2) To Display in Japanese: Click: [Option] → and the window will be displayed in Japanese. Fig.
9. Help Information such as software name, version number, and copyright can be displayed from the Help menu. Fig. 9-1 Help Menu 9.1 Version Information To display the software version information, click: [Help] → Note: The version number shown below is just an example. It may be different from your software version. Version Number Fig.