English User Manual T6090 TV Mount TILTING FLAT PANEL TV MOUNT +10°/-5° 200 lb (91 kg) 100 x 100 1100 x 600 VESA Supporting your digital lifestyle™
Table of Contents Table of Contents / Introduction . . . . . . . . . . . . . 2 Supplied Parts & Hardware . . . . . . . . . . . . . . . . . 3 Setup - Step 1 . . . . . . . . . . . . . . . . . . . . . . . . . . . . . 4 Setup - Step 2 . . . . . . . . . . . . . . . . . . . . . . . . . . . . . 5 Setup - Steps 3 and 4 . . . . . . . . . . . . . . . . . . . . . . . Setup - Steps 5 and 6 . . . . . . . . . . . . . . . . . . . . . . . Other Kanto Products . . . . . . . . . . . . . . . . . . . . . . Warranty . . . . .
Supplied Parts and Hardware x4 A: M5 x 15mm Bolt x4 B: M5 x 25mm Bolt x4 F: M8 x 35mm Bolt G: M8 x 50mm Bolt x4 C: M6 x 15mm Bolt D: M6 x 25mm Bolt x4 x4 I: Lag Bolt Washer x6 x2 E: M8 x 20mm Bolt x4 J: 5mm x2 M: Concrete Anchor L: Lag Bolt x4 x6 H: Washer x6 x4 K: 10mm x4 x2 N: M5 x 10mm Bolt O: Plastic Cap Wall Plate x4 P: Quick-Lock TV Bracket x8 x8 Bracket Extension Parts (assembled in separate bag) Required Tools Socket Set Phillips Screwdriver Hammer (for Concrete in
Step 1: Attach TV Brackets (extend if necessary) There are a wide variety of TVs available requiring an assortment of bolt sizes. We provide a selection of mounting bolts to fit most TVs. If you have any concerns about this mounting hardware or installation call us direct at 1-888848-2643 or email at support@kantoliving.com The T6090 uses 400mm brackets for most TVs, but is shipped with extensions that you should connect if your TV has vertical VESA spacing up to 600mm, or if you require vertical shift.
Step 2: Mount Wall Plate Attach the two plastic End Caps (O) to the Wall Plate. Wood Stud Wall Brick or Concrete Wall The Wall Plate can be mounted to three wood studs with 16” centers, or to two wood studs with 24” centers. Use a stud sensor to locate the studs, clearly marking the outer edges of the studs. Use a long level to ensure the hole marks are level at the desired height.
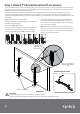
CAUTION Read this section carefully prior to install. Step 3: Attach TV to Wall Plate With the Quick-Lock brackets firmly secured to the TV, use two people to lift the TV into position and hook the QuickLock brackets onto the Wall Plate, as shown in Diagram D. Swing the bottom of the television towards the Wall Plate, and the Quick-Lock bracket will lock into place, as shown in Diagram E.
Step 5: Tilt the TV Your Kanto tilting mount features a unique Magic TiltTM system that is pre-tensioned at the factory. With your TV mounted to the wall plate, simply tilt the TV to your desired viewing angle, between +10° and −5°, and your installation is complete. As an added feature, the T6090 can be locked into position at three tilt positions, as shown in Diagram F. Use the M5 x 10mm bolts (N) supplied to lock the tilt arm in place at either -5°, 0° or +5°.
Check out more great products from Kanto! Kanto Speakers • Check out our full line of bookshelf and desktop speaker systems • Available in a stunning array of colors • Visit kantospeakers.com for more! + SP26 + + • Full line of Audio and Video Cables • White or Black Cables available • HDMI, Optical, Mini-jack, RCA, USB • Switchers, Hubs, and Adapters • Visit kantoliving.com par To learn more about all our products, visit www.kantoliving.