DE EN DAB 2410 DAB+/UKW-Radio, tragbar DAB+/FM Radio, portable | Bedienungsanleitung | User Manual
DE Vorwort Vielen Dank, dass Sie sich für dieses Produkt entschieden haben. Bitte lesen Sie diese Bedienungsanleitung sorgfältig, damit Sie in der Lage sind, die maximale Leistungsfähigkeit dessen auszuschöpfen und die Sicherheit bei Installation, Verwendung und Wartung gewährleistet wird. Bewahren Sie diese Bedienungsanleitung so auf, dass Sie sie immer griffbereit haben. Unsere Hotline für technische Fragen: 07082 / 925420 (Mo. – Do.: 8.00 – 16.30 Uhr | Fr.: 8.00 – 15.
Sicherheitshinweise 1. 2. 3. 4. 5. 6. 7. 8. 9. 10. 11. 12. 13. 14. 15. 4 - DE Bedienungsanleitung lesen – Lesen Sie die Bedienungsanleitung aufmerksam, um sich mit der Bedienung des Gerätes vertraut zu machen. Bedienungsanleitung aufbewahren – Bewahren Sie die Bedienungsanleitung sorgfältig auf. Hinweise beachten – Beachten Sie alle Hinweise und Anweisungen in der Bedienungsanleitung. Wasser und Feuchtigkeit – Das Gerät darf nicht in der Nähe von Wasser (z. B.
DE 16. 17. 18. 19. 20. 21. personal durchgeführt werden. Versuchen Sie niemals, das Gerät selbst zu reparieren. Öffnen Sie niemals das Gehäuse. Offenes Feuer – Halten Sie das Gerät fern von offenem Feuer. Stellen Sie keine brennenden Kerzen oder ähnliches auf das Gerät. Gewitter – Während eines Gewitters sollten Sie den Netzstecker ziehen.
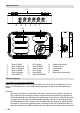
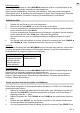
Geräteübersicht 16 12 11 10 9 1 8 7 15 5 6 3 2 1. 2. 3. 4. 5. 6. Taste POWER Taste TUNING ◄ Taste TUNING ► Taste VOLUMETaste VOLUME+ Taste SELECT 7. 8. 9. 10. 11. 12. 4 13 14 17 LCD-Display Taste PRESET Taste ALARM Taste SCAN Taste MODE Taste INFO/MENU 13. 14. 15. 16. 17.
DE • • angeschlossen wird. Die Ladedauer beträgt etwa 3 bis 3,5 Stunden. Die Wiedergabedauer des mitgelieferten Akkus beträgt etwa 3,5 Stunden bei maximaler Lautstärke und etwa 5,5 Stunden bei mittlerer Lautstärke. Wenn das Gerät für längere Zeit nicht verwendet wird, Akku herausnehmen, um Beschädigungen am Gerät oder Akku zu vermeiden. Batterien (nicht im Lieferumfang enthalten) Öffnen Sie das Batteriefach und nehmen Sie den Li-Ion-Akku heraus, sofern dieser eingesetzt ist.
Tastensperre • Halten Sie im Radiobetrieb die Taste SELECT für etwa 5 Sekunden gedrückt, um die Tastensperre zu aktivieren (im Display wird ein Schlosssymbol angezeigt). Alle Tasten sind nun gesperrt und es ist keine Bedienung möglich. • Um die Tastensperre wieder zu deaktivieren, halten Sie die Taste SELECT erneut für etwa 5 Sekunden gedrückt (das Schlosssymbol erlischt aus dem Display).
DE DAB-Display-Modi Wenn Sie im DAB-Betrieb die Taste INFO/MENU wiederholt drücken, zeigt das Display in der unteren Zeile die folgenden Informationen nacheinander an: Signal Strength (Signalstärke), Time/Date (Uhrzeit/Datum), DLS (vom Sender übertragene Informationen, wie z. B. aktuelles Lied und Interpret), Program Type (Programmtyp), Ensemble Name (Ensemblename), Ensemble Frequency (Ensemblefrequenz), Audio-Bitrate. UKW-Modus (FM) 1. 2. 3. 4. Schalten Sie das Gerät ein, wie zuvor beschrieben.
wählen Sie dann anhand der Taste TUNING ◄ oder TUNING ► den Speicherplatz, auf welchem sich der gewünschte Sender befindet. Drücken Sie dann SELECT, um den Sender zu spielen. Wenn der gewählte Speicherplatz nicht belegt ist, wird „Preset Empty“ angezeigt. Signalstärke & Empfangsqualität Sie haben sowohl im DAB+ als auch im UKW-Modus die Möglichkeit, die Signalstärke anzeigen zu lassen. Dies ist hilfreich bei der Aufstellung des Gerätes und der Ausrichtung der Antenne.
DE 3. stellen und drücken dann SELECT, um zu bestätigen. Der Wecker ist nun deaktiviert. Einen aktiven Wecker ausschalten • Um einen aktiven Wecker auszuschalten, drücken Sie die Taste POWER. Das Gerät schaltet sich wieder in den Standby-Modus. Snooze 1. Wenn der Wecker ertönt, können Sie die Taste SELECT drücken, um diesen zu verschieben (Snooze-/Schlummerfunktion). Im Display wird „Z“ angezeigt. Nach 6 Minuten ertönt der Wecker erneut. 2.
Safety Information 1. 2. 3. 4. 5. 6. 7. 8. 9. 10. 11. 12. 13. 14. 15. 16. 17. 18. Read Instructions - All the safety and operating instructions should be read before the appliance is operated. Retain Instructions - The safety and operating instructions should be retained for future reference. Heed Warnings - All warnings on the appliance and in the operating instructions should be adhered to. Water and Moisture – Do not use the apparatus near water (e.g.
19. 20. 21. ensure that the apparatus is working properly and safely. Batteries – Only use the supplied battery or standard batteries (AAA, non-rechargeable). Always place batteries in the correct polarization into electrical components. Danger of explosion if battery is incorrectly replaced. Replace only with the same or equivalent type. Do not mix old and new batteries. Take attention to the environmental aspects of battery disposal.
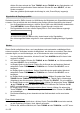
Product Overview 16 12 11 10 9 1 8 7 15 5 6 3 2 1. 2. 3. 4. 5. 6. POWER LEFT (TUNING ◄) RIGHT (TUNING ►) VOLUMEVOLUME+ SELECT 7. 8. 9. 10. 11. 12. 4 LCD Display PRESET ALARM SCAN MODE INFO/MENU 13 14 17 13. 14. 15. 16. 17. Headphone Jack DC Charging Port Speaker Antenna Battery Compartment (Back) Power Supply Li-Ion Battery (included) Open the battery compartment on the back of the unit and insert the supplied Li-Ion battery (3.
• • standard USB port (e.g. on a computer). The charge time is around 3 to 3.5 hours. The playback time of the supplied battery is approximately 3.5 hours in max. volume and approximately 5.5 hours in middle volume. When the unit is not in use for a longer period of time, remove the battery to avoid damage to the unit or battery. AAA Batteries (not included) Open the battery compartment and take out the Li-Ion battery in case it is inserted. You can now insert 3x AAA size batteries (1.5V).
• (display shows a lock icon), all keys will be locked and show no function. To deactivate the key lock function, press and hold SELECT again for 5 seconds (lock icon disappears from display). Menus The following controls are used to navigate the menu tree to choose and select the required settings: • Press and hold for 2 seconds the INFO/MENU button while the unit is in DAB+ or FM mode to enter the main menu. • Navigate the menu using the ◄ LEFT / ► RIGHT buttons.
FM Mode 1. 2. 3. 4. EN Power and switch on the radio as described above. Press the MODE button to switch to FM mode. To automatically search for the next available radio station, press the SCAN button. To automatically search for the previous available radio station, press and briefly hold the SCAN button. The unit will search for the next/previous available station and stop automatically once a station has been found. To manually search for a station, press the ◄ LEFT or ► RIGHT button repeatedly.
• The signal strength is shown in the bottom line of the display: The further to the right the bar is reaching, the better is the signal strength. The empty bar indicates the minimum signal strength necessary for an optimal reception. Alarm Function This unit enables you to set 2 different and independent alarm times. You can even set an alarm to ring Daily, Weekdays, Weekends, or Once. 1. 2. 3. 4. 5. 6. 7. 8. To set an alarm, press the ALARM button once to set Alarm1, or twice to set Alarm2.
Headphone Jack A headphone jack is located at right side of the unit. When the unit is powered on and playing music, you can connect earphones (not included) to the headphone jack for your private listening. Mind the safety information from page 12 on. With headphones connected the unit’s speaker is disabled. To listen via the speaker again, disconnect the headphones. Technical Specifications Battery: Li-Ion 3.7V, 800mAh (included) DC 4.5V (3x 1.
www.karcher-audio.