DE EN DAB 2420 DAB+/UKW-Radiowecker DAB+/FM Clock Radio | Bedienungsanleitung | User Manual
DE Vorwort Vielen Dank, dass Sie sich für dieses Produkt entschieden haben. Bitte lesen Sie diese Bedienungsanleitung sorgfältig, damit Sie in der Lage sind, die maximale Leistungsfähigkeit dessen auszuschöpfen und die Sicherheit bei Installation, Verwendung und Wartung gewährleistet wird. Bewahren Sie diese Bedienungsanleitung so auf, dass Sie sie immer griffbereit haben. Unsere Hotline für technische Fragen: 07082 / 925420 (Mo. – Do.: 8.00 – 16.30 Uhr | Fr.: 8.00 – 15.
Sicherheitshinweise 1. 2. 3. 4. 5. 6. 7. 8. 9. 10. 11. 12. 13. 14. 15. 4 - DE Bedienungsanleitung lesen – Lesen Sie die Bedienungsanleitung aufmerksam, um sich mit der Bedienung des Gerätes vertraut zu machen. Bedienungsanleitung aufbewahren – Bewahren Sie die Bedienungsanleitung sorgfältig auf. Hinweise beachten – Beachten Sie alle Hinweise und Anweisungen in der Bedienungsanleitung. Wasser und Feuchtigkeit – Das Gerät darf nicht in der Nähe von Wasser (z. B.
DE 16. 17. 18. 19. 20. 21. personal durchgeführt werden. Versuchen Sie niemals, das Gerät selbst zu reparieren. Öffnen Sie niemals das Gehäuse. Offenes Feuer – Halten Sie das Gerät fern von offenem Feuer. Stellen Sie keine brennenden Kerzen oder ähnliches auf das Gerät. Gewitter – Während eines Gewitters sollten Sie den Netzstecker ziehen.
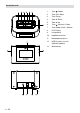
Geräteübersicht 1. Taste 2. Taste Info / Menu / Mode 3. Taste Preset 4. Taste ▼ Down 5. Taste ▲ Up 6. Taste 7. Taste Sleep / Alarm / Snooze 8. LCD-Display 9. Lautsprecher 10. Kopfhöreranschluss 11. Netzadapteranschluss 12. (Volume) / Select USB-Anschluss (nur für Software-Updates) 13.
DE Stromversorgung Netzadapter 1. Die Stromaufnahme des Gerätes beträgt DC 5V 1,2A. 2. Verbinden Sie den mitgelieferten Netzadapter mit dem Anschluss an der Geräterückseite. Verbinden Sie das andere Ende mit einer geeigneten Steckdose. 3. Versichern Sie sich, dass die Ausgangsleistung der Steckdose mit der vom Netzadapter benötigten Spannung übereinstimmt. Hinweis: • Wenn Sie das Gerät längere Zeit nicht verwenden, ziehen Sie den Netzadapter aus der Steckdose und aus dem Gerät.
Sie können eine Zeit einstellen, nach welcher sich die Beleuchtungsstufe von „Hell“ wieder automatisch in die von Ihnen eingestellte Stufe („Dunkel“ oder „Mittel“) herunterfährt (TimeoutFunktion). Das Gerät muss sich dazu im Radiomodus befinden: • Halten Sie im Radiomodus (DAB+ oder UKW) die Taste Info / Menu 2 Sekunden lang gedrückt, um in das Hauptmenü zu gelangen. Navigieren Sie zum Untermenü TIMEOUT.
DE DAB+-Menü Öffnen Sie im DAB+-Modus das Menü wie zuvor beschrieben. Im Menü stehen die folgenden Optionen zur Verfügung: < FULL SCAN > < MANUAL TUNE > < SYSTEM > Verfügbare Untermenüs: Manuelle Sendersuche anhand der TIME SET 12/24 HOUR Select, um einen Tasten ▲ Up und ▼ vollständigen SuchZwischen 12- und 24-StundenDown. lauf zu starten. Anzeige auswählen. / Select drücken SET TIME/DATE um eine gewählte Manuelle Einstellung von Frequenz aufzurufen. Uhrzeit und Datum.
DAB 2 DAB 2 DAB DAB DAB DAB 2 3. DAB DAB DAB Wenn der Sendersuchlauf abgeschlossen ist, wird die Anzahl der gefunden Sender angezeigt und der alphanumerisch zuerst gefundene Sender gespielt: 2 DAB DAB 2 DAB DAB DAB 2 4. Anhand der Tasten ▲ Up / ▼ Down können Sie die gefundenen Sender durchsuchen. Um einen beliebigen Sender wiederzugeben, drücken Sie die Taste / Select wenn der Sendername angezeigt wird.
DAB DAB DE 2 Sender speichern und aufrufen (DAB+ und UKW-Modus) Dieses Gerät verfügt über 20 Senderspeicherplätze auf denen je 10 DAB- und 10 UKW-Sender gespeichert werden können. 1. Wählen Sie zunächst den gewünschten Sender (DAB+ oder UKW-Modus) und halten Sie dann die Taste Preset 2 Sekunden lang gedrückt. Im Display wird blinkend „P01 EMPTY” angezeigt: DAB DAB 2 DAB DAB 2 2. 3. Wählen Sie anhand der Taste ▲ Up oder ▼ Down den gewünschten Speicherplatz.
5. 6. 7. 8. 9. 10. Die Minute blinkt nun. Stellen Sie die Minuten der gewünschten Weckzeit anhand der Tasten ▲ Up oder ▼ Down ein. Drücken Sie / Select, um zu bestätigen. Der Wecktyp (Alarm Type) blinkt nun. Wählen Sie anhand der Tasten ▲ Up oder ▼ Down zwischen DAB, FM oder BUZZER und drücken Sie dann / Select, um zu bestätigen. Wenn DAB oder FM als Wecktyp ausgewählt wurde, werden Sie nun gefragt, zu welchem Sender Sie geweckt werden möchten.
DE • stellt, bzw. muss ein Zeitsignal via DAB oder UKW-RDS empfangen werden. Wenn als Wecktyp DAB ausgewählt ist, aber kein Signal empfangen wird, so ertönt der Buzzer. Kopfhöreranschluss Ein Kopfhöreranschluss befindet sich an der Rückseite des Gerätes. Bei der Musikwiedergabe können Sie an diesen Kopfhörer (nicht im Lieferumfang enthalten) anschließen. Beachten Sie die Sicherheitshinweise auf Seite 4 ff. Während Kopfhörer angeschlossen sind, sind die geräteinternen Lautsprecher deaktiviert.
Safety Information 1. 2. 3. 4. 5. 6. 7. 8. 9. 10. 11. 12. 13. 14. 15. 16. 17. 18. Read Instructions - All the safety and operating instructions should be read before the appliance is operated. Retain Instructions - The safety and operating instructions should be retained for future reference. Heed Warnings - All warnings on the appliance and in the operating instructions should be adhered to. Water and Moisture – Do not use the apparatus near water (e.g.
19. 20. 21. ensure that the apparatus is working properly and safely. Batteries – Always place batteries in the correct polarization into electrical components. Danger of explosion if battery is incorrectly replaced. Replace only with the same or equivalent type. Do not mix old and new batteries. Take attention to the environmental aspects of battery disposal. Batteries shall not be exposed to excessive heat such as sunshine, fire or the like. Remove batteries before disposing of the product.
Product Overview 1. / Mode button 2. Info / Menu button 3. Preset button 4. ▼ Down button 5. ▲ Up button 6. (Volume) / Select button 7. Sleep / Alarm / Snooze button 8. LCD Display 9. Speakers 10. Headphone jack 11. DC In jack 12. USB port (for Software Updates Only) 13.
Power Supply EN Power Adaptor 1. The unit requires DC 5V 1.2A. 2. Plug the supplied adaptor cable into the DC input socket of the unit and the other end into a suitable wall socket. 3. Make sure that the output power of the wall outlet matches the required power of the adaptor. Note: • If not using the unit for a longer period of time, unplug the adaptor from the wall outlet and from the unit. Alarm Backup In case of a power failure, your set alarms remain stored in the system.
• to enter the main menu. Navigate to the submenu TIMEOUT. Here you can select the time after which the backlight will dim down again automatically (OFF, 5, 10, 15, 20, 25 or 30 seconds). When you select “OFF”, the display backlight will remain at the setting last selected, even if any button is pressed. Note: • For a description on how to navigate through the menus, see the following chapter “Menus”. Time Setting The clock in this radio is equipped to receive a time signal through DAB+ or FM RDS.
< FULL SCAN > Press / Select to start full frequency scan. < MANUAL TUNE > < SYSTEM > Manually select Submenus available: frequency using the TIME SET 12/24 HOUR ▲ Up and ▼ Down Select between 12 and 24 hour buttons. Press / Select display mode. to select a desired SET TIME/DATE frequency. To manually set time and date. AUTO UPDATE Select source from which time/ date are synchronized: - ANY (default) - FROM DAB - FROM FM - NO UPDATE TIMEOUT Select timeout for display dimmer (see “Basic Functions”).
2 DAB DAB 2 DAB DAB 2 DAB 2 4. You can now press the ▲ Up / ▼ Down buttons to explore the found stations followed by pressing the / Select button to play the selected station: DAB 2 DAB Auto and Manual Scan • To automatically scan again for available stations or manually search frequencies, go to the main menu (see chapter “Menus”).
2 EN DAB DAB 2 2. 3. Press the ▲ Up or ▼ Down button to select your desired station preset number. Press the / Select button to confirm your selection. The station currently broadcasting has now been stored in the selected location: DAB 2 DAB DAB 2 DAB 2 DAB 4. 5. DAB Repeat the above steps to store more stations.
8. 9. If BUZZER was selected, this step is skipped. If DAB or FM was selected for alarm type, you will now be asked to set the Alarm Volume. Press the ▲ Up or ▼ Down button to select the desired alarm volume and then press / Select to confirm. If BUZZER was selected, this step is skipped. The Alarm Duration will be flashing. Press the ▲ Up or ▼ Down button to select the desired alarm duration (minutes) and then press / Select to confirm. The Alarm Mode will be flashing.
USB EN The USB connector on this unit is for software updates only. Your unit is already equipped with the latest software. Software updates are only necessary in case the unit requires service. Technical Specifications Power Supply: DC 5V 1.2A Radio Frequency Range: DAB: 174 - 240 MHz FM 87.5 - 108 MHz Dimensions (WxDxH) ca.: 120 x 95 x 78 mm (adapter included) Technical specifications and design may change without notice.
www.karcher-audio.