
Operation Manual


12 - EN
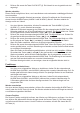
Functions and Controls
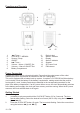
1
2
3
4
5
6 7
8
9
10 11 12
13
14 15
1. ◄◄ / Tune -
2. CLOCK.SET / MEM/M+
3. Snooze / Sleep
4. ON/OFF
5. ►► / Tune +
6. Volume - / Alarm 1 ON/OFF Set
7. Volume + / Alarm 2 ON/OFF Set
8. Battery Compartment
9. Rating Label
10. Alarm 1 Indicator
11. Display
12. Alarm 2 Indicator
13. Speaker
14. AC Power Cord
15. FM Antenna
Power Connection
Plug the AC power cord to a household outlet. Ensure that the output power of the outlet
matches the power requirement as indicated on the unit’s rating label.
This unit is equipped with a battery back up system; it requires a 3V CR2032 at lithium battery
(not included). Insert the battery in the battery compartment, making certain that the positive
and negative (+ and -) battery terminals are attached to the corresponding terminals on the
plate in the battery compartment. If an AC power failure occurs, the clock automatically switches
to the battery power supply, the clock and timer memory continue running. When the AC power
resumes, the clock switches back to AC again.
Getting Started
Clock Setting
1. In standby mode press and hold the CLOCK.SET button (2) for 2 seconds. The hour
format starts ashing. Select the desired hour format (24h or 12h) using the buttons ◄◄
(1) and ►► (5).
2. Press the CLOCK.SET button (2) again. The hour starts ashing. Select the current hour
using the buttons ◄◄ (1) and ►► (5).