
User Manual


– 8
The air vents on the appli-
ance must not be blocked up.
Only use this appliance on hard
floors with waterproof coatings
(e. g. varnished parquet, enam-
elled tiles, Linoleum).
Do not use the appliance for
cleaning of carpets or carpet-
ed floors.
Do not use the appliance over
the floor grilles of convector
heaters. The appliance is not
able to take in the water dis-
charged when used above
grilles.
In case of longer breaks and
after use, switch the appli-
ance off at the main switch /
appliance switch and pull the
mains plug.
Do not operate the appliance
at temperatures below 0 °C.
Protect the unit from rain. Do
not store outside.
Illustrations on fold-out page!
Illustrations on fold-out page!
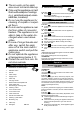
Illustration
Insert handle into the basic unit as far as it goes un-
til it engages audibly.
The handle must sit snugly into the appliance.
Illustration
To stabilise, place the appliance into the cleaning
station.
Illustration
Remove the fresh water tank from the appliance
using the handle.
Illustration
Open fuel filler cap.
Fill the fresh water tank with cold or lukewarm tap
water.
*Add cleaning or disinfecting agent as required.
Do not exceed the "MAX" marking when filling.
Close tank lock.
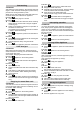
Illustration
Insert the fresh water container into the appliance.
The fresh water tank must sit snugly into the appli-
ance.
Note
*KÄRCHER detergents/care agents can also be added
to the fresh water tank.
See chapter "Detergents and care products".
ATTENTION
Follow the recommended dosage instructions on the
detergent/care agent.
ATTENTION
Illustration
The appliance must only be used for the intake of dirt
and fluids (max. 250 ml).
Illustration
Before beginning your work, remove any objects, such
as shards, pebbles, screws or toy parts from the floor.
Before use, check the floor for water consistency at sus-
pect areas. Do not clean water-sensitive coatings, such
as untreated cork floors (moisture ingress is possible
which may damage the floor).
Notes
To prevent yourself from tripping over network cables,
keep the handle in one hand, and the network cable in
the other.
Illustration
To avoid fresh footprints on the freshly-wiped floor, work
backwards towards the door.
Hold the appliance at the handle at angle of approx.
60 degrees.
Clean the floor by moving the appliance back and
forth at a similar speed as if you were vacuum
cleaning.
If the floor is especially dirty, let the appliance glide
slowly across the floor.
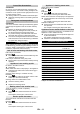
Description of the Appliance
1 ON/OFF switch
2 Handle
3 Cable clamp
4 Supply Cord
5 Cable clip
6 Carrying handle
7 Waste water tank/separator lid
8 waste water tank
9 Recessed grip cleaning roller
10 Cleaning rollers
11 Cover suction head
12 Lock suction head
13 Fresh water tank
14 Handle fresh water tank
15 Cleaning / park station
16 Measuring cup
17 Filter inlay
18 Detergent RM 536
Assembly
Commissioning
Fill fresh water reservoir
Operation
General information on the
operation
16 EN