
Full Product Manual
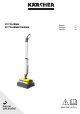

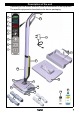
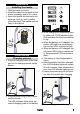
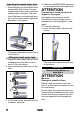
Table Of Contents
- FLOOR CLEANER OPERATOR MANUAL
- Contents
- IMPORTANT SAFETY INSTRUCTIONS
- Customer Service
- Technical data
- Description of the unit
- Installation
- Initial startup
- Operation
- Care and service
- Troubleshooting guide
- Disposal
- MANUEL OPERATEUR NETTOYEUR DE SOL
- Contenu
- CONSIGNES DE SECURITE IMPORTANTES
- Service à la clientèle
- Caractéristiques techniques
- Description de l'appareil
- Montage
- Mise en service
- Utilisation
- Entretien et maintenance
- Dépannage en cas de défaut
- Élimination
- MANUAL DEL OPERADOR DEL LIMPIADOR DE PISO
- Índice de contenidos
- INTRUCCIONES DE SEGURIDAD IMPORTANTES
- Servicio al cliente
- Datos técnicos
- Descripción del equipo
- Montaje
- Puesta en funcionamiento
- Servicio
- Cuidado y mantenimiento
- Ayuda en caso de fallos
- Eliminación de residuos

English 9
Installation
Installing the handle
1. Hold the basic unit firmly.
2. Insert the cable into the guide of the
plastic connector and fix it in place.
3. Insert the handle into th
e basic unit
as far as it will go, until it audibly
clicks into place. The handle must sit
firmly in the device.
Initial startup
Charging process
1. Plug the charging cable of the char-
ger into the charging socket on the
device.
2. Plug the power plug of the charge
r
into the socket.
The LED indicator lights show the
current charging state of the battery.
● Whe
n charging the completely emp-
ty battery, all 3 LED indica
tor lights
flash one after the other from bottom
to top.
● When the battery is 1/3 charged, the
bottom LED lights up continuously,
the
two top LEDs continue to
flash.
● When the battery is 2/3 charged, the
two lower LEDs light up continuous-
ly, the uppermost LED continues to
flash.
● Th
e battery is fully charged after 4
hours.
● After the battery has been charged,
the 3 LED indicator lights will remain
lit for 60 minutes. After this period of
time, the LED indicator lights go out.
3. Unplug the power plug for the char-
ger from the socket after charging.
4. Pull the charging cable out of the device.
a
b
a
b
4 h
a
b