
Operating instructions


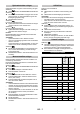


Table Of Contents
- Deutsch
- English
- Français
- Italiano
- Nederlands
- Español
- Português
- Dansk
- Norsk
- Svenska
- Suomi
- Ελληνικά
- Türkçe
- Русский
- Magyar
- Čeština
- Slovenščina
- Polski
- Româneşte
- Slovenčina
- Hrvatski
- Srpski
- Български
- Eesti
- Latviešu
- Lietuviškai
- Українська
- Қазақша

– 7
Clean the cyclone separator in case of coarse soiling.
Illustration
Push the lock and remove the dust container.
Illustration
Turn the cover of the dust container in the counter-
clockwise direction so that the marking points to the
unlocking symbol.
Remove dust container.
Illustration
For quick cleaning
Clean the cyclone separator by using a soft sponge
and wipe with a moist cloth.
Illustration
For thorough cleaning:
Disassemble the cyclone separator and clean the
sieve and ring under running water.
Note
The dust container can also be cleaned under running
water.
ATTENTION
– Do not immerse the cyclone separator into water.
– Do not wash the parts using detergents or boiling
water.
– Allow the cyclone separator and the dust container
to dry completely before installing it in the device.
Illustration
Turn the cover of the dust container in the clock-
wise direction so that the marking points to the
locking symbol.
Place the dust container into the device and snap it
into place.
Wash the motor protection filter on a weekly basis or in
case of visible soiling.
The motor protection filter is located in the casing above
the dust container.
Illustration
Push the lock and remove the dust container.
Illustration
Unlatch the lock and open the cover.
Remove the motor protection filter.
Illustration
Remove the foam inlay from the frame.
Wash foam inlay in warm water (max. 40°C).
Thoroughly rinse the foam inlay and allow it to air-
dry.
ATTENTION
– Never clean the foam inlay in the washing machine
and do not dry it by means of a hair dryer.
– Do not wash the parts using detergents or boiling
water.
– Allow the foam inlay to dry completely before in-
stalling it in the device (at least 24 hours).
Insert the motor protection filter with the foam inlay
into the top part of the dust container.
Snap in the cover.
Place the dust container into the device and snap it
into place.
Filter for pure blower air.
Note
Clean the HEPA filter in case of visible soiling.
Replace the HEPA filter in case of damage
ATTENTION
Material damage due to incorrect cleaning of the HEPA
filter.
– Do not rinse out the HEPA filter!
– Never clean the filter in the washing machine and
do not dry it by means of a hair dryer.
Illustration
Turn the cover in the counter-clockwise direction so
that the marking points to the unlocking symbol.
Remove the HEPA-filter.
Carefully empty/knock dirt out of the HEPA filter.
Insert HEPA filter.
Turn the cover in the clockwise direction so that the
marking points to the locking symbol.
Illustration
Handle and suction tube can be disconnected in or-
der to clean or if clogged. Push the 2 interlocks and
pull apart.
Connect handle and suction tube and insert.
Subject to technical modifications!
Cleaning the cyclone separator
Cleaning the motor protection filter
HEPA filter
Cleaning the accessories
Technical specifications
Kärcher
VC 3
Premium
1.198-135.0
VC 3
1.198-125.0
Voltage V 220-240 220-240
Current type Hz 50/60 50/60
Protective class II II
Weight (without accesso-
ries)
kg 4.4 4.4
Action radius m 7.5 7.5
Actual dust container vol-
ume
l 0.9 0.9
Dimensions
Length mm 396 396
Width mm 270 270
Height mm 332 332
Vacuum min. kPa ≥ 16 ≥ 16
HEPA filter HEPA 13 HEPA 12
Eco design as per 666/2013:
Sound power level L
WA
dB(A) 76 76
Rated power input W 700 700
10 EN