
Operating instructions

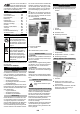
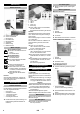
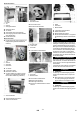
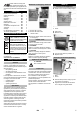
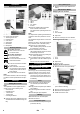
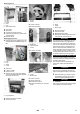
Table Of Contents
- Deutsch
- English
- Français
- Italiano
- Nederlands
- Español
- Português
- Dansk
- Norsk
- Svenska
- Suomi
- Ελληνικά
- Türkçe
- Русский
- Magyar
- Čeština
- Slovenščina
- Polski
- Româneşte
- Slovenčina
- Hrvatski
- Srpski
- Български
- Eesti
- Latviešu
- Lietuviškai
- Українська
- Leere Seite

- 3
1 Cover
2Door
3Lock
4 Star handle screw
Open locks.
Open door.
Unscrew the star-knob screw.
Repeat the procedure on the other side
of the appliance.
Remove the lid.
Remove the lid (see "Maintenance and
care/Maintenance tasks/Removing the
lid").
1Door
2Lock
3Screw
4 V-belt
Open door.
Loosen 4 screws.
Remove V-belt.
Remove the front cover (see "Mainte-
nance and care/Maintenance tasks/Re-
moving the front cover").
1 Funnel
2 Dirt receptacle
Remove the waste container.
Pull out the funnel.
1Screw
2Pulley
Loosen 2 screws.
Remove the pulley.
A Right side
B Left-hand side
1Screw
Unscrew 12 screws.
1 Bracket
2Screw
3 Brush roller
Loosen 4 screws.
Lift the roller brush.
Remove the supports.
Remove the retainer incl. the roller
brush.
1Screw
2 Shaft
3 Intake
4 Brush roller
Unscrew 2 screws.
Pull out the shaft.
Remove the roller brush.
Reassemble everything in the reverse
order with the new roller brush.
The warranty terms published by our com-
petent sales company are applicable in
each country. We will repair potential fail-
ures of your accessory within the warranty
period free of charge, provided that such
failure is caused by faulty material or de-
fects in fabrication. In the event of a warran-
ty claim please contact your dealer or the
nearest authorized Customer Service cent-
er. Please submit the proof of purchase.
Only use original accessories and spare
parts, they ensure the safe and trouble-free
operation of the device.
For information about accessories and
spare parts, please visit www.kaerch-
er.com.
몇 CAUTION
Risk of injury and damage! Observe the
weight of the appliance when you transport
it.
When transporting in vehicles, secure
the appliance according to the guide-
lines from slipping and tipping over.
몇
CAUTION
Risk of injury and damage! Note the weight
of the appliance in case of storage.
Removing the lid
Exchanging the brush
Warranty
Accessories and Spare Parts
Transport
Storage
9EN